1. Introduction
This manual provides essential information for the safe and efficient operation, installation, and maintenance of your DLAB D3024R High Speed Refrigerated Micro-Centrifuge. Please read this manual thoroughly before operating the instrument to ensure proper usage and to prevent potential hazards or damage.
The DLAB D3024R is designed for high-speed separation of samples in laboratory environments, featuring refrigeration capabilities to maintain sample integrity. It includes an As24-2 Aluminum Alloy Rotor Kit.
2. Safety Information
Always observe the following safety precautions:
- Ensure the centrifuge is placed on a stable, level surface.
- Do not operate the centrifuge without the rotor properly installed and balanced.
- Always close the lid securely before starting operation.
- Never open the lid while the rotor is spinning.
- Use only rotors and accessories approved by DLAB for this model.
- Wear appropriate personal protective equipment (PPE) when handling samples.
- Disconnect power before performing any maintenance or cleaning.
- Avoid spilling liquids inside the centrifuge chamber.
- Ensure proper ventilation around the unit.
3. Product Overview
The DLAB D3024R is a compact, high-speed refrigerated micro-centrifuge designed for various molecular biology and biochemistry applications. Key features include:
- High-speed centrifugation with precise temperature control.
- Pre-cooling function for optimal sample protection.
- Rapid cooling to 2°C within 7 minutes.
- Quiet operation with noise levels less than 54 dB.
- Equipped with an As24-2 Aluminum Alloy Rotor Kit.
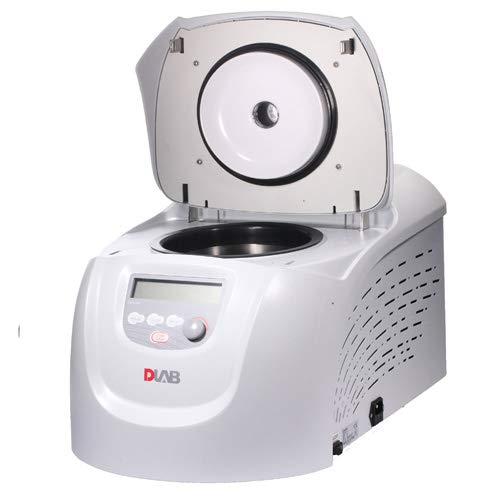
Figure 1: DLAB D3024R Refrigerated Micro-Centrifuge. The unit is white with a grey control panel and a clear LCD display. The lid is open, revealing the black rotor chamber and the silver rotor assembly inside. The DLAB logo is visible on the front panel.
4. Setup and Installation
- Unpacking: Carefully remove the centrifuge from its packaging. Inspect for any visible damage. Retain packaging for future transport or storage.
- Placement: Place the centrifuge on a sturdy, level, and vibration-free workbench. Ensure there is adequate space (at least 10 cm) around the unit for ventilation.
- Power Connection: Connect the power cord to the centrifuge's power inlet and then to a grounded electrical outlet (USA Plug). Ensure the voltage matches the instrument's requirements.
- Rotor Installation:
- Open the centrifuge lid.
- Carefully place the As24-2 Aluminum Alloy Rotor onto the motor shaft, ensuring it sits firmly.
- Secure the rotor using the provided rotor nut/tool, tightening it clockwise until snug. Do not overtighten.
- Initial Check: Close the lid. Power on the unit using the main power switch. The display should illuminate.
5. Operating Instructions
5.1. Loading Samples
- Ensure the rotor is clean and dry.
- Load samples into the rotor tubes. Always balance the rotor by placing tubes of equal weight directly opposite each other. Uneven loading can cause vibration and damage.
- Close the rotor lid (if applicable) and then close the centrifuge main lid securely.
5.2. Setting Parameters
Use the control panel buttons and knob to set the desired parameters:
- Speed (RPM/RCF): Adjust the rotational speed.
- Time: Set the centrifugation duration.
- Temperature: Set the desired temperature for refrigeration. The pre-cooling function will activate to reach this temperature quickly.
- Acceleration/Deceleration: Select appropriate ramp rates (if available).
5.3. Starting and Stopping
- Press the START button to begin the centrifugation cycle.
- The display will show the current status (e.g., actual speed, remaining time, temperature).
- To stop the cycle prematurely, press the STOP button.
- Once the cycle is complete and the rotor has come to a complete stop, the lid will unlock automatically or can be opened manually.
- Carefully remove your samples.
6. Maintenance and Care
6.1. Cleaning
- Exterior: Wipe the exterior surfaces with a soft cloth dampened with mild detergent or disinfectant. Avoid abrasive cleaners.
- Rotor Chamber: Clean the rotor chamber regularly to prevent accumulation of dust or spills. Use a soft cloth and mild cleaning solution. Ensure it is dry before next use.
- Rotor: Clean the rotor and accessories after each use. Autoclave or sterilize as per laboratory protocols and manufacturer guidelines.
6.2. General Care
- Regularly inspect the power cord for damage.
- Check the rotor and rotor chamber for any signs of corrosion or wear.
- Ensure proper ventilation is maintained around the unit.
- Store the centrifuge in a dry, dust-free environment when not in use for extended periods.
7. Troubleshooting
| Problem | Possible Cause | Solution |
|---|---|---|
| Centrifuge does not power on. | No power supply; power cord disconnected; main switch off. | Check power connection; ensure main switch is on; check circuit breaker. |
| Lid does not open. | Rotor still spinning; lid lock malfunction. | Wait for rotor to stop completely; contact service if issue persists. |
| Excessive vibration during operation. | Unbalanced rotor; damaged rotor or tubes. | Ensure samples are balanced; inspect rotor and tubes for damage. |
| Temperature not maintained. | Poor ventilation; refrigeration system issue. | Ensure adequate ventilation; contact service. |
8. Specifications
| Feature | Detail |
|---|---|
| Model Number | 9033101121 |
| Product Dimensions | 32.68 x 20.87 x 23.62 inches |
| Item Weight | 116.84 Pounds |
| Manufacturer | DLAB |
| Rotor Kit | As24-2 Aluminum Alloy Rotor Kit |
| Pre-cooling | Ensures optimal sample protection before warming. |
| Cooling Performance | Guaranteed 2°C within 7 minutes for both chamber. |
| Noise Level | Less than 54 dB. |
9. Warranty and Support
For warranty information, technical support, or service inquiries, please contact DLAB customer service. Keep your purchase receipt and product model number (9033101121) readily available when contacting support.
You can find contact details on the official DLAB website or through your authorized distributor. For general inquiries, visit www.dlabsci.com.


