1. Introduction
The Wavlink USB 2.0 Network LPR Print Server (Model NU88M11) is designed to enable multiple computers on a local area network (LAN) to share a single USB printer. This device provides a cost-effective and efficient solution for printer sharing in both home and office environments, eliminating the need for a dedicated print server computer.
Key Features:
- Allows multiple computers to share one USB printer over a network.
- Supports DHCP client for automatic IP address assignment.
- Compatible with various network protocols.
- Features 10BASE-T / 100BASE-T auto-detection for network speed.
- Offers management via Telnet and Web-based software.
2. Package Contents
Please verify that all items listed below are included in your package. If any items are missing or damaged, please contact your retailer.
- Wavlink USB 2.0 Network LPR Print Server (Model NU88M11)
- Power Adapter
- Ethernet Cable
- Installation CD (with drivers and utility software)
- Quick Installation Guide
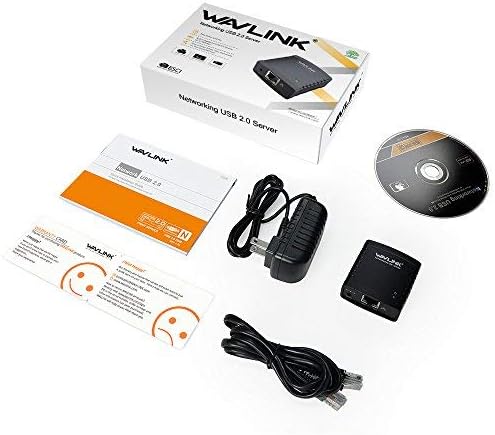
Image: Contents of the Wavlink USB 2.0 Network LPR Print Server package, including the print server unit, power adapter, Ethernet cable, installation CD, and quick start guide.
3. Setup Instructions
3.1 Physical Connection
- Connect the Printer: Plug your USB printer's USB cable into the USB port on the Wavlink Print Server.
- Connect to Network: Connect one end of the provided Ethernet cable to the LAN port on the Wavlink Print Server and the other end to an available LAN port on your router or network switch.
- Connect Power: Plug the power adapter into the DC 5V port on the Wavlink Print Server, then plug the adapter into a power outlet. The power LED on the device should illuminate.
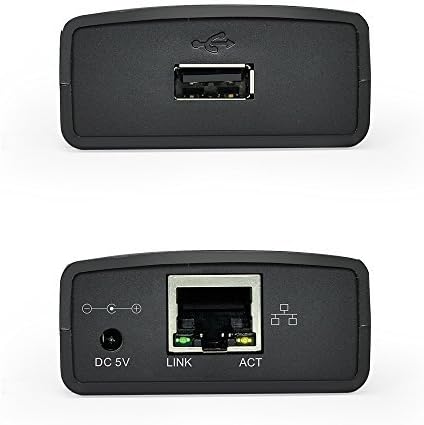
Image: Close-up view of the Wavlink USB 2.0 Network LPR Print Server, showing the USB port on one side and the DC 5V power input, Ethernet (LAN) port, and status LEDs on the other side.

Image: A diagram illustrating the network setup. The Wavlink Print Server is connected to a router via an Ethernet cable, and a USB printer is connected to the print server. A laptop is shown wirelessly connected to the router, indicating network access to the printer.
3.2 Software Installation and Configuration
Important Note: The Wavlink Print Server itself does not support WiFi functionality. It must be connected to a wireless router via an Ethernet cable to be accessible over a wireless network. When installing, you only need to install the printer's own driver on each computer that will use the shared printer. You do not need to install a separate Wavlink device driver.
- Install Printer Driver: On each computer that will use the shared printer, install the manufacturer's driver for your specific USB printer. Ensure the printer driver is fully installed and functional if the printer were connected directly to the computer.
- Install Print Server Utility: Insert the provided installation CD into your computer's CD/DVD drive. Follow the on-screen instructions to install the Wavlink Print Server Utility software. This utility helps discover and configure the print server on your network.
- Discover and Add Printer: Launch the Wavlink Print Server Utility. It should automatically detect the print server on your network. Follow the utility's instructions to add your printer through the print server. This typically involves selecting the detected print server and associating it with the printer driver you installed in step 1.
- Verify LPR Protocol: Ensure your printer supports the LPR (Line Printer Remote) protocol. If your printer does not support LPR, the Wavlink device may not be compatible, and printing functionality may be limited or unavailable.
- Network Protocol Configuration (Advanced): The device supports DHCP client for automatic IP assignment. For advanced users, Telnet and Web management software are available for manual configuration of network settings, such as assigning a static IP address if required. Refer to the utility's help section for details on accessing these advanced options.
4. Operating Instructions
Once the Wavlink USB 2.0 Network LPR Print Server is set up and configured, you can print from any computer connected to the same network.
- Ensure the print server is powered on and connected to the network and printer.
- On your computer, open the document or image you wish to print.
- Select 'Print' from the application's menu (e.g., File > Print).
- In the print dialog box, select the printer that you configured through the Wavlink Print Server Utility. This printer will appear as a network printer.
- Adjust any desired print settings (e.g., paper size, orientation, number of copies).
- Click 'Print' to send the print job to the shared printer.
The print server will manage the print queue and send the job to the printer. Multiple users can send print jobs simultaneously, and the print server will process them in order.
5. Maintenance
To ensure optimal performance and longevity of your Wavlink USB 2.0 Network LPR Print Server, consider the following maintenance tips:
- Keep Clean: Regularly clean the device with a soft, dry cloth. Avoid using liquid cleaners or solvents.
- Ventilation: Ensure the device is placed in a well-ventilated area to prevent overheating. The device is designed to be heat-resistant, but proper airflow is still beneficial.
- Firmware Updates: Periodically check the Wavlink official website for any available firmware updates. Firmware updates can improve performance, add new features, or fix bugs. Follow the instructions provided with the firmware update carefully.
- Cable Connections: Periodically check all cable connections (USB, Ethernet, Power) to ensure they are secure. Loose connections can lead to intermittent operation.
6. Troubleshooting
If you encounter issues with your Wavlink USB 2.0 Network LPR Print Server, please refer to the following common problems and solutions:
- Printer Not Detected:
- Ensure the print server is powered on and its status LEDs are active.
- Verify that the USB cable connecting the printer to the print server is securely attached.
- Check the Ethernet cable connection between the print server and your router/switch.
- Confirm that your printer's driver is correctly installed on the computer.
- Restart the print server and your computer.
- Cannot Print:
- Ensure the printer is turned on and has paper and ink/toner.
- Verify that the printer is not in an error state (e.g., paper jam).
- Check if the print server is accessible on the network using the utility software.
- Confirm that your printer supports the LPR protocol. If not, the Wavlink device may not be compatible.
- Temporarily disable any firewall software on your computer to see if it's blocking communication.
- Network Connection Issues:
- Ensure the Ethernet cable is properly connected to both the print server and the router/switch.
- Check the network activity lights on the print server's Ethernet port.
- Verify that your router is functioning correctly and providing network access.
- If using a static IP, ensure the settings are correct and do not conflict with other devices on the network.
If these steps do not resolve your issue, please consult the Wavlink support website or contact customer service for further assistance.
7. Specifications
| Brand | WAVLINK |
| Model Number | NU88M11 |
| Manufacturer | Wavlink |
| UPC | 695536201443 |
| Product Dimensions | 0.56 x 1.62 x 2.25 cm |
| Item Weight | 0.29 grams |
| Hardware Interface | USB |
| Compatible Devices | Server, Printer, Router |
| Data Transfer Rate | 100 Megabits per second |
| Other Features | Heat resistant |
| Batteries Included | No |
| Batteries Required | No |
8. Warranty and Support
Wavlink products are designed for reliability and performance. For specific warranty information regarding your Wavlink USB 2.0 Network LPR Print Server (Model NU88M11), please refer to the warranty card included in your product packaging or visit the official Wavlink website.
For technical support, driver downloads, or further assistance, please visit the Wavlink support page or contact their customer service department. Contact information can typically be found on the Wavlink website or in your product documentation.