Goolsky FS-i6s
Goolsky Flysky FS-i6s 2.4G 10CH AFHDS 2A Touchscreen Transmitter User Manual
Model: FS-i6s with FS-iA6B Receiver
1. Product Overview
The Goolsky Flysky FS-i6s is a 2.4GHz 10-channel digital proportional computerized RC system designed for various remote-controlled models, including airplanes, helicopters, and multicopters. It features a 3-inch touchscreen interface for intuitive control and configuration, along with AFHDS 2A (Automatic Frequency Hopping Digital System Second Generation) technology for reliable communication. This system includes the FS-i6s transmitter and the FS-iA6B 6-channel receiver.
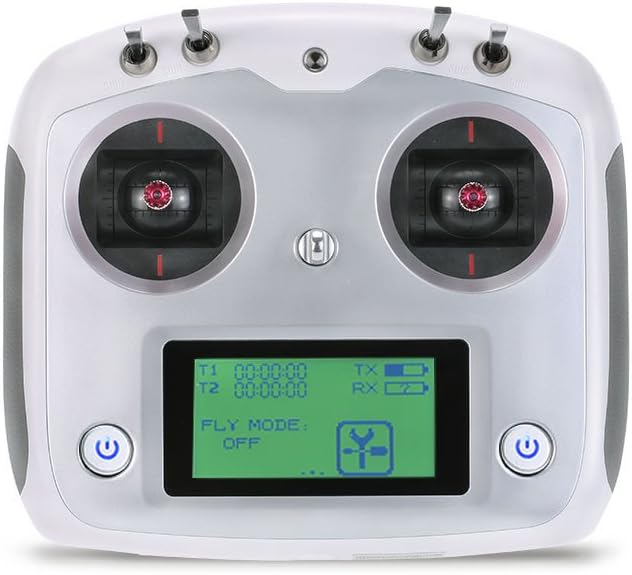
Figure 1.1: Front view of the Flysky FS-i6s transmitter, showing the touchscreen display, dual joysticks, and power buttons.

Figure 1.2: The Flysky FS-i6s 2.4G 10CH Transmitter paired with the FS-iA6B Receiver, designed for RC aircraft.
2. Key Features
- 2.4GHz AFHDS 2A System: Advanced digital proportional computerized RC system for enhanced reliability and interference resistance.
- 10 Channels: Provides ample control for complex RC models.
- 3-inch Touchscreen Interface: Offers convenient and intuitive control for system settings and navigation.
- Low Voltage Alarm Function: Alerts the user when battery voltage is low, ensuring safe operation.
- Unique ID: Each transmitter and receiver pair has a unique ID for secure binding.
- Online Software Updates: Allows users to keep the system firmware current.
- Switchable Control Mode: Provides flexibility for different user preferences and model types.
- Ergonomic Design: Comfortable to hold and operate for extended periods.

Figure 2.1: Illustration of the ergonomic design for comfortable handling and the various model types (multirotor, airplane, helicopter) compatible with the FS-i6s transmitter.
3. Components and Controls
3.1 FS-i6s Transmitter Layout

Figure 3.1: Front view diagram of the FS-i6s transmitter, highlighting key components such as SwB, VrA, SwA, left lever, touchscreen, power button, phone holder mounting point, SwC, VrB, SwD, right lever, and neck strap eye.

Figure 3.2: Back view diagram of the FS-i6s transmitter, showing the handle, key 2, key 1, and the battery cover.
3.2 FS-iA6B Receiver Overview
The FS-iA6B is a 6-channel receiver designed to work seamlessly with the FS-i6s transmitter. It features dual antennas for improved signal reception and reliability.

Figure 3.3: Overview of the Flysky FS-iA6B receiver, including its LED indicator, antenna, and connection ports (B/VCC, CH2-6, PPM/CH1). A wiring diagram illustrates how to connect the receiver to servos for various control surfaces.
4. Setup
4.1 Package Contents
Before beginning setup, ensure all components are present in the package:
- Flysky FS-i6s Transmitter
- Flysky FS-iA6B Receiver
- USB Cable
- Mounting Bracket and Screws (for phone holder, if applicable)

Figure 4.1: The typical contents of the Flysky FS-i6s package, including the transmitter, receiver, USB cable, and mounting bracket with screws.
4.2 Battery Installation
The FS-i6s transmitter requires 4 AA batteries for operation. To install the batteries:
- Locate the battery cover on the back of the transmitter (refer to Figure 3.2).
- Slide the battery cover open.
- Insert 4 AA batteries, ensuring correct polarity (+/-) as indicated inside the battery compartment.
- Close the battery cover securely.
4.3 Receiver Connection
Connect the FS-iA6B receiver to your model's flight controller or servos according to the wiring diagram provided in Figure 3.3. Ensure all connections are secure and correctly oriented.
4.4 Binding Process
To establish communication between the transmitter and receiver, a binding process is required. Refer to the detailed binding instructions in the full manual for your specific model, as steps may vary slightly.
5. Operating Instructions
5.1 Powering On/Off
- To Power On: Press and hold both power buttons on the front of the transmitter simultaneously until the screen illuminates.
- To Power Off: Press and hold both power buttons simultaneously until the screen turns off.
5.2 Touchscreen Interface Navigation
The 3-inch touchscreen allows for easy navigation through menus and settings. Tap icons or menu items to select them. Swipe gestures may be used for scrolling in certain menus.
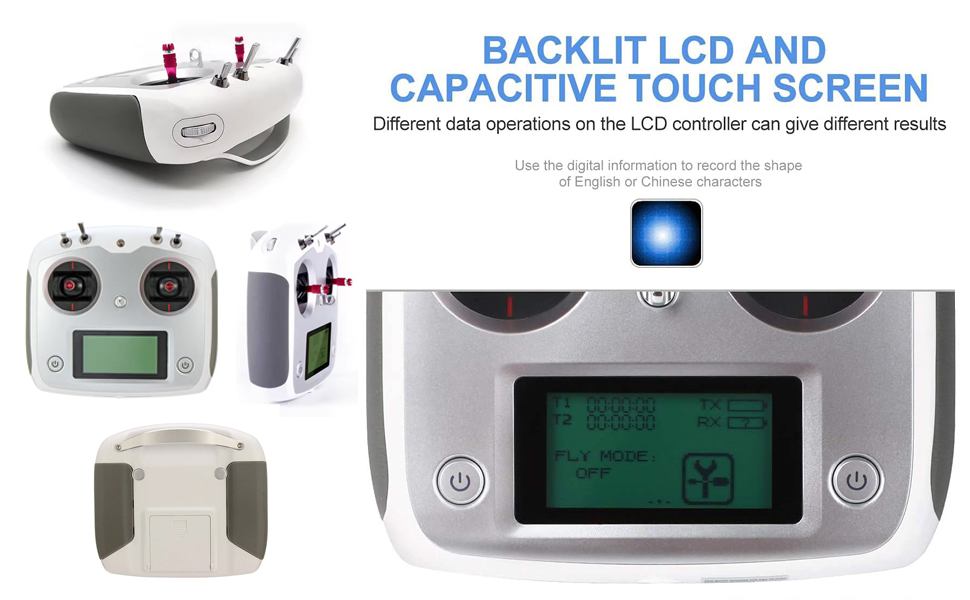
Figure 5.1: The backlit LCD and capacitive touchscreen of the FS-i6s, showing various views of the transmitter and a close-up of the display interface.
5.3 Control Stick Operation
The transmitter features two main control sticks (left and right levers) for precise control of your RC model. The feel of the joysticks is designed for delicate and accurate movements.
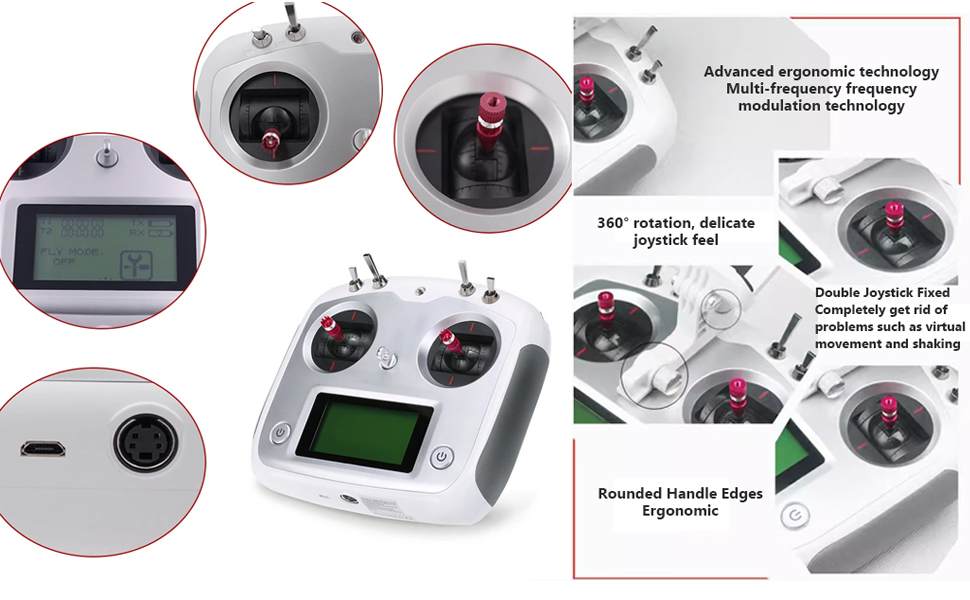
Figure 5.2: Detailed views of the FS-i6s joysticks, highlighting their 360-degree rotation and delicate feel. Also shown are the USB and PS/2 ports for connectivity.
5.4 Model Selection and Configuration
The FS-i6s allows for multiple model memories and configurations. Use the touchscreen interface to select your desired model and adjust settings such as:
- Channel assignments
- Servo reversing
- End points
- Sub-trims
- Mixes
6. Maintenance
6.1 Cleaning
To maintain the appearance and functionality of your transmitter:
- Wipe the exterior with a soft, dry cloth.
- For stubborn dirt, use a slightly damp cloth with mild soap, then wipe dry.
- Avoid using harsh chemicals or abrasive cleaners.
6.2 Storage
When not in use, store the transmitter in a cool, dry place away from direct sunlight and extreme temperatures. If storing for an extended period, remove the batteries to prevent leakage.
6.3 Software Updates
The FS-i6s supports online software updates. Periodically check the official Flysky website for the latest firmware versions and instructions on how to update your transmitter using the provided USB cable.
7. Troubleshooting
7.1 Common Issues and Solutions
| Issue | Possible Cause | Solution |
|---|---|---|
| Transmitter does not power on | Low or dead batteries; Incorrect battery polarity | Replace batteries; Check battery orientation |
| No signal to receiver | Receiver not bound; Receiver not powered; Damaged antenna | Perform binding process; Check receiver power supply; Inspect receiver antennas |
| Low voltage alarm activates frequently | Batteries are low; Battery type setting incorrect | Replace batteries; Check battery type setting in transmitter menu |
| Touchscreen unresponsive | Software glitch; Physical damage | Restart transmitter; Contact support if issue persists |
8. Specifications
| Feature | Specification |
|---|---|
| Product Dimensions | 10.6 x 8.7 x 4.4 inches (270 x 220 x 110 mm) |
| Item Weight | 1.58 pounds (0.72 kg) |
| Channels | 10 |
| Frequency | 2.4GHz AFHDS 2A |
| Display | 3-inch Touchscreen |
| Power Supply | 4 x AA Batteries |
| Low Voltage Alarm | Yes |
| Manufacturer | Goolsky |

Figure 8.1: Visual representation of the Flysky FS-i6s package dimensions and the included components.
9. Warranty and Support
Goolsky products are typically covered by a limited warranty against manufacturing defects. For specific warranty terms and conditions, please refer to the documentation included with your purchase or visit the official Goolsky brand store.
For technical support, troubleshooting assistance, or inquiries regarding your Goolsky Flysky FS-i6s transmitter, please contact Goolsky customer service through their official channels or visit their brand store: