Introduction
This manual provides detailed instructions for the safe and efficient operation of your Starbucks Verismo System Single Serve Brewer. Please read all instructions carefully before first use and retain this manual for future reference.
Important Safety Information
Important Safety Precautions:
- Read all instructions before operating the appliance.
- Do not immerse the appliance, power cord, or plug in water or other liquids.
- Close supervision is necessary when the appliance is used by or near children.
- Unplug from outlet when not in use and before cleaning.
- Do not operate any appliance with a damaged cord or plug, or after the appliance malfunctions or has been damaged in any manner.
- Use only filtered drinking water in the water tank.
- Do not open the brewing chamber during operation.
- Always ensure the handle is fully closed before brewing.
Package Contents
- Verismo Brewer Unit
- Water Reservoir with Lid
- Drip Tray with Grate
- Owner's Manual
- Quick Start Guide
Setup
- Unpacking: Carefully remove all components from the packaging.
- Water Tank Preparation: Remove the water tank from the brewer. Rinse it thoroughly with water. Fill the water tank with filtered drinking water up to the indicated "MAX" line (approximately 3/4 full).
- Drip Tray Assembly: Slide the drip tray onto the brewer. The drip tray is adjustable and removable to accommodate various mug sizes.
- Power Connection: Plug the Verismo brewer into a suitable power outlet. Ensure the handle on top of the brewer is closed.
- Initial Heat-Up: Press the On/Off switch. The power button will blink as the brewer heats up. It will turn to a solid white glow when ready.
- Priming the Brewer: Before first use, or if the brewer has been unused for a long period, it must be primed. Place a mug under the spout. Press the rinse button (shower icon). Repeat this step four times, discarding the water from the mug each time. This ensures water is in the pump and the system is ready for brewing.

Image: Starbucks Verismo System Single Serve Brewer, Black, showing overall dimensions (8"D x 12.9"W x 11"H) and components like the water reservoir and drip tray.
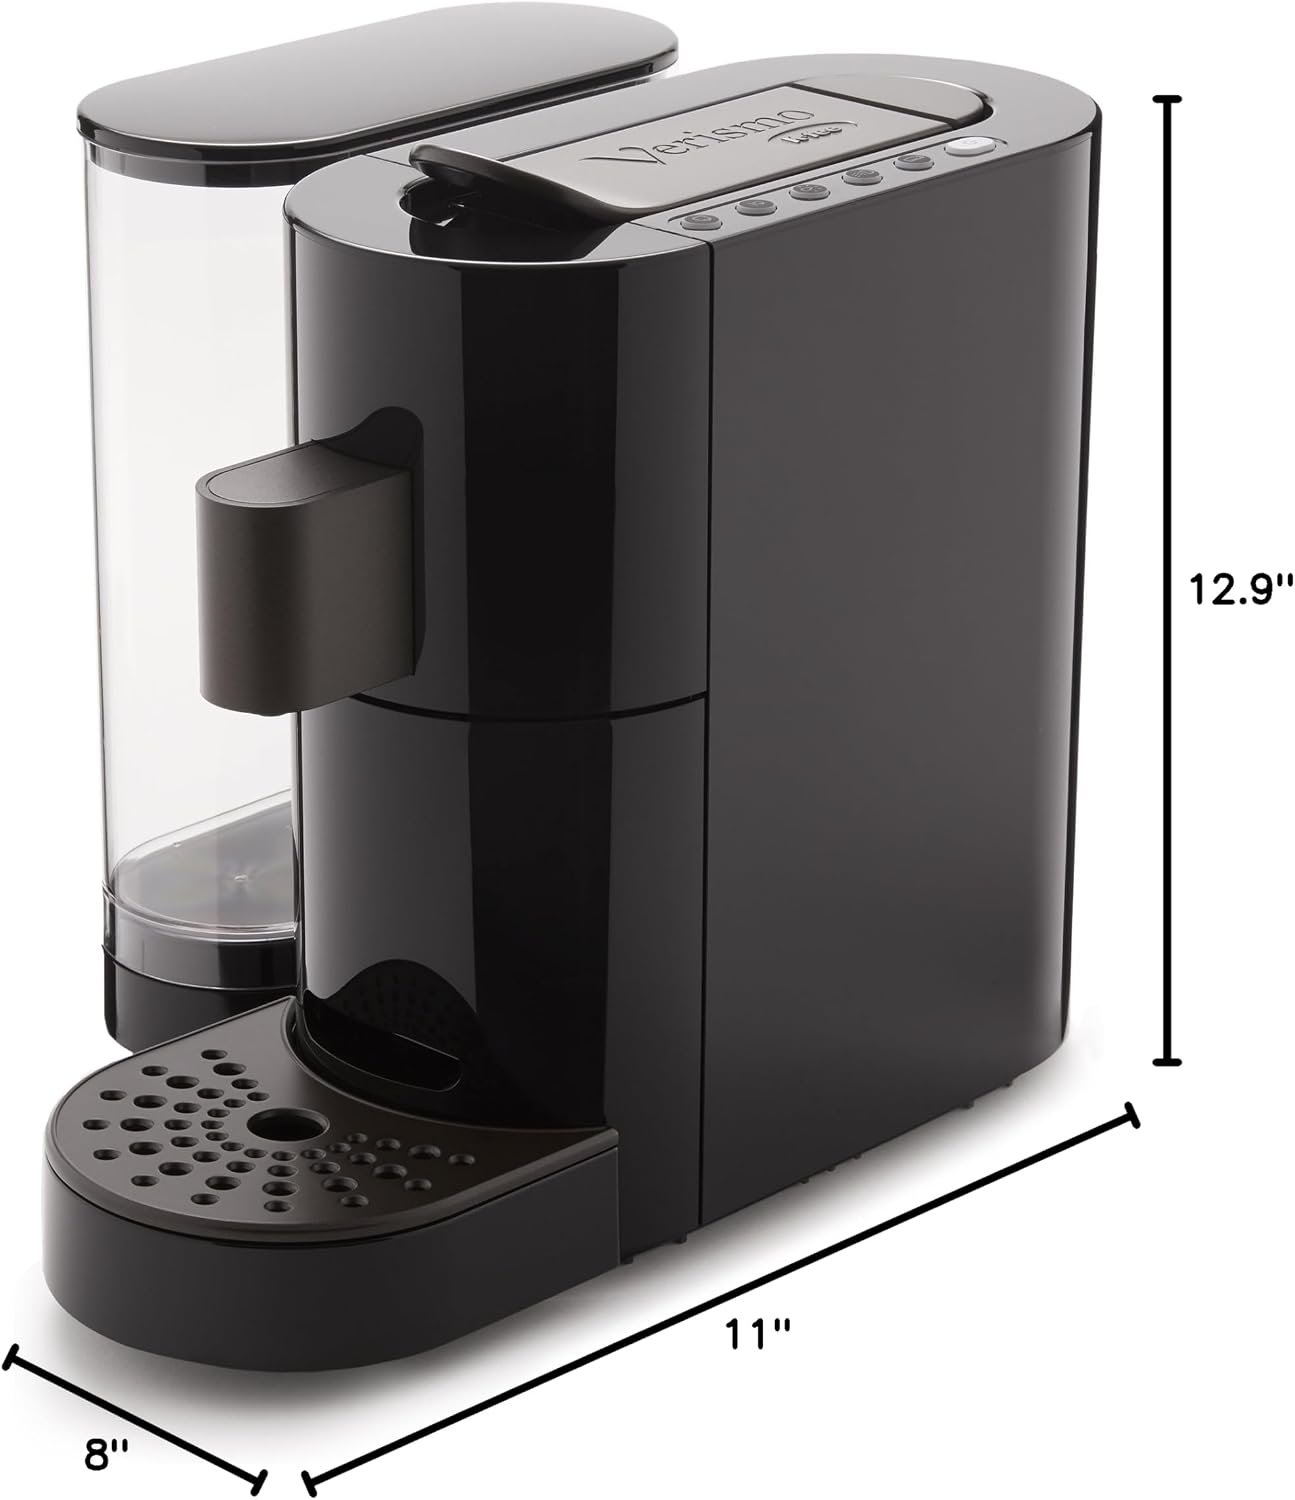
Image: Close-up view of the Starbucks Verismo System, highlighting the clear water reservoir on the left and the main brewing unit on the right.
Operating Instructions
Brewing Coffee
- Select Coffee Pod: Choose your preferred brewed coffee pod (silver-colored pods).
- Prepare Pod: Remove the tab at the bottom of the coffee pod just before brewing.
- Insert Pod: Lift the handle on top of the Verismo brewer. Insert the coffee pod into the brewing chamber. Close the handle completely to engage the brewer.
- Place Mug: Place your mug under the spout.
- Start Brewing: Press the brewed coffee button (the larger of the two cup icons). The brewer will begin pouring your coffee.
- Remove Pod: Once brewing is complete, lift the handle again to eject the used pod into the discard bin. Close the handle.
- Enjoy: Remove your finished coffee beverage.
Brewing Espresso
- Select Espresso Pod: Choose your preferred espresso pod (copper-colored pods).
- Insert Pod: Lift the handle on top of the Verismo brewer. Insert the espresso pod into the brewing chamber. Close the handle completely to engage the brewer.
- Place Mug: Place your mug or espresso glass under the spout.
- Start Brewing: Press the espresso button (the smaller of the two cup icons). The brewer will begin pouring your espresso shot.
- Remove Pod: Once brewing is complete, lift the handle again to eject the used pod into the discard bin. Close the handle.
- Enjoy: Remove your finished espresso.
Using the Verismo Milk Frother (Optional Accessory)
The Verismo Milk Frother allows you to create creamy, silky foam for various coffee drinks. It can produce hot or cold foam using dairy or non-dairy milk.
- Components: The frother consists of a lid, the frother unit, and a base. It also includes a metal whisk attachment.
- Fill with Milk: Fill the frother unit with your chosen milk up to the "MAX" line indicated on the inside.
- For Lots of Foam (e.g., Cappuccinos): Attach the metal whisk to the whisk holder inside the frother unit.
- For Less Foam (e.g., Lattes, Mochas): Do not attach the whisk. The frother will heat the milk and produce a smaller amount of foam.
- Hot Foam: Press and hold the power button on the frother for one second. The light will turn red, indicating hot foam production.
- Cold Foam: Press and hold the power button for three seconds. The light will turn blue, indicating cold foam production.
- Pour: Once frothing is complete, pour the frothed milk into your beverage.
Video: Official Starbucks Verismo Milk Frother demonstration, showing how to use the frother to create hot and cold frothed milk for various beverages.
Maintenance
Cleaning
- Exterior: Wipe the exterior of the brewer with a damp cloth. Do not use abrasive cleaners.
- Water Tank & Drip Tray: Remove and wash the water tank and drip tray with warm, soapy water. Rinse thoroughly and dry.
- Milk Frother: The milk frother unit is non-stick and easy to clean. Wash the frother unit, lid, and whisk attachment with warm, soapy water after each use. Rinse and dry completely.
Descaling
Regular descaling is essential to maintain brewer performance and extend its lifespan. The frequency depends on water hardness and usage. Refer to the full owner's manual for detailed descaling instructions and recommended descaling solutions.
Troubleshooting
- No Water Flow / Priming Issues: If the machine does not pull water during initial setup or after being unused, ensure the water tank is filled and properly seated. Perform the priming steps (pressing the rinse button multiple times) as described in the "Setup" section.
- Brewer Not Heating: Ensure the brewer is properly plugged in and the power button is pressed. If the light is blinking, the machine is still heating. Wait for a solid white light.
- Pod Ejection Issues: Ensure the handle is fully lifted to eject the used pod into the discard bin.
- Weak Brew: Ensure the correct pod type is used (coffee for brewed, espresso for espresso) and the tab is removed from coffee pods. Check water level.
For further assistance, consult the full owner's manual or contact Starbucks customer support.
Specifications
| Feature | Detail |
|---|---|
| Brand | Starbucks |
| Model Name | Verismo Brewer |
| Model Number | 7.62111E+11 (B01M9E8L73) |
| Color | Black |
| Material | Plastic |
| Product Dimensions (D x W x H) | 8"D x 12.9"W x 11"H |
| Item Weight | 7.7 Pounds |
| Capacity | 1100 Milliliters |
| Coffee Maker Type | Espresso Machine |
| Operation Mode | Fully Automatic |
| Wattage | 1260 watts |
| Voltage | 120 Volts |
| Human Interface Input | Buttons |
| Coffee Input Type | Pods |
| Filter Type | Reusable |
| Included Components | Brewer, Water Reservoir with Lid, Drip Tray with Grate, Owners Manual, Quick Start Guide |
Warranty and Support
Warranty Information
The Starbucks Verismo System Single Serve Brewer comes with a 1-year limited warranty covering defects in material and workmanship. Please retain your proof of purchase for warranty claims.
Customer Support
For technical assistance, troubleshooting, or warranty inquiries, please refer to the contact information provided in your Quick Start Guide or the official Starbucks website.