1. Introduction
Thank you for purchasing the Syma X5HW RC Quadcopter Drone. This manual provides essential information for the safe operation, setup, and maintenance of your drone. Please read it thoroughly before first use to ensure proper function and to avoid damage.
The Syma X5HW is a 2.4G 4-channel RC quadcopter featuring a 0.3MP HD camera for FPV real-time transmission, high-hold mode, 360° 3D flips, headless mode, and a built-in 6-axis gyro for stable flight. It is designed for both beginners and experienced users.
2. Safety Precautions
- Flight Environment: Fly in open areas, away from people, animals, buildings, and power lines. Avoid flying in strong winds or adverse weather conditions.
- Age Recommendation: This product is recommended for users aged 14 and above. Adult supervision is advised for younger users.
- Battery Safety: Use only the provided charger and battery. Do not overcharge or short-circuit the battery. Disconnect the battery after use and during charging. Do not expose batteries to extreme temperatures or direct sunlight.
- Propeller Safety: Keep hands, face, and loose clothing away from rotating propellers. Always ensure propellers are securely attached before flight.
- Water Exposure: The drone is not waterproof. Avoid contact with water or moisture.
- Visual Line of Sight: Always maintain visual line of sight with the drone during flight.
- Respect Privacy: When using the camera, respect the privacy of others.
3. Package Contents
Verify that all items are present in the package:
- Syma X5HW RC Quadcopter Drone
- Remote Controller
- USB Charging Cable
- Main Blades (Propellers)
- Propeller Guards
- Landing Gear
- HD Camera (0.3MP)
- Screwdriver
- User Manual (this document)
- 3.7V 600mAh LiPo Battery

Image: Syma X5HW package contents, showing the drone, remote, and various accessories.
4. Component Identification
4.1 Drone Components

Image: Top view of the Syma X5HW drone.
- Propellers: Four main blades for lift and propulsion.
- Propeller Guards: Protective frames around the propellers.
- Motors: Drive the propellers.
- LED Lights: Indicate drone orientation and status (front: red, rear: green).
- Battery Compartment: Located on the underside of the drone.
- Camera: Attaches to the bottom for photo and video capture.
- Landing Gear: Provides stable landing and protects the camera.
4.2 Remote Controller Components
Image: Syma X5HW remote controller (part of the package contents image).
- Left Joystick (Throttle/Yaw): Controls altitude (up/down) and rotation (left/right).
- Right Joystick (Direction): Controls forward/backward and left/right movement.
- Power Switch: Turns the controller on/off.
- Trim Buttons: Adjust drone stability (forward/backward, left/right, yaw).
- Speed Mode Button: Toggles between low and high speed.
- 3D Flip Button: Initiates 360° flips.
- Headless Mode Button: Activates/deactivates headless mode.
- Photo/Video Button: Captures photos or starts/stops video recording.
- Phone Holder: For mounting a smartphone to view FPV feed.
5. Setup
5.1 Charging the Drone Battery
- Connect the drone battery to the USB charging cable.
- Plug the USB cable into a USB power source (e.g., computer USB port, USB wall adapter).
- The indicator light on the USB cable will illuminate during charging and turn off when fully charged.
- Charging time is approximately 90 minutes. Do not leave unattended during charging.
5.2 Remote Controller Battery Installation
- Open the battery compartment on the back of the remote controller.
- Insert 4x AA batteries (not included) according to the polarity markings.
- Close the battery compartment securely.
5.3 Propeller Installation
Ensure propellers are installed correctly. Each propeller is marked with 'A' or 'B'. Match them to the corresponding motor shafts marked 'A' or 'B'.
- Attach propeller 'A' to motor shafts 'A'.
- Attach propeller 'B' to motor shafts 'B'.
- Press down firmly until they are seated.
5.4 Propeller Guard Installation
Attach the propeller guards to the drone's arms using the provided screws and screwdriver for added protection.
5.5 Landing Gear Installation
Slide the landing gear into the designated slots on the underside of the drone until they click into place.
5.6 Camera Installation
- Connect the camera's cable to the port on the underside of the drone.
- Secure the camera module into its slot.
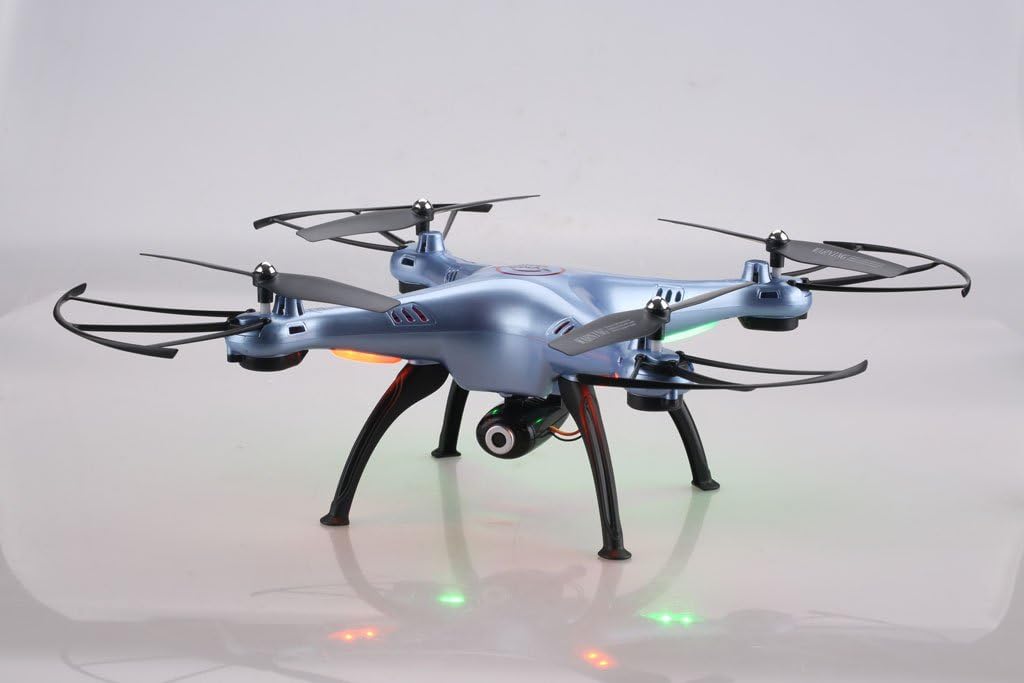
Image: Syma X5HW drone with camera and landing gear attached.
6. Operating Instructions
6.1 Pairing the Drone and Remote Controller
- Place the drone on a flat, level surface.
- Insert the charged battery into the drone and connect it. The drone's LED lights will flash.
- Turn on the remote controller. The indicator light on the remote will flash.
- Push the left joystick (throttle) all the way up, then all the way down.
- The drone's LED lights and the remote's indicator light will become solid, indicating successful pairing.
6.2 Calibration (Gyroscope Reset)
If the drone drifts during flight, perform a gyroscope calibration:
- After pairing, place the drone on a flat, level surface.
- Push both joysticks to the bottom-right corner simultaneously for 2-3 seconds.
- The drone's LED lights will flash rapidly and then become solid, indicating successful calibration.
6.3 Basic Flight Controls
- Take-off: After pairing and calibration, gently push the left joystick (throttle) up. The propellers will start spinning, and the drone will ascend.
- Landing: Gently pull the left joystick (throttle) down. The drone will descend and land.
- Altitude Control: Left joystick up/down.
- Rotation (Yaw): Left joystick left/right.
- Forward/Backward: Right joystick up/down.
- Left/Right Sideways Flight: Right joystick left/right.
6.4 Advanced Flight Functions
- Speed Mode: Press the Speed Mode button to switch between low and high speed. Low speed is recommended for beginners.
- Headless Mode: Press the Headless Mode button. The drone will orient itself relative to the pilot, regardless of its actual front direction. Press again to exit.
- High-Hold Mode (Altitude Hold): The drone automatically maintains its altitude using an integrated air pressure sensor. After taking off, release the left joystick, and the drone will hover at its current height. Adjust altitude by pushing the left joystick up or down.
- 3D Flips: Fly the drone to a height of at least 3 meters. Press the 3D Flip button, then quickly push the right joystick in any direction (forward, backward, left, or right). The drone will perform a 360° flip in that direction.
6.5 FPV and Camera Operation
The Syma X5HW features a 0.3MP HD camera for real-time FPV transmission via Wi-Fi.
- Download the App: Download the free "SYMA FPV" app from the App Store (iOS) or Google Play Store (Android) to your smartphone.
- Connect to Wi-Fi: Turn on the drone. On your smartphone, go to Wi-Fi settings and connect to the Wi-Fi network named "SYMA-X5HW" (or similar).
- Launch the App: Open the SYMA FPV app. You should see the live video feed from the drone's camera.
- Take Photos: Press the Photo/Video button on the remote controller once to take a photo. Photos are saved to your smartphone.
- Record Video: Press and hold the Photo/Video button on the remote controller to start video recording. Press and hold again to stop. Videos are saved to your smartphone.
7. Maintenance
- Cleaning: Use a soft, dry cloth to clean the drone and remote controller. Do not use solvents or harsh chemicals.
- Propeller Inspection: Regularly check propellers for damage (cracks, bends). Replace damaged propellers immediately.
- Motor Care: Keep motors free from dust and debris.
- Battery Storage: If storing the drone for an extended period, charge the battery to about 50% and remove it from the drone. Store in a cool, dry place.
- General Storage: Store the drone and remote in a cool, dry environment, away from direct sunlight and extreme temperatures.
8. Troubleshooting
| Problem | Possible Cause | Solution |
|---|---|---|
| Drone does not respond to remote. | Not paired; low battery (drone or remote). | Ensure drone and remote are powered on and paired correctly. Charge drone battery. Replace remote batteries. |
| Drone drifts during flight. | Gyroscope not calibrated; uneven surface during startup; wind interference. | Perform gyroscope calibration on a flat surface. Fly in calm conditions. Use trim buttons to fine-tune. |
| Propellers do not spin. | Propellers jammed; motor issue; low battery. | Check for obstructions. Ensure battery is charged and connected. |
| No FPV video feed. | Wi-Fi not connected; app not open; camera not connected. | Ensure smartphone is connected to drone's Wi-Fi. Open SYMA FPV app. Check camera connection to drone. |
| Short flight time. | Battery not fully charged; old battery; aggressive flying. | Ensure battery is fully charged. Consider replacing old batteries. Fly more gently. |
9. Specifications
- Model: Syma X5HW
- Frequency: 2.4GHz
- Channels: 4-Channel
- Gyro: 6-Axis Gyroscope
- Camera: 0.3MP HD Camera (720p video resolution)
- FPV: Wi-Fi Real-time Transmission
- Flight Modes: High-Hold Mode, Headless Mode, 3D Flips
- Battery: 3.7V 600mAh LiPo
- Charging Time: Approximately 90 minutes
- Flight Time: Approximately 10 minutes
- Control Range: Up to 100 meters
- Material: Plastic
- Recommended Age: 14+
10. Warranty and Support
Syma products are manufactured to high quality standards. For warranty information or technical support, please refer to the contact details provided with your purchase documentation or visit the official Syma website. Keep your proof of purchase for warranty claims.