
1. Introduction
The AMEC TB-520 is a compact and reliable Man Overboard (MOB) beacon designed to enhance safety at sea. Utilizing advanced Automatic Identification System (AIS) technology, it significantly increases the chances of a swift rescue in an overboard situation by alerting nearby AIS-equipped vessels to your precise location.
This manual provides comprehensive instructions for the proper setup, operation, maintenance, and troubleshooting of your AMEC TB-520 beacon. Please read it thoroughly before using the device to ensure optimal performance and safety.
2. Product Overview
The TB-520 is engineered for rapid deployment and reliable performance. It features a high-performance GPS receiver for quick position acquisition and can be activated automatically via a water sensor or manually. Its robust design ensures durability in marine environments.
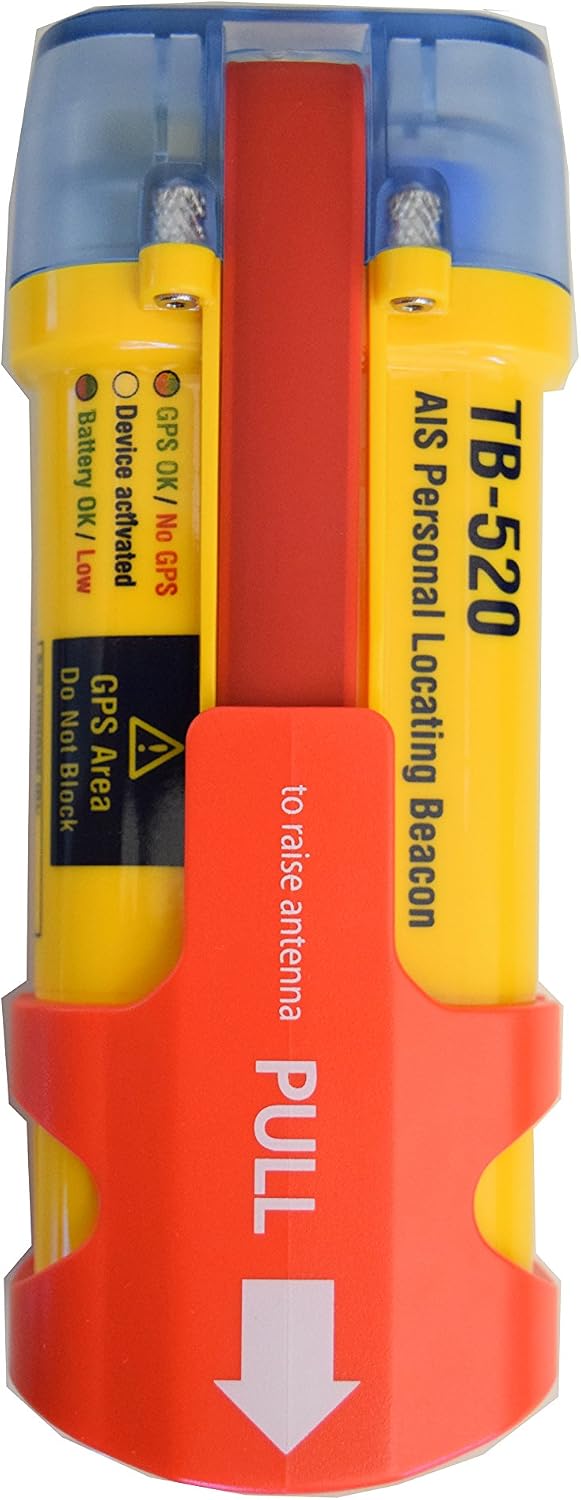
Figure 2.1: Front view of the AMEC TB-520 beacon, showing indicators for GPS status, battery level, and activation, along with the pull tab for antenna deployment.

Figure 2.2: The AMEC TB-520 beacon displayed with its standard accessories, including a test tab, mounting bracket, user guide, and a protective carrying pouch.
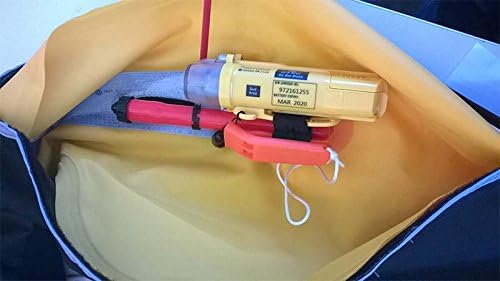
Figure 2.3: The AMEC TB-520 beacon shown securely placed within a pouch, typically found on a life vest or personal flotation device, ready for deployment.
Key Features:
- AIS Technology for enhanced MOB recovery.
- Automatic (water sensor) and Manual activation modes.
- High-performance GPS receiver for rapid position acquisition.
- Sends alert messages, GPS position, and unique ID.
- Compact, lightweight, and easy to use.
- Waterproof IP68 rating.
3. Setup and Installation
3.1 Initial Inspection
Upon unboxing, inspect the TB-520 beacon for any signs of damage. Ensure all components listed in Figure 2.2 are present.
3.2 Mounting the Beacon
The TB-520 is designed to be easily integrated with personal flotation devices (PFDs) or life vests. Use the provided mounting bracket or pouch to secure the beacon. Ensure the beacon is positioned so that the antenna can deploy freely when activated and the water sensors are exposed to water.
- Attach the mounting bracket to your PFD in a location that allows for quick access and deployment.
- Secure the TB-520 into the bracket or place it within the dedicated pouch on your PFD.
- Ensure the beacon is oriented correctly, typically with the "PULL" tab facing outwards for easy manual activation.
3.3 Battery Information
The TB-520 uses an internal battery. It is not user-replaceable. Refer to the specifications section for battery life details. The device includes a battery status indicator (refer to Figure 2.1) to show its charge level.
4. Operating Instructions
4.1 Activation Modes
The AMEC TB-520 can be activated in two ways:
4.1.1 Automatic Activation
The beacon will automatically activate when its water sensors are submerged. This is the primary activation method when a person falls overboard. Once activated, the beacon will deploy its antenna and begin transmitting AIS alert messages.
4.1.2 Manual Activation
To manually activate the beacon:
- Locate the red "PULL" tab on the beacon (refer to Figure 2.1).
- Firmly pull the tab to deploy the antenna.
- The beacon will then begin transmitting AIS alert messages.
4.2 Indicator Lights
The TB-520 features indicator lights to provide status feedback:
- Green Light (GPS OK / No GPS): Indicates GPS acquisition status. A steady green light typically means GPS fix is acquired.
- Orange Light (Device activated): Illuminates when the beacon is actively transmitting.
- Red Light (Battery OK / Low): Indicates battery status. A flashing red light may indicate low battery.
Note: Refer to the full user guide for detailed interpretations of light patterns.
4.3 Deactivation
To deactivate the beacon after an event or test, ensure the antenna is fully retracted and the water sensors are dry. The beacon should cease transmission automatically. If it continues, consult the troubleshooting section.
5. Maintenance and Storage
5.1 Cleaning
After exposure to saltwater, rinse the beacon thoroughly with fresh water. Wipe it dry with a soft cloth. Do not use harsh chemicals or abrasive materials.
5.2 Battery Check
Regularly check the battery status indicator. Although the battery is not user-replaceable, monitoring its status is crucial. If the low battery indicator is persistent, the unit may need professional servicing or replacement.
5.3 Storage
Store the TB-520 in a cool, dry place, away from direct sunlight and extreme temperatures. Ensure the antenna is fully retracted and the water sensors are clean and dry before storage.
5.4 Testing
Perform periodic self-tests as per the full user manual's instructions. Use the provided test tab if applicable. Avoid unnecessary full activations to preserve battery life.
6. Troubleshooting
| Problem | Possible Cause | Solution |
|---|---|---|
| Beacon does not activate automatically when submerged. | Water sensors are blocked or dirty; device malfunction. | Clean water sensors. Ensure full submersion. Attempt manual activation. If issue persists, contact support. |
| Beacon does not activate manually. | Pull tab not fully engaged; internal mechanism issue. | Ensure the pull tab is firmly and fully pulled. If no activation, contact support. |
| No GPS fix (Green light not steady). | Obstructed view of sky; poor satellite signal. | Ensure the beacon has a clear, unobstructed view of the sky. Move to an open area. |
| Battery low indicator (Red light flashing). | Battery nearing end of life. | The battery is not user-replaceable. The unit may require replacement or professional servicing. |
| Beacon continues transmitting after deactivation. | Water sensors still wet; internal fault. | Ensure water sensors are completely dry. Retract antenna fully. If issue persists, contact support. |
7. Technical Specifications
| Feature | Detail |
|---|---|
| Model Number | TB-520 |
| Brand | AMEC |
| Technology | AIS (Automatic Identification System) |
| Activation | Automatic (water sensor) / Manual |
| GPS Receiver | High-performance, fast acquisition |
| Waterproof Rating | IP68 |
| Battery Type | Internal, non-user replaceable |
| Item Weight | 1 Kilogram |
| Package Dimensions | 20 x 20 x 20 cm |
| Human Interface Input | Buttons |
| Batteries Included | No (refers to external batteries, internal is built-in) |
| First Available Date | 11 April 2019 |
| Product Discontinued | No |
| GTIN | 04713095731211 |
8. Warranty and Support
8.1 Warranty Information
For specific warranty terms and conditions, please refer to the warranty card included with your product packaging or visit the official AMEC website. Keep your proof of purchase for warranty claims.
8.2 Customer Support
If you encounter any issues not covered in this manual or require further assistance, please contact AMEC customer support. Contact details can typically be found on the official AMEC website or on your product packaging.
Always ensure you are using the latest version of the user manual, available on the manufacturer's website.


