Nessagro HI99121
HI99121 Portable pH Meter for Direct Soil Measurement User Manual
Model: HI99121 | Brand: Nessagro
1. Introduction
This manual provides detailed instructions for the proper use, setup, operation, maintenance, and troubleshooting of the Nessagro HI99121 Portable pH Meter. Designed for direct soil measurement, this instrument offers accurate and reliable pH readings essential for agricultural and environmental applications. Please read this manual thoroughly before operating the device to ensure optimal performance and longevity.
2. Safety Information
- Always handle the pH electrode with care. The glass bulb is fragile.
- Do not immerse the meter unit in water. It is designed to be splash-resistant, not submersible.
- Keep calibration solutions and electrode storage solutions out of reach of children and pets.
- Dispose of batteries and old electrodes according to local environmental regulations.
- Ensure the battery compartment is sealed properly to prevent moisture ingress.
3. Product Overview
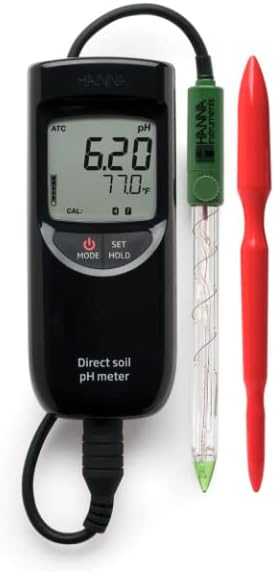
The image displays the HI99121 Portable pH Meter. It features a black handheld meter unit with a digital display showing '6.20 pH' and '77.0°F'. The meter has buttons for 'MODE', 'SET', and 'HOLD'. Connected to the meter is a green-capped pH electrode with a clear glass body and a pointed tip, labeled 'HANNA Instruments'. A red soil auger is shown alongside the probe.
Key Components:
- Meter Unit: The main handheld device with LCD display and control buttons.
- pH Electrode: Specialized probe for direct soil pH measurement.
- Soil Auger: Tool for preparing the soil sample area.
- Batteries: Power source for the meter.
4. Setup
4.1. Battery Installation
- Locate the battery compartment cover on the back of the meter unit.
- Remove the cover by sliding or unscrewing it.
- Insert the required batteries (e.g., 1.5V AAA) observing the correct polarity (+/-).
- Replace the battery compartment cover securely.
4.2. Electrode Connection
- Carefully remove the protective cap from the pH electrode.
- Connect the electrode's BNC connector to the corresponding port on the top of the meter unit. Ensure a secure, twist-lock connection.
- If applicable, connect the temperature probe (ATC) connector to its designated port.
4.3. Initial Calibration
For accurate measurements, the pH meter must be calibrated regularly. It is recommended to perform a two-point calibration using pH 7.01 and pH 4.01 or pH 10.01 buffer solutions.
- Turn on the meter by pressing the POWER button.
- Press the CAL button (if available, or follow menu instructions).
- Rinse the electrode with distilled water and blot dry.
- Immerse the electrode into the first buffer solution (e.g., pH 7.01). Wait for the reading to stabilize.
- Confirm calibration point as per meter instructions (e.g., press SET).
- Rinse the electrode again and immerse it into the second buffer solution (e.g., pH 4.01). Wait for stabilization.
- Confirm the second calibration point. The meter will indicate successful calibration.
5. Operating Instructions
5.1. Taking a Direct Soil pH Measurement
- Prepare the soil sample: Use the provided soil auger to create a hole in the soil. For best results, moisten the soil with distilled water if it is dry, allowing it to equilibrate for 15-20 minutes.
- Turn on the meter by pressing the POWER button.
- Rinse the pH electrode with distilled water and gently blot dry with a lint-free cloth.
- Carefully insert the pH electrode directly into the prepared soil hole. Ensure good contact between the electrode tip and the soil.
- Allow the reading on the display to stabilize. This may take a few minutes depending on the soil type and moisture content.
- Record the pH reading once it is stable. The display will also show the temperature.
- To hold the reading on the display, press the HOLD button. Press again to release.
- After measurement, remove the electrode from the soil.
5.2. Using MODE Function
The MODE button allows you to access various settings or display options, such as temperature units (°C/°F) or calibration history. Refer to the on-screen prompts or specific menu structure for detailed navigation.
6. Maintenance
6.1. Electrode Cleaning and Storage
- After Each Use: Rinse the electrode thoroughly with distilled or deionized water to remove any soil particles.
- Periodic Cleaning: If readings become sluggish or inaccurate, clean the electrode using a specialized electrode cleaning solution. Follow the cleaning solution's instructions.
- Storage: Always store the pH electrode with its protective cap filled with electrode storage solution. Never store the electrode dry or in distilled water, as this will shorten its lifespan.
6.2. Battery Replacement
When the low battery indicator appears on the display, replace the batteries as described in Section 4.1. Ensure the meter is turned off before replacing batteries.
6.3. General Care
- Keep the meter and electrode clean and dry.
- Avoid dropping the meter or subjecting it to severe shocks.
- Store the meter in a cool, dry place away from direct sunlight and extreme temperatures.
7. Troubleshooting
| Problem | Possible Cause | Solution |
|---|---|---|
| Meter does not turn on | Dead or incorrectly installed batteries | Replace batteries, ensuring correct polarity. |
| Inaccurate or unstable readings |
|
|
| "CAL" error message | Incorrect calibration procedure or faulty buffer solution | Repeat calibration carefully; ensure buffer solutions are correct and not expired. |
| Slow response time |
|
|
8. Specifications
- Model: HI99121
- Brand: Nessagro
- Measurement Range: 0.00 to 14.00 pH
- Resolution: 0.01 pH
- Accuracy: ±0.02 pH
- Temperature Compensation: Automatic Temperature Compensation (ATC)
- Power Supply: (Assumed) 1.5V AAA Batteries (number may vary)
- Electrode: Specialized pH electrode for direct soil measurement
- Operating Environment: 0 to 50°C (32 to 122°F); RH max 95% non-condensing
9. Warranty and Support
This Nessagro HI99121 Portable pH Meter is covered by a standard manufacturer's warranty against defects in materials and workmanship. Please refer to the warranty card included with your product for specific terms and conditions, including warranty period and coverage details.
For technical support, calibration services, or replacement parts, please contact Nessagro customer service. Contact information can typically be found on the product packaging or the official Nessagro website. When contacting support, please have your product model number (HI99121) and purchase date ready.
Online Resources: For additional resources, FAQs, and updated information, visit the official Nessagro support page or the product's Amazon listing: https://www.amazon.com/dp/B01M3MSIPO
Ask a question about this manual
Ask about setup, troubleshooting, compatibility, parts, safety, or missing instructions. Manuals+ will review the question and use this page’s manual context to help answer it.