1. Introduction and System Overview
The Aquaboon 3-Stage Whole House Water Filter System is designed to provide clean, filtered water throughout your entire home. This system effectively reduces sediment, chlorine, unpleasant tastes, and odors, protecting your plumbing and appliances while improving water quality for various uses.
The system features a triple filtration process:
- First Stage (Pleated Sediment Filter): Removes larger particles like sand, rust, and silt, extending the life of subsequent filters.
- Second Stage (Carbon Block Filter): Targets chlorine, tastes, odors, and various chemicals.
- Third Stage (Pleated Sediment Filter): Provides final polishing filtration, ensuring comprehensive water purification.

Figure 1: How the Aquaboon 3-Stage Whole House Water Filter System Works

Figure 2: The Filter Cartridges and Their Functions
Video 1: Aquaboon 3-Stage Whole House Water Filter System Overview. This video provides a visual explanation of the system's components and how it functions to purify water.
2. Safety Information
Please read all safety warnings and instructions carefully before installing or operating this water filtration system. Failure to follow these instructions could result in property damage, injury, or death.
- Always turn off the main water supply before beginning any installation or maintenance.
- Wear appropriate personal protective equipment, including safety glasses and gloves, during installation and maintenance.
- Ensure all connections are secure and leak-free before restoring water pressure.
- Do not overtighten filter housings, as this can damage the seals.
- If you are unsure about any part of the installation process, consult a qualified plumber.
- The system is designed for cold water applications only (up to 70°F / 21°C).
- Do not use with water that is microbiologically unsafe or of unknown quality without adequate disinfection before or after the system.
3. Parts List
Verify that all components are present before beginning installation:
- 3-Stage Whole House Water Filter System Housing
- Pleated Sediment Filter Cartridge (First Stage)
- Carbon Block Filter Cartridge (Second Stage)
- Pleated Sediment Filter Cartridge (Third Stage)
- Housing Wrench
- Mounting Brackets
- Pressure Gauges
- Instruction Manual
- Additional fittings and O-rings as supplied
Note: An optional pre-filter may be purchased separately to extend the life of your main filters.
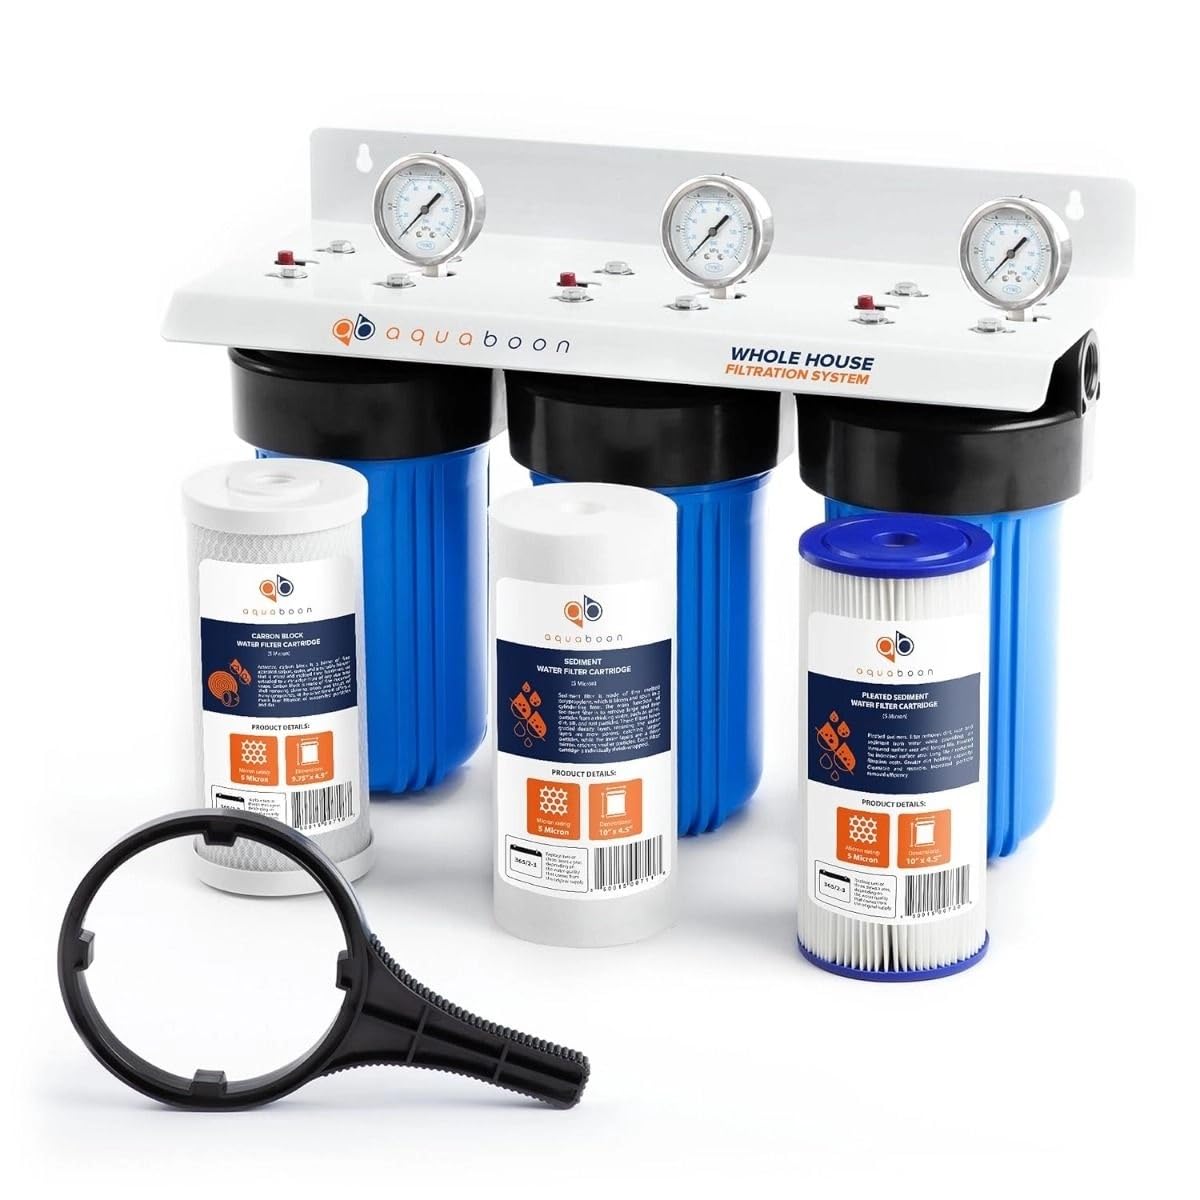
Figure 3: Aquaboon 3-Stage Whole House Water Filter System Components
4. Setup and Installation
Proper installation is crucial for the optimal performance of your Aquaboon water filter system. Follow these steps carefully.
4.1 Pre-Installation Steps
- Turn off Main Water Supply: Locate your home's main water shut-off valve and turn it off.
- Drain Water Lines: Open a faucet in your home to relieve pressure and drain water from the pipes.
- Choose Location: Select a suitable location for the filter system. It should be on the main water line, easily accessible for maintenance, and protected from freezing temperatures and direct sunlight. Ensure enough space is available for filter changes.
4.2 Mounting the System
- Mark Mounting Points: Hold the system bracket against the wall at your chosen location and mark the drilling points for the mounting screws.
- Drill Holes: Drill appropriate pilot holes for the mounting screws.
- Secure System: Mount the system securely to the wall using the provided screws and bracket.
4.3 Installing Pressure Gauges and Adapters
- Apply Thread Sealant: Wrap plumber's tape (PTFE tape) clockwise around the threaded ends of the pressure gauges and 1" NPT adapters.
- Install Gauges: Screw the pressure gauges into the designated ports on top of the filter housing. Tighten hand-tight, then an additional 1/4 to 1/2 turn with a wrench.
- Install Adapters: Screw the 1" NPT adapters into the inlet and outlet ports of the system.
4.4 Connecting Water Lines (Optional Pre-Filter)
If using an optional pre-filter, install it before the main 3-stage system on the incoming water line.

Figure 4: Optional Pre-Filter Installation
- Cut Main Water Line: Carefully cut into your main water line where the system will be installed. Ensure the cut is clean and straight.
- Connect Inlet: Connect the incoming water line to the system's inlet port (usually marked 'IN' or 'FLOW').
- Connect Outlet: Connect the outgoing water line to the system's outlet port (usually marked 'OUT').
- Secure Connections: Use appropriate plumbing techniques (e.g., welding for PEX, compression fittings for copper) to ensure all connections are watertight.
4.5 Inserting Filter Cartridges
- Unwrap Filters: Remove the plastic wrapping from each filter cartridge.
- Insert Filters: Carefully insert each filter cartridge into its corresponding housing. Ensure they are seated correctly. The order is typically Pleated Sediment (Stage 1), Carbon Block (Stage 2), Pleated Sediment (Stage 3).
- Tighten Housings: Screw the filter housings onto the system head. Hand-tighten, then use the provided wrench for an additional 1/4 to 1/2 turn. Do not overtighten.
Video 2: Installation Guide for Aquaboon Whole House Water Filter Systems. This video provides a step-by-step visual guide for installing your water filtration system.
5. Operating Instructions
5.1 Initial System Startup
- Slowly Turn On Water: Slowly open the main water supply valve. Listen for any leaks.
- Check for Leaks: Carefully inspect all connections for any signs of leakage. If leaks are present, turn off the water supply and tighten the connections as needed.
- Flush the System: Open a cold water faucet in your home (preferably one furthest from the filter) and let the water run for at least 10-15 minutes, or until the water runs clear and all air is purged from the system. This flushes out any carbon fines and air.
- Monitor Pressure Gauges: Observe the pressure gauges. They indicate the pressure before and after each filter stage, helping you monitor filter performance.
5.2 Normal Operation
Once flushed, your system is ready for normal use. You should notice an improvement in water quality throughout your home.
- The system operates automatically as water flows through your main line.
- Periodically check the pressure gauges. A significant drop in pressure across a filter stage indicates that the filter is becoming clogged and may need replacement.
6. Maintenance
Regular maintenance ensures the longevity and effectiveness of your Aquaboon water filter system.
6.1 Filter Replacement
Filter life varies depending on water quality and usage. As a general guideline, filters should be replaced every 3-6 months, or when a noticeable drop in water pressure occurs, or water quality diminishes.
- Turn off Water Supply: Turn off the main water supply to the system.
- Relieve Pressure: Press the red pressure release button on top of each housing to relieve internal pressure.
- Unscrew Housings: Use the provided filter wrench to unscrew the filter housings.
- Remove Old Filters: Remove and discard the old filter cartridges.
- Clean Housings: Clean the inside of the filter housings with warm, soapy water. Rinse thoroughly.
- Inspect O-Rings: Inspect the O-rings for any cracks or damage. Replace if necessary. Lubricate O-rings with food-grade silicone grease.
- Insert New Filters: Unwrap and insert new filter cartridges into their respective housings.
- Re-attach Housings: Screw the housings back onto the system head. Hand-tighten, then use the wrench for an additional 1/4 to 1/2 turn. Do not overtighten.
- Restore Water Supply: Slowly turn on the main water supply and check for leaks.
- Flush System: Flush the system as described in Section 5.1.

Figure 5: Double O-Ring Design for Leak Prevention
6.2 Optional Pre-Filter Maintenance
If you have installed an optional reusable pre-filter, it should be cleaned periodically. Refer to the pre-filter's specific instructions for cleaning frequency and procedure. Typically, this involves turning off the water, opening the drain valve on the pre-filter, and rinsing the screen.
7. Troubleshooting
Here are some common issues and their potential solutions:
| Problem | Possible Cause | Solution |
|---|---|---|
| Low Water Pressure | Clogged filter cartridges; Air in the system; Incorrect installation. | Replace clogged filters; Flush the system to remove air; Recheck installation for proper flow direction and connections. |
| Water Leaks | Loose connections; Damaged O-rings; Overtightened housings. | Turn off water, tighten connections; Replace damaged O-rings; Ensure housings are not overtightened. |
| Poor Water Quality (Taste/Odor) | Spent carbon filter; System not flushed properly; Incorrect filter type for contaminants. | Replace carbon filter; Re-flush the system; Ensure you are using the correct filter combination for your water issues. |
| Pressure Gauges Read Zero | No water flow; Faulty gauge. | Check main water supply; Replace faulty gauge. |
If you encounter issues not listed here or if solutions do not resolve the problem, please contact Aquaboon customer support.
8. Specifications
- Brand: Aquaboon
- Model Name: Aquaboon 3-Stage Whole House Water Filter System
- Item Model Number: B01M329CNR
- Special Feature: NSF certified
- Product Dimensions: 19"L x 12"W x 25"H
- Material: Polypropylene
- Capacity: 100,000 Gallons (approximate, varies by water quality)
- Installation Type: Whole House
- Purification Method: Granular Activated Carbon, Sedimentation
- Power Source: Manual Operation
- Maximum Flow Rate: 15 Gallons Per Minute (GPM)
- Upper Temperature Rating: 70 Degrees Fahrenheit (21°C)
- Supported Water TDS Level Maximum (PPM): 1000
- Item Weight: 34.5 pounds
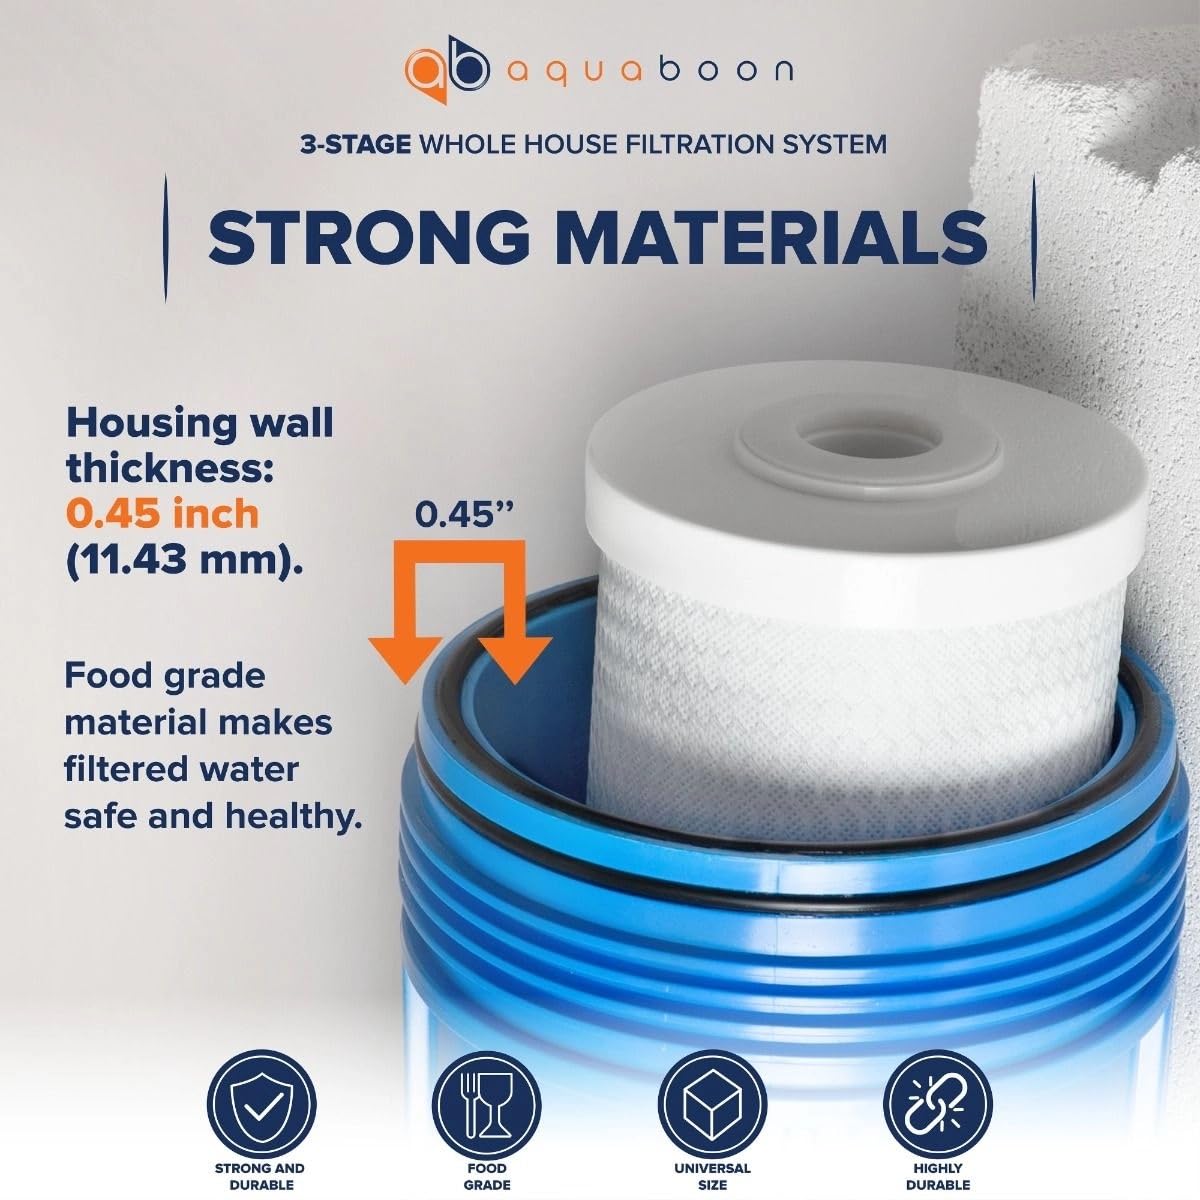
Figure 6: Durable Construction Details
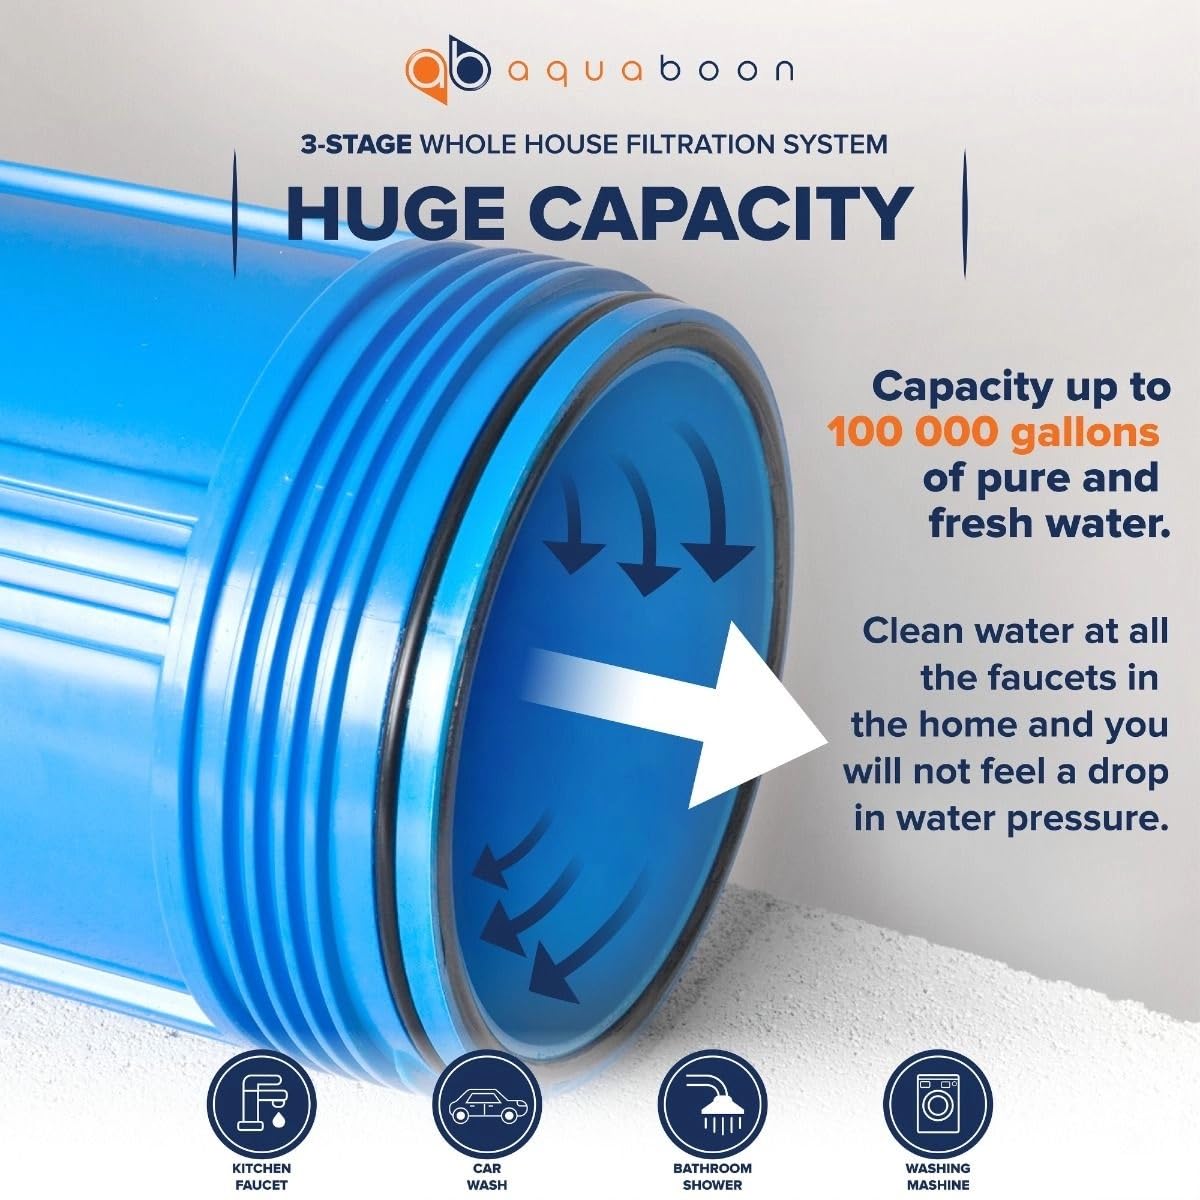
Figure 7: High Capacity and Efficient Flow
9. Warranty and Support
Aquaboon products are manufactured to high-quality standards. For specific warranty details, please refer to the warranty card included with your product or visit the official Aquaboon website.
For technical assistance, troubleshooting, or to order replacement parts, please contact Aquaboon customer support. Our dedicated team is available to assist you with any questions or concerns regarding your water filtration system.
Contact Information: Please refer to the contact details provided in your product packaging or on the official Aquaboon website.