Introduction
The Godox SN-01 Bowens Mount Snoot is a light shaping accessory designed to provide precise control over your studio strobe's light output. It is ideal for creating focused light beams, accent lighting, or hair lights in photography. This manual provides essential information for the safe and effective use of your SN-01 snoot.
Product Overview and Features
The SN-01 snoot is constructed from durable metal and plastic, featuring a Bowens S-Type mount for broad compatibility with various studio strobes and monolights. It includes a removable honeycomb grid for enhanced light control.
- Bowens Mount Compatibility: Designed for strobe and monolight heads utilizing the Bowens S-Type Bayonet mount.
- Light Shaping: Creates a focused, spotlight effect for accentuation in portrait and beauty photography.
- Honeycomb Grid: Includes a removable honeycomb grid to further narrow the light beam and control spill.
- Durable Construction: Made from metal and plastic for longevity.

Figure 1: The Godox SN-01 Snoot mounted on a compatible studio strobe. This image illustrates the snoot's attachment mechanism and its overall appearance when in use.
Setup
- Verify Compatibility: Ensure your studio strobe or monolight has a Bowens S-Type mount. The SN-01 is compatible with many Godox strobes and other brands that use this mount, particularly those above 300 watts.
- Attach the Snoot: Align the three mounting tabs on the base of the SN-01 snoot with the corresponding slots on your strobe's Bowens mount. Insert the snoot into the mount and rotate it clockwise until it locks securely into place. You should hear a click or feel it firmly seated.
- Check Stability: Gently tug on the snoot to ensure it is firmly attached and does not wobble. If it feels loose, re-attach it, ensuring proper alignment and rotation.
- Honeycomb Grid Installation (Optional): The honeycomb grid is located at the front of the snoot. It can be removed or re-inserted by gently tapping or pushing it out from the front or back, depending on its current orientation. Ensure it is seated flush if you choose to use it.
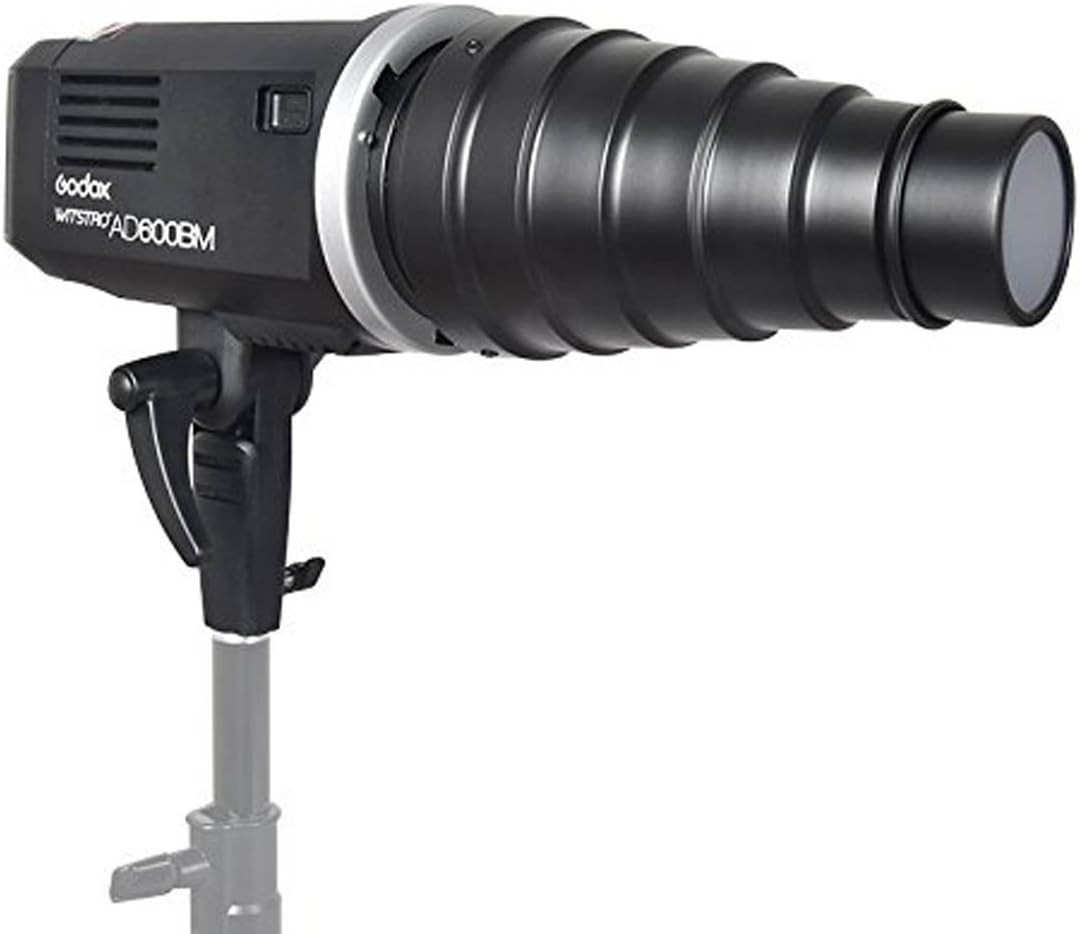
Figure 2: Side view of the Godox SN-01 Snoot, showing its conical shape and Bowens mount base. This view highlights the overall construction.
Operating Instructions
Once the SN-01 snoot is securely mounted on your strobe, you can begin shaping your light.
- Positioning: Direct the snoot towards your subject or background to create a concentrated beam of light. Experiment with distance and angle to achieve the desired effect.
- Using the Honeycomb Grid:
- With Grid: The honeycomb grid further narrows the light beam, creating a more defined and controlled spot. This is useful for precise accent lighting or preventing light spill onto unwanted areas.
- Without Grid: Removing the grid provides a slightly wider, softer spot of light while still maintaining a focused beam compared to an open reflector.
- Light Intensity: Adjust the power output of your strobe to control the brightness of the light beam.
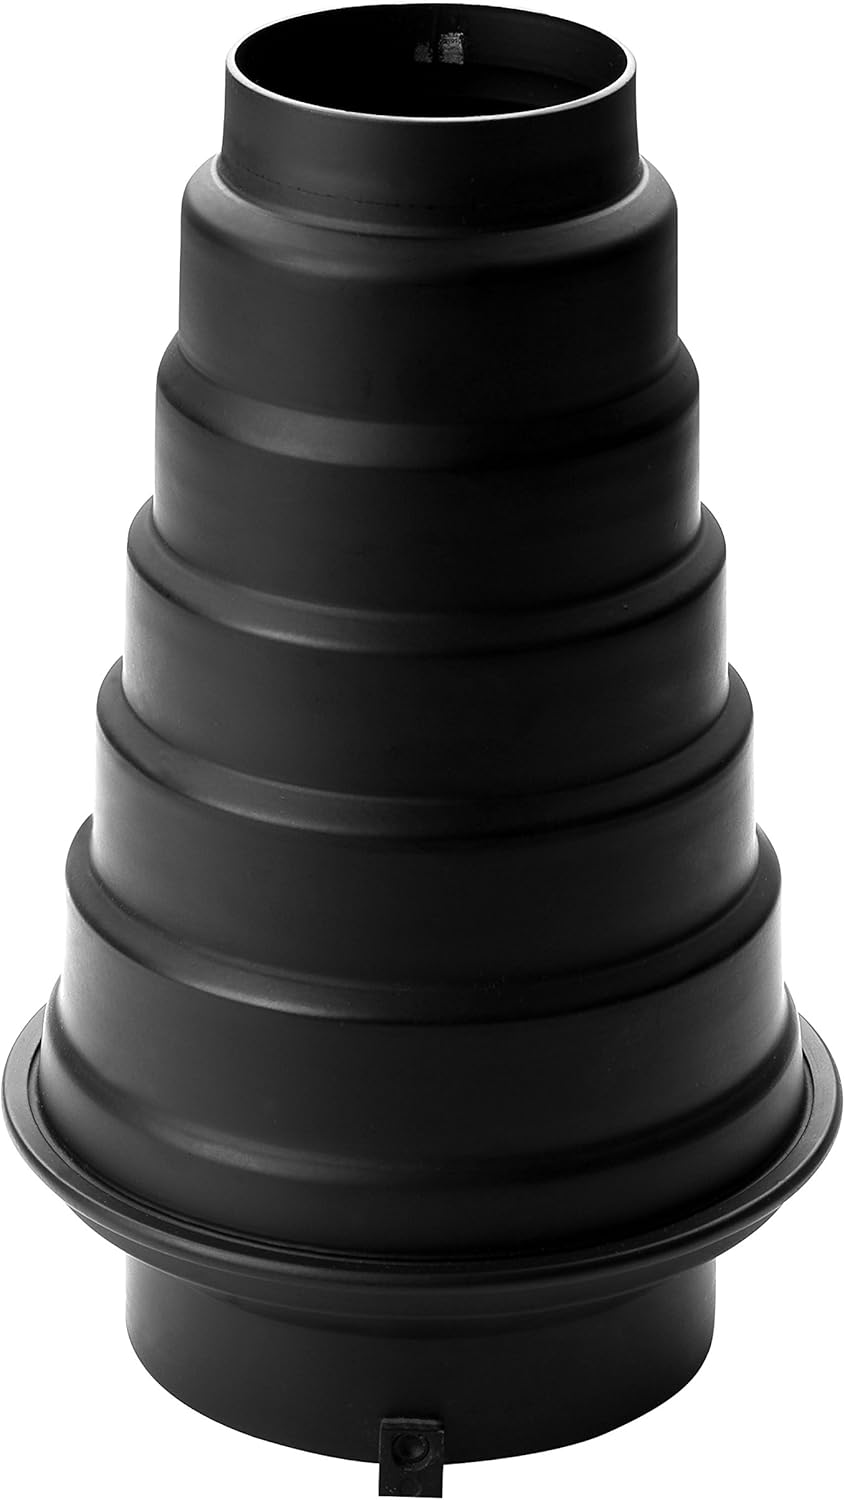
Figure 3: Front view of the Godox SN-01 Snoot, showing the honeycomb grid insert. This grid helps to further narrow and control the light beam.
Maintenance
Proper maintenance ensures the longevity and optimal performance of your SN-01 snoot.
- Cleaning: Use a soft, dry cloth to wipe down the exterior of the snoot. For stubborn marks, a slightly damp cloth with mild soap can be used, followed by thorough drying. Avoid abrasive cleaners or solvents.
- Honeycomb Grid: The grid can be cleaned with a soft brush or compressed air to remove dust and debris.
- Storage: Store the snoot in a dry, dust-free environment when not in use. Protect it from impacts that could dent or deform the metal.
- Heat Precaution: The metal construction can heat up during extended use with powerful strobes. Exercise caution when handling the snoot after prolonged operation.
Troubleshooting
| Problem | Possible Cause | Solution |
|---|---|---|
| Snoot feels loose on the strobe mount. | Improper attachment; mounting tabs not fully engaged. | Ensure the snoot is fully inserted and rotated clockwise until it locks securely. Verify the strobe's Bowens mount is not damaged. |
| Honeycomb grid appears stuck or difficult to remove. | Grid is seated tightly; minor manufacturing variations. | Gently tap the edge of the grid from the opposite side to dislodge it. It is designed to be removable. |
| Light beam is not as focused as expected. | Honeycomb grid not installed; snoot positioned too far from subject. | Install the honeycomb grid for a tighter beam. Move the snoot closer to the subject for a more concentrated spot. |
Specifications
- Model: SN-01
- Mount Type: Bowens S-Type
- Material: Metal, Plastic
- Color: Black
- Product Dimensions (D x W x H): 2.3" x 3.7" x 9" (approximately 5.8cm x 9.4cm x 22.9cm)
- Length: 23 cm (approx. 9 inches)
- Mount Diameter: 9.5 cm (approx. 3.7 inches)
- Light Outlet Diameter: 6 cm (approx. 2.3 inches)
- Weight: Approximately 1 Kilogram (2.2 lbs)
- Compatible Devices: Strobe and monolight heads with Bowens Mount (e.g., Godox SK400II, SK300IIV, MS200V, MS300V, SL60, SL100, etc., generally above 300 watts).
Warranty Information
Specific warranty details for the Godox SN-01 snoot may vary by region and retailer. Please refer to your purchase documentation or contact your point of sale for precise warranty terms and conditions. Generally, Godox products come with a limited manufacturer's warranty covering defects in materials and workmanship.
Support
For technical assistance, product inquiries, or service requests, please contact Godox customer support or visit the official Godox website. You may also reach out to the retailer from whom you purchased the product for support.
Godox Official Website: www.godox.com
Amazon Brand Store: Visit the GODOX Store on Amazon