
1. Introduction
Thank you for choosing the Westward 21LP31 Electronic Measuring Wheel. This manual provides essential information for the safe and efficient operation, setup, and maintenance of your measuring wheel. Please read this manual thoroughly before use and retain it for future reference.
2. Safety Information
Always observe basic safety precautions when using this product to reduce the risk of injury or damage. This device is designed for measuring distances on various surfaces. Do not use it for purposes other than its intended use.
- Keep the measuring wheel clean and free from debris.
- Store the device in a dry, protected environment when not in use.
- Avoid exposing the electronic components to extreme temperatures or moisture.
- Do not attempt to disassemble or modify the device, as this may void the warranty and cause damage.
- Ensure the handle is securely locked in place before operation.
3. Package Contents
Verify that all items are present in the package:
- Westward 21LP31 Electronic Measuring Wheel Unit
- Instruction Guide (this manual)
4. Product Features
The Westward 21LP31 Electronic Measuring Wheel is designed for accurate distance measurement with the following key features:
- Wheel Diameter: 12-1/2 inches (Spoked wheel)
- Wheel Circumference: 3.3 feet
- Measuring Range: Up to 9999.99 meters
- Measuring Units: Feet (ft.), inches (in.), meters (m), centimeters (cm)
- Handle: Pistol-style handle with integrated counter, telescopic shaft, and quick snap cam lock. Extends to 40-3/8 inches.
- Display: Screen panel with backlit power on/off function.
- Functions: Reading Clear, Reading Hold, 4 Memory storage slots.
- Construction: ABS frame with TPE rubber tire.
- Power: Requires (2) AAA Alkaline Batteries.
- Additional: Folded stand for stability.
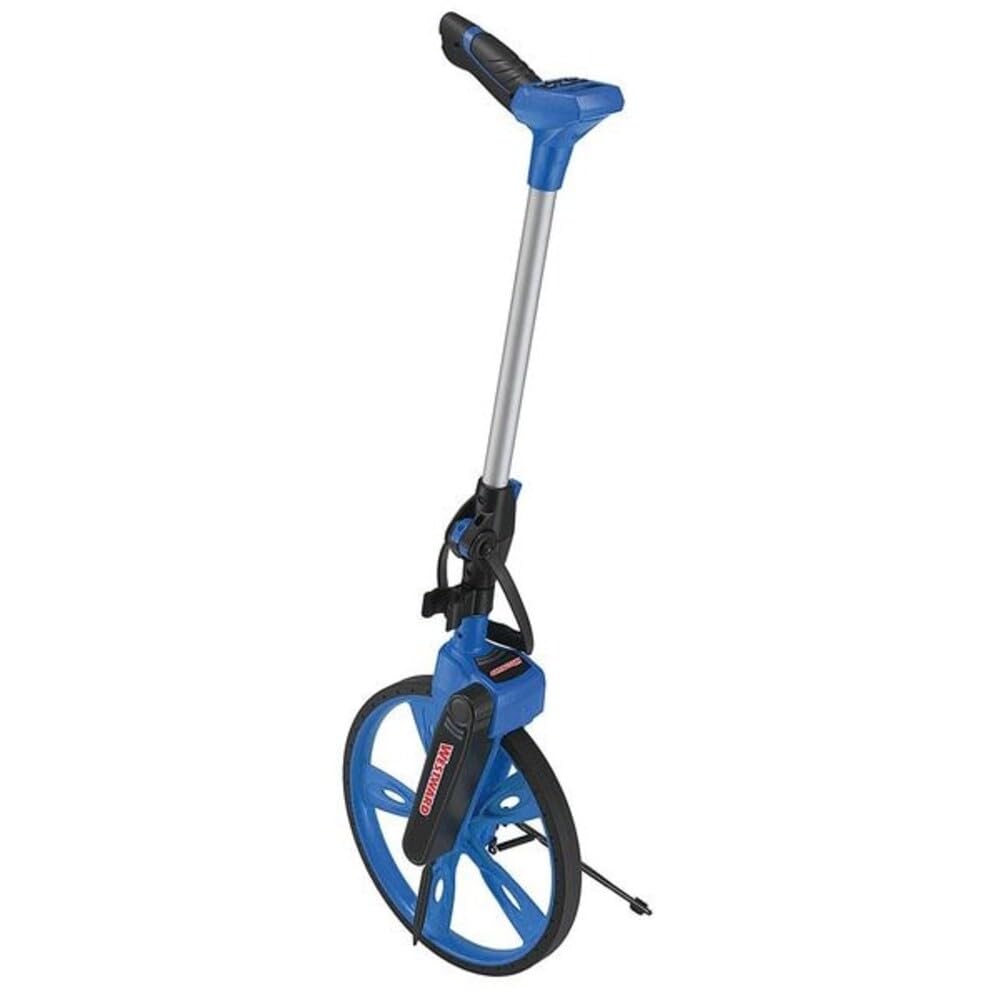
Figure 1: Westward 21LP31 Electronic Measuring Wheel. This image shows the measuring wheel with its telescopic handle extended, featuring the digital display and pistol-style grip.
5. Setup
5.1 Battery Installation
- Locate the battery compartment, typically on the handle or display unit.
- Open the battery compartment cover.
- Insert two (2) AAA alkaline batteries, ensuring correct polarity (+/-).
- Close the battery compartment cover securely.
5.2 Handle Assembly and Extension
- Unfold the measuring wheel stand, if applicable, to stabilize the unit.
- Locate the quick snap cam lock on the telescopic shaft.
- Open the cam lock and extend the handle to a comfortable operating height (up to 40-3/8 inches).
- Securely close the cam lock to fix the handle in position. Ensure the handle is firm and does not wobble.
6. Operating Instructions
6.1 Power On/Off
Press the POWER button on the display panel to turn the unit on or off. The display is backlit for visibility in various lighting conditions.
6.2 Selecting Measuring Units
The device supports measurement in feet (ft.), inches (in.), meters (m), and centimeters (cm). Refer to the display panel buttons to cycle through and select your desired unit of measurement before starting a measurement.
6.3 Taking a Measurement
- Ensure the unit is powered on and the desired measuring unit is selected.
- Place the wheel at the starting point of your measurement.
- Roll the wheel along the path to be measured. The digital display will show the accumulated distance.
- For accurate readings, maintain a straight path and consistent pressure on the handle.
- When you reach the end point, stop rolling the wheel. The final measurement will be displayed.
6.4 Reading Clear Function
Press the CLEAR button to reset the current measurement to zero. This prepares the device for a new measurement.
6.5 Reading Hold Function
Press the HOLD button to temporarily freeze the current reading on the display. This is useful for recording measurements before clearing the display. Press HOLD again to resume live measurement or clear the reading.
6.6 Memory Function
The device features 4 memory slots to store measurements. Consult the display panel for buttons labeled MEMORY or similar. Typically, you would:
- Complete a measurement.
- Press a SAVE or MEM button to store the current reading into an available memory slot.
- Use RECALL or MEM to view stored measurements.
- Follow on-screen prompts or refer to specific button labels for clearing individual memory slots or all memories.
7. Maintenance
7.1 Cleaning
Regularly clean the measuring wheel to ensure optimal performance and longevity.
- Wipe the wheel and frame with a damp cloth to remove dirt and debris.
- Avoid using abrasive cleaners or solvents that could damage the ABS frame or TPE rubber tire.
- Keep the display panel clean and dry.
7.2 Storage
When not in use, store the measuring wheel in a cool, dry place, away from direct sunlight and extreme temperatures. The telescopic shaft can be collapsed for compact storage.
7.3 Battery Replacement
Replace batteries when the display indicates low power or when the unit fails to power on. Always use fresh AAA alkaline batteries.
8. Troubleshooting
- Problem: Display does not turn on.
- Solution: Check battery installation. Ensure batteries are inserted with correct polarity. Replace with fresh AAA alkaline batteries.
- Problem: Inaccurate measurements.
- Solution: Ensure the wheel is clean and free of debris that could affect its rotation. Roll the wheel in a straight line. Verify the selected unit of measurement.
- Problem: Handle is wobbly after extension.
- Solution: Ensure the quick snap cam lock is fully closed and secured after extending the telescopic shaft.
9. Specifications
| Attribute | Value |
|---|---|
| Model Number | 21LP31 |
| Brand | Westward |
| Wheel Diameter | 12-1/2 inches |
| Wheel Circumference | 3.3 feet |
| Measuring Range | 9999.99 meters |
| Measuring Units | ft., in., m, cm |
| Handle Extended Length | 40-3/8 inches |
| Frame Material | ABS |
| Tire Material | TPE Rubber |
| Product Dimensions (L x W x D, folded) | 27 In. x 12-5/8 In. x 4-1/2 In. |
| Net Weight | 3.48 lb. |
| Packaged Dimensions (L x W x H) | 12.87 x 6.85 x 20.55 inches |
| Packaged Weight | 6 pounds |
| Power Source | (2) AAA Alkaline Batteries |
| Country of Manufacture | Taiwan |
10. Warranty and Support
Westward products are manufactured to high-quality standards. For specific warranty information, please refer to the warranty card included with your purchase or contact Westward customer support. Keep your purchase receipt as proof of purchase.
For technical assistance or inquiries, please visit the official Westward website or contact their customer service department. Contact information is typically available on the product packaging or the manufacturer's website.