Introduction
This manual provides detailed instructions for the installation, maintenance, and care of your ShelterLogic Shed-in-a-Box 6x10x6.5 ft. Replacement Cover Kit, Model 90501. This kit is designed to replace the existing cover and end panels of your ShelterLogic Shed-in-a-Box structure, ensuring continued protection for your stored items. The cover is constructed from durable, triple-layer woven PE fabric, treated for UV resistance and waterproof performance.
Kit Contents
Verify that all components listed below are present in your replacement cover kit before beginning installation.
- 1x Fitted One-Piece Cover
- 1x Solid Rear Panel
- 1x Double Zippered Front Door
- 4x Bungee Cords
- 8x Ratchets

Image: Components included in the ShelterLogic Replacement Cover Kit.
Compatibility
This replacement cover kit (Model #90501) is specifically designed to fit ShelterLogic Shed-in-a-Box structures with the following model numbers:
- Shed Model #70403
- Compatible with Cover #s: 802401, 805267, 805271, 805275, 805279, 805283, 805287
To ensure proper fit, locate the identifying reorder part number on your existing ShelterLogic cover. This number is typically found on a white tag or sticker positioned on the inside corner of your building or shelter.
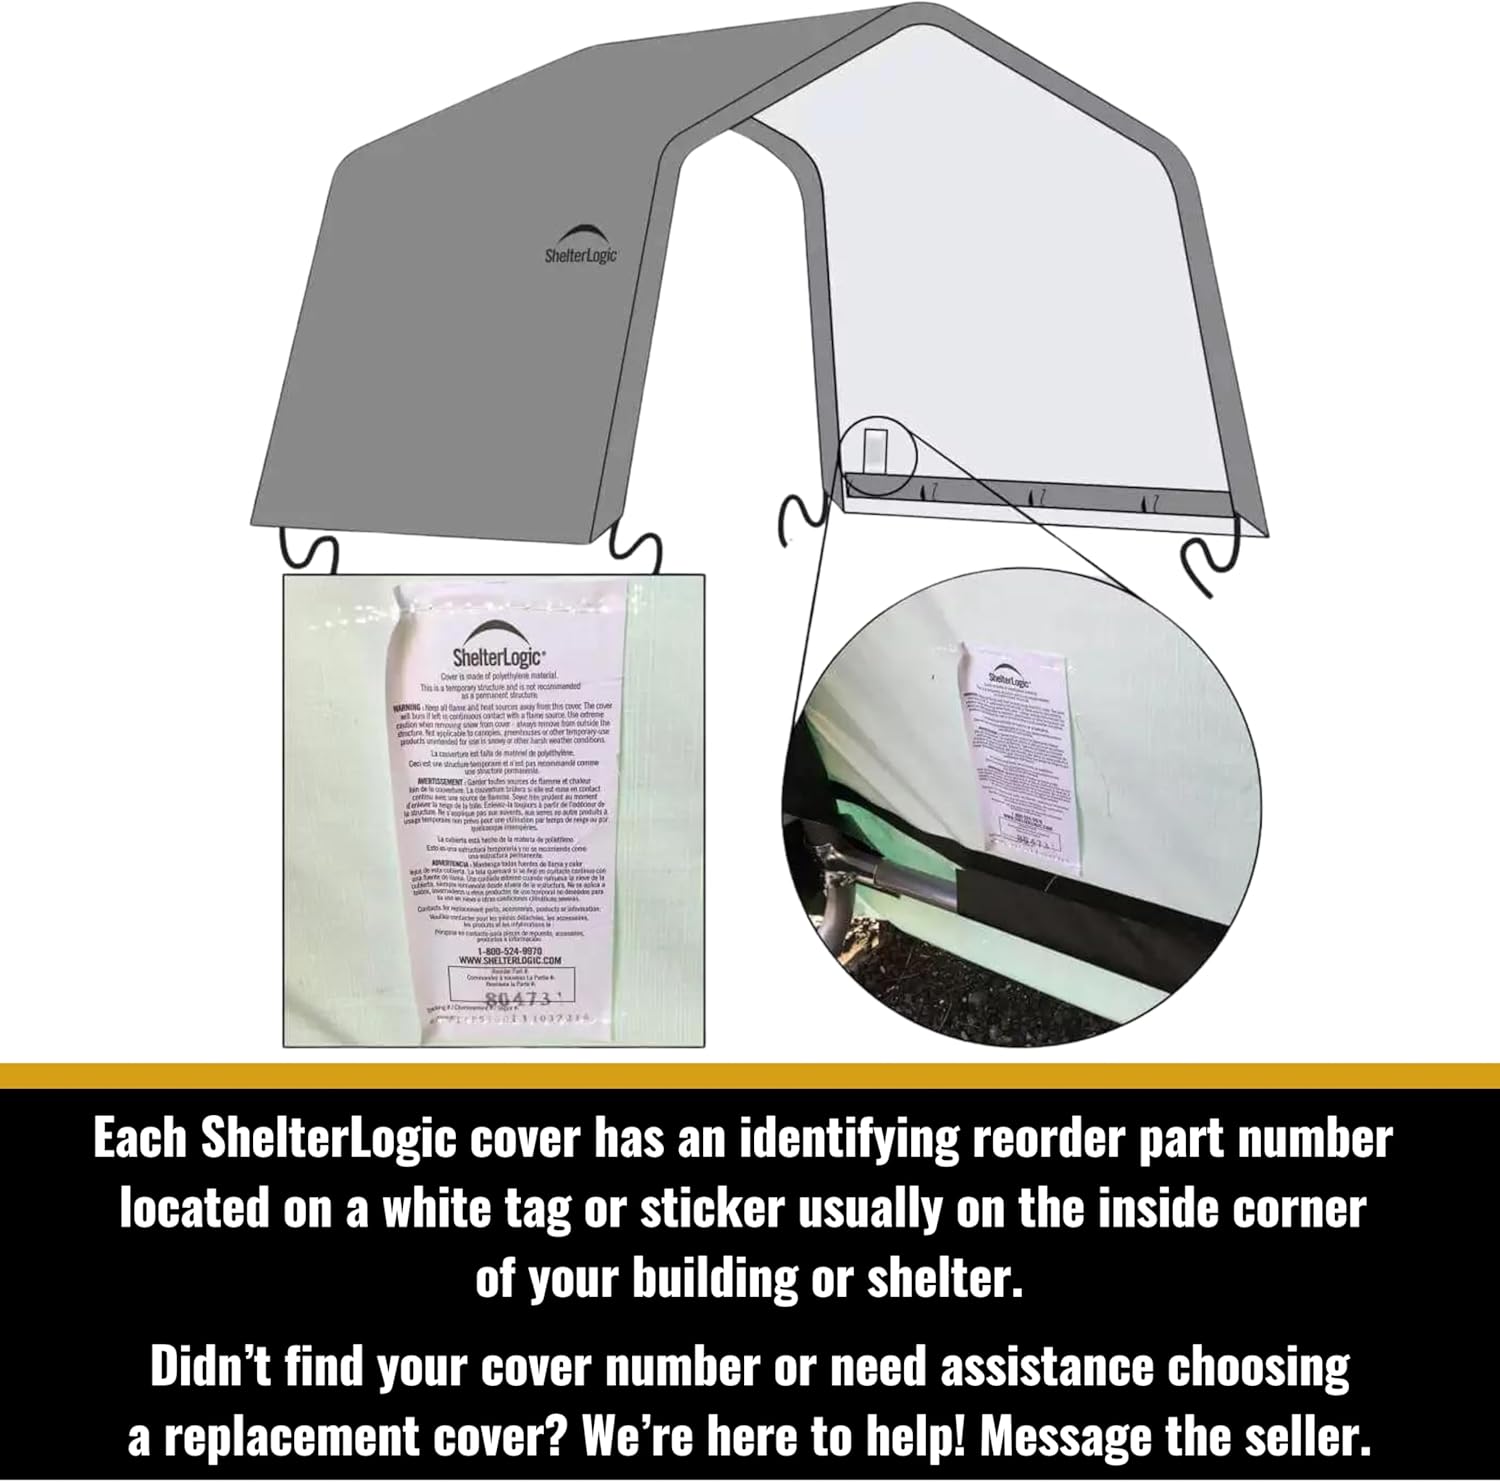
Image: Location of the cover reorder part number.
Installation Instructions
These instructions assume you have an existing ShelterLogic Shed-in-a-Box frame ready for a new cover. It is recommended to have at least two people for installation.
- Prepare the Frame: Ensure the shed frame is clean, stable, and free from any sharp edges that could damage the new cover. Remove the old cover and any remaining securing hardware.
- Unpack and Unfold: Carefully unpack the new cover kit components. Unfold the main cover, solid rear panel, and double zippered front door on a clean, flat surface to avoid tears or punctures.
- Position the Main Cover: Drape the one-piece main cover over the shed frame. Align the cover so that it is centered and evenly distributed over the frame. The ShelterLogic logo should typically be visible on the side.
- Attach Rear Panel: Secure the solid rear panel to the corresponding end of the frame using the provided bungee cords and ratchets. Ensure a snug fit to prevent wind uplift.
- Attach Front Door: Secure the double zippered front door to the front end of the frame using the remaining bungee cords and ratchets. Ensure the zippers are functional and the door can be opened and closed smoothly.
- Tension the Cover: Systematically tighten all bungee cords and ratchets around the base and sides of the cover. Work from one end to the other, ensuring the cover is taut and wrinkle-free. This provides stability and prevents water pooling.
- Final Inspection: Double-check all connections and ensure the cover is securely fastened to the frame. Confirm that the door operates correctly and the quick bungee door fastener holds it open when needed.

Image: Fully installed ShelterLogic Shed-in-a-Box replacement cover.
Operation
The double zippered front door allows for easy access to the shed's interior. To open, simply unzip both zippers and roll up the door panel. The quick bungee door fastener can be used to secure the rolled-up door, keeping it open for convenient entry and exit, or for ventilation. To close, unfasten the bungee, unroll the door, and zip it securely.
Maintenance
- Cleaning: Periodically clean the cover with mild soap and water. Avoid harsh chemicals or abrasive brushes, which can damage the UV coating and fabric. Rinse thoroughly with clean water.
- Inspection: Regularly inspect the cover for any signs of wear, tears, or loose connections. Pay close attention to areas where the cover meets the frame.
- Tension: Ensure the cover remains taut at all times. Re-tighten bungee cords and ratchets as needed to prevent wind damage and water accumulation.
- Snow Removal: In snowy conditions, promptly remove heavy snow accumulation from the roof to prevent structural damage to the frame and cover.
- UV Protection: The cover is UV treated inside and out to prevent fading and deterioration. However, prolonged exposure to extreme sunlight will naturally cause some wear over time.
Troubleshooting
- Water Pooling: If water collects on the roof, the cover may not be sufficiently taut. Re-tension all bungee cords and ratchets to ensure a snug fit.
- Loose Cover: A loose cover can lead to wind damage. Check all securing points and tighten ratchets and bungee cords.
- Minor Tears: Small tears can be repaired using a compatible fabric repair kit designed for polyethylene materials. Address tears promptly to prevent them from enlarging.
- Zipper Issues: If zippers stick, clean them and apply a silicone-based lubricant. Avoid forcing stuck zippers.
Specifications
| Brand | ShelterLogic |
| Model Number | 90501 |
| Compatible Shed Dimensions | 6 ft. x 10 ft. x 6 ft. 6 in. (96 x 72 x 72 inches) |
| Fabric Material | Triple Layer Woven Polyethylene (PE) |
| Fabric Weight | 7 oz. |
| Color | Gray |
| Water Resistance Level | Waterproof |
| UV Treatment | UV treated inside and out |
| Item Weight | 20 Pounds |
| UPC | 677599905018 |
Warranty Information
This ShelterLogic Replacement Cover Kit is backed by a 1-Year Limited Warranty. This warranty covers defects in materials and workmanship under normal use. For specific terms and conditions, or to make a warranty claim, please refer to the documentation included with your original product or contact ShelterLogic customer support.

Image: 1-Year Limited Warranty.
Customer Support
For further assistance, questions regarding installation, or to inquire about replacement parts, please contact ShelterLogic customer support. Visit the official ShelterLogic website for contact information and additional resources.
Additional Information
The UV-treated fabric of this ShelterLogic cover is recognized by the Skin Cancer Foundation for its protective qualities against harmful UV rays.

Image: Skin Cancer Foundation Recommendation.