deleyCON MK-W-19
deleyCON Universal TV & Monitor Wall Mount User Manual
Model: MK-W-19
1. Introduction
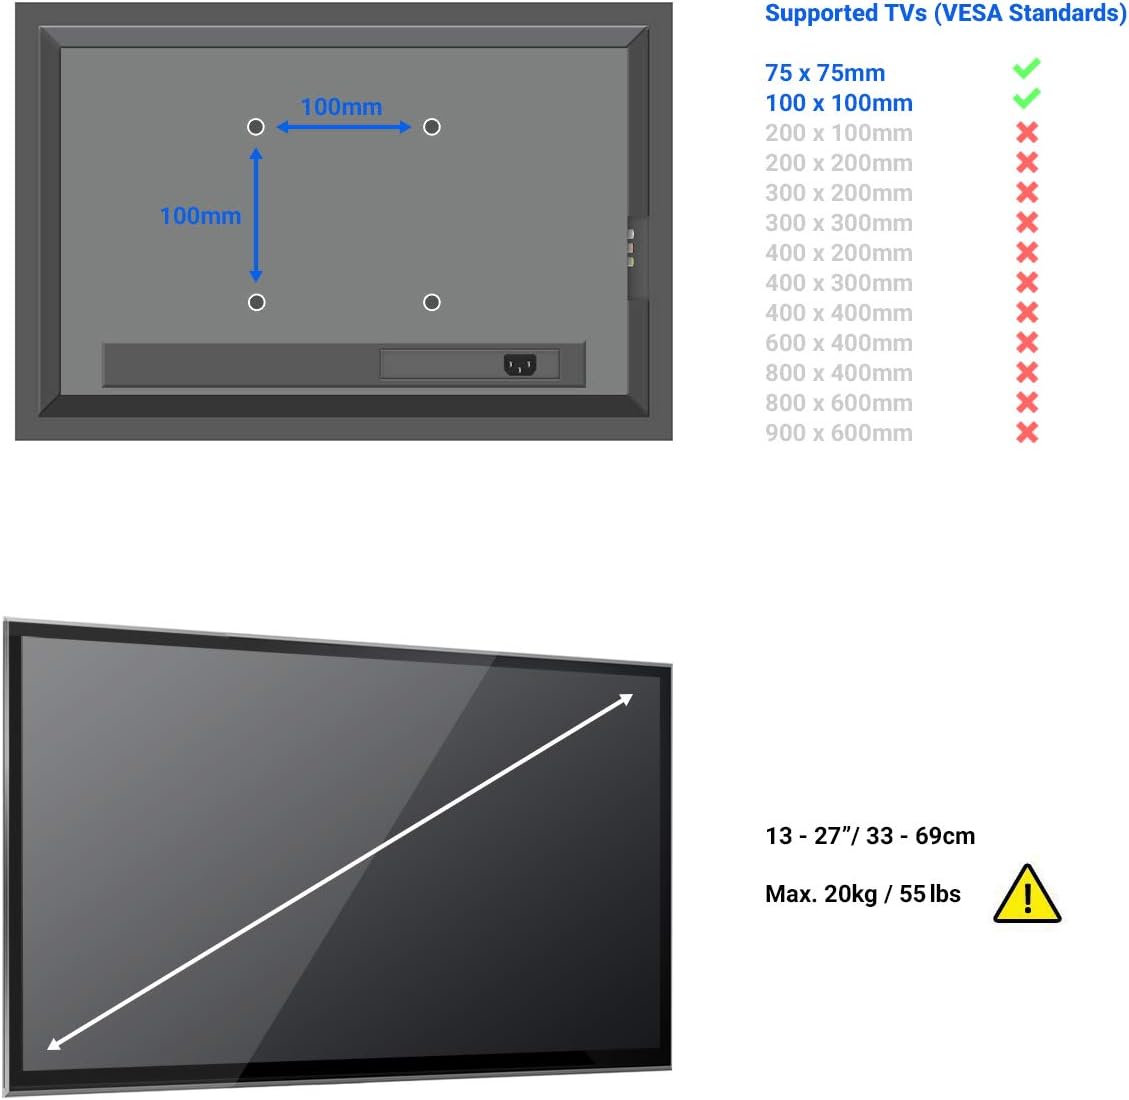
This manual provides detailed instructions for the installation, operation, and maintenance of your deleyCON Universal TV & Monitor Wall Mount. Please read this manual thoroughly before installation to ensure safe and correct usage. This wall mount is designed for TVs and monitors ranging from 13 to 27 inches (33-69 cm) and supports a maximum weight of 20 kg. It is compatible with VESA standards 75x75mm and 100x100mm.
2. Safety Information
- Ensure the wall structure can support the combined weight of the mount and your display. Consult a professional if unsure.
- Do not exceed the maximum weight capacity of 20 kg (44 lbs).
- Verify VESA compatibility (75x75mm or 100x100mm) with your display before installation.
- Use appropriate tools and follow all steps carefully. Improper installation can lead to injury or equipment damage.
- Keep small parts away from children.
3. Package Contents
Before starting the installation, please check that all parts are included in the package:
- 1x Mounting Plate
- 1x Illustrated Installation Manual
- 1x Allen Key
- 4x M4x14 Screws
- 4x M5x14 Screws
- 4x D5 Washers
- 3x Wall Washers
- 3x Wall Plugs (Dowel)
- 3x Wall Screws

4. Setup and Installation
Follow these steps for a secure installation of your wall mount.
4.1. Prepare the Display
Attach the mounting plate to the back of your TV or monitor. Ensure the VESA holes on your display match the 75x75mm or 100x100mm pattern on the mount. Use the appropriate M4 or M5 screws and D5 washers provided.


4.2. Mark and Drill Wall Holes
Choose a suitable location on the wall. Use the wall mount as a template to mark the drilling points. Drill holes of appropriate size for the wall plugs (dowels) and wall screws. Insert the wall plugs into the drilled holes.
4.3. Mount to Wall
Align the wall mount with the drilled holes. Insert the wall screws through the mount and into the wall plugs. Tighten the screws securely, ensuring the mount is firmly fixed to the wall.

4.4. Attach Display to Wall Mount
Carefully lift your display with the attached mounting plate and hook it onto the wall-mounted bracket. Secure the display to the bracket using the provided locking mechanism or screws, as indicated in the illustrated manual.
5. Operating Instructions
Once installed, you can adjust your display for optimal viewing.
5.1. Adjusting Tilt Angle
The mount allows for a tilt adjustment of -12° to +3°. Loosen the tilt adjustment screws, set the desired angle, and then re-tighten the screws to secure the position.
5.2. Adjusting Swivel Angle
The mount can swivel by +/- 25°. Gently pivot the display to the left or right to achieve your preferred viewing angle. The swivel mechanism is designed for smooth movement.


Important Note: Ensure that the cable routing allows for the full range of motion without strain. Cables should ideally be routed from below or from the side of the display.
6. Maintenance
The deleyCON wall mount requires minimal maintenance.
- Cleaning: Wipe the mount with a soft, dry cloth. Do not use abrasive cleaners or solvents.
- Periodic Check: Periodically check all screws and connections to ensure they remain tight and secure. Re-tighten if necessary.
- Lubrication: The moving parts are designed for long-term smooth operation and generally do not require lubrication. If movement becomes stiff, a small amount of silicone-based lubricant can be applied to the pivot points.
7. Troubleshooting
| Problem | Possible Cause | Solution |
|---|---|---|
| Mount feels unstable after installation. | Screws not fully tightened; wall material not suitable; incorrect wall plugs used. | Ensure all wall screws are securely tightened. Verify wall material suitability and use appropriate anchors. Consult a professional if needed. |
| Display cannot be tilted or swiveled. | Adjustment screws are too tight; cables are obstructing movement. | Loosen the tilt/swivel adjustment screws slightly. Check cable routing to ensure no obstruction. |
| Display is not level. | Wall mount not installed level; display not properly seated on the mount. | Re-check the level of the wall mount during installation. Adjust the display's position on the mounting plate if possible. |
| Screws for display attachment are too long/short. | Incorrect screw size selected for the display's VESA holes. | Use the correct screw length (M4 or M5) and washers as needed. If provided screws are unsuitable, acquire appropriate screws from a hardware store. |
8. Specifications
| Feature | Detail |
|---|---|
| Model Number | MK-W-19 |
| Compatible Screen Sizes | 13" - 27" (33cm - 69cm) |
| Maximum Load Capacity | 20 kg (44 lbs) |
| VESA Standards Supported | 75x75mm, 100x100mm |
| Wall Distance | 75mm |
| Tilt Angle | -12° to +3° |
| Swivel Angle | +/- 25° |
| Material | Robust, durable steel |
| Color | Black |
9. Warranty Information
deleyCON products are manufactured with high quality standards. For information regarding warranty terms and conditions, please refer to the specific warranty statement provided with your purchase or visit the official deleyCON website. Keep your proof of purchase for any warranty claims.
10. Support and Contact
If you encounter any issues or have questions not covered in this manual, please contact deleyCON customer support.
- Brand: deleyCON
- Model: MK-W-19
- Website: www.deleycon.com (Note: This is a placeholder URL, please refer to your product packaging for the exact support contact details.)
- Email: info@deleycon.de
Ask a question about this manual
Ask about setup, troubleshooting, compatibility, parts, safety, or missing instructions. Manuals+ will review the question and use this page’s manual context to help answer it.