1. Introduction
This manual provides detailed instructions for the proper setup, operation, and maintenance of your UUQ 4-16x50EG Tactical Rifle Scope. This optical system includes a 4-16x50EG rifle scope, a holographic dot sight, and a green laser sight, designed for mounting on 22mm Picatinny or Weaver rails. Please read this manual thoroughly before use to ensure safe and effective operation.

Image 1.1: Overview of the UUQ 4-16x50EG Tactical Rifle Scope system, including the main scope, holographic dot sight, and green laser sight.
2. Product Overview and Components
The UUQ 4-16x50EG system integrates multiple sighting components for versatility. Understanding each part is crucial for correct usage.

Image 2.1: Labeled components of the UUQ 4-16x50EG Tactical Rifle Scope.
Key Components:
- Rifle Scope (4-16x50EG): Main optical sight with variable 4x to 16x magnification and a 50mm objective lens. Features red/green illuminated reticle with 5 brightness levels.
- Holographic Dot Sight: A secondary, non-magnifying sight with 4 selectable reticle patterns and dual red/green illumination. Mounts on top of the rifle scope.
- Green Laser Sight: A detachable laser aiming module for rapid target acquisition. Mounts on the side rail of the rifle scope.
- Windage and Elevation Adjustments: Dials for precise horizontal and vertical reticle adjustments.
- Parallax Adjustment: Ring on the objective lens for parallax correction.
- Diopter Adjustment: Ring on the eyepiece for focusing the reticle to the user's eye.
3. Setup Instructions
3.1. Battery Installation
The rifle scope and holographic dot sight require CR2032 batteries. The green laser sight may require a different battery type (e.g., LS14250 or CR2). Please verify the specific battery type for your laser unit.
- Rifle Scope: Unscrew the battery cap on the illumination control knob. Insert one CR2032 battery with the positive (+) side facing outwards. Replace the cap securely.
- Holographic Dot Sight: Locate the battery compartment, typically on the side or top. Open the compartment, insert one CR2032 battery with the positive (+) side facing upwards, and close the compartment.
- Green Laser Sight: Unscrew the rear cap of the laser unit. Insert the required battery type (e.g., LS14250 or CR2) with the positive (+) terminal facing the front of the laser. Replace the cap securely.
3.2. Mounting the Scope System
The scope system is designed for 22mm Picatinny or Weaver rails.
- Loosen the mounting screws on the scope's integrated rail mount.
- Place the scope onto your firearm's 22mm rail, ensuring proper eye relief (distance from your eye to the eyepiece).
- Tighten the mounting screws evenly and securely. Do not overtighten.
- Ensure the holographic dot sight and green laser sight are securely attached to the scope's accessory rails.
4. Operating Instructions
4.1. Magnification Adjustment (Rifle Scope)
Rotate the magnification ring, located near the eyepiece, to adjust the magnification from 4x to 16x.
4.2. Focus Adjustment (Rifle Scope)
- Diopter Adjustment: Look through the scope at a plain background (e.g., a clear sky). Rotate the diopter ring on the eyepiece until the reticle appears sharp and clear. This adjustment is specific to your eyesight.
- Parallax Adjustment: For targets at varying distances, rotate the parallax adjustment ring (located on the objective lens) until the target image and reticle appear to be in the same focal plane. This eliminates parallax error.
4.3. Reticle Illumination (Rifle Scope)
The rifle scope features a dual red/green illuminated reticle with 5 brightness levels for each color.
- Rotate the illumination control knob (where the battery is installed) to turn on the illumination.
- Select either red or green illumination.
- Adjust the knob to choose one of the 5 brightness settings.
4.4. Windage and Elevation Adjustment (Zeroing)
Windage and elevation adjustments are made using the turrets on top and side of the scope. Each click typically represents 1/4 MOA (Minute of Angle) at 100 yards.
- Fire a test shot or group of shots at a known distance.
- Observe the point of impact relative to your aim point.
- To adjust the point of impact:
- For Elevation (vertical adjustment), turn the top turret. Turning it clockwise typically moves the point of impact down, counter-clockwise moves it up.
- For Windage (horizontal adjustment), turn the side turret. Turning it clockwise typically moves the point of impact right, counter-clockwise moves it left.
- Repeat firing and adjusting until your point of impact matches your aim point (zeroed).
4.5. Holographic Dot Sight Operation
The holographic dot sight offers quick target acquisition.
- Use the control knob to turn the sight on and select red or green illumination.
- Rotate the knob to adjust brightness.
- Use the side button or lever to cycle through the 4 available reticle patterns.
- Adjust windage and elevation using the small adjustment screws, typically located on the side and top of the sight.
4.6. Green Laser Sight Operation
The green laser sight provides an additional aiming point.
- Press the power button or activate the pressure switch (if included) to turn the laser on/off.
- Adjust the laser's point of aim using the small adjustment screws on the laser unit.
5. Maintenance
5.1. Cleaning
- Lenses: Use a soft, lint-free cloth or lens brush to remove dust. For smudges, use a lens cleaning solution specifically designed for optics and a clean microfiber cloth. Avoid touching the lenses with fingers.
- Body: Wipe the scope body with a damp cloth to remove dirt and debris. Avoid harsh chemicals.
5.2. Storage
Store the scope in a cool, dry place, away from direct sunlight and extreme temperatures. If storing for extended periods, remove all batteries to prevent leakage.
5.3. Battery Replacement
Replace batteries when illumination or laser intensity diminishes. Refer to section 3.1 for battery types and installation.
6. Troubleshooting
| Problem | Possible Cause | Solution |
|---|---|---|
| Reticle/Dot Sight/Laser does not illuminate. | Dead or incorrectly installed battery. | Check battery orientation. Replace with a fresh battery. |
| Image is blurry or out of focus. | Improper diopter or parallax adjustment. | Adjust diopter for reticle sharpness. Adjust parallax for target image sharpness. |
| Point of impact shifts after zeroing. | Mounting screws loose; scope not holding zero. | Ensure all mounting screws are securely tightened. If problem persists, contact support. |
| Cannot adjust windage/elevation. | Adjustment turrets are stuck or damaged. | Do not force adjustments. Contact support. |
7. Specifications
- Model: UUQ 4-16x50EG
- Magnification: 4x-16x (Variable)
- Objective Lens Diameter: 50mm
- Reticle: Range Finding, Red/Green Illuminated (5 brightness levels)
- Holographic Dot Sight: 4 Reticle Patterns, Red/Green Illumination
- Laser Sight: Green Laser
- Mounting: Integrated for 22mm Picatinny/Weaver Rails
- Windage/Elevation Adjustment: 1/4 MOA per click
- Material: Alloy Steel
- Water Resistance: Waterproof
- Shockproof: Yes
- Batteries: 3 x CR2032 (for scope and dot sight, laser battery type may vary)
- Product Dimensions: Approximately 33.02 x 7.62 x 10.16 cm
- Item Weight: Approximately 1.5 kg (53 ounces)
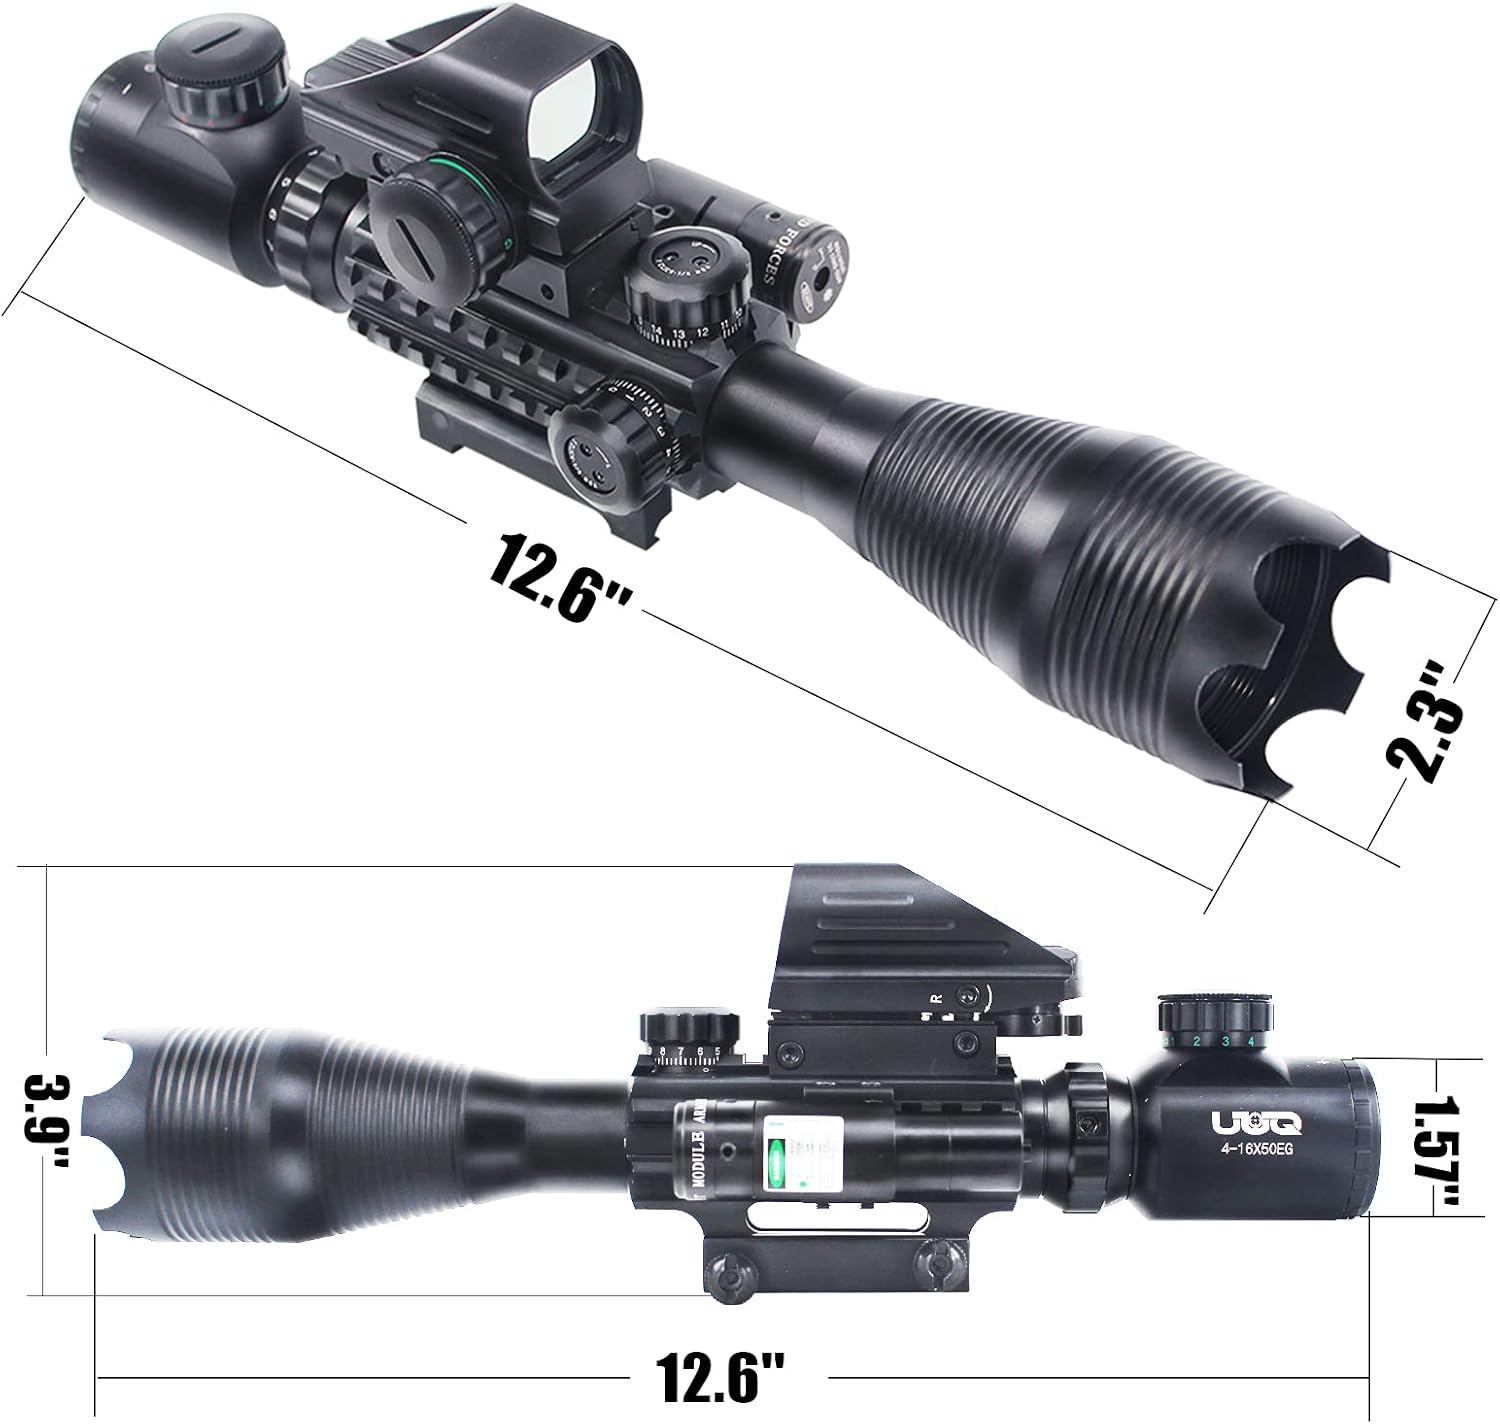
Image 7.1: Dimensional overview of the UUQ 4-16x50EG Tactical Rifle Scope.

Image 7.2: The scope demonstrating its waterproof capability.
8. Warranty and Support
UUQ offers customer service for this product. For warranty claims, technical assistance, or any inquiries, please refer to the contact information provided with your purchase or visit the official UUQ website. Please retain your proof of purchase for warranty validation.