1. Introduction
Thank you for choosing Acoustic Audio by Goldwood CSi63S In-Wall/Ceiling Speakers. This manual provides essential information for the proper installation, operation, and maintenance of your new speaker system. These 6.5-inch, 3-way speakers are designed to deliver high-quality audio for home theater, whole-house audio, or commercial installations, integrating seamlessly into your environment.

Image 1.1: Acoustic Audio by Goldwood CSi63S Speakers (Grilles Removed)
2. Safety Information
Please read and understand all safety instructions before installing or operating these speakers. Failure to do so may result in injury or damage to the equipment.
- Electrical Safety: Always disconnect power to the installation area before performing any wiring. Consult a qualified electrician if you are unsure about electrical connections.
- Installation: Ensure the mounting surface (wall or ceiling) can safely support the weight of the speakers. Improper installation can lead to speakers falling, causing injury or damage.
- Ventilation: Do not obstruct the ventilation of the speakers. Ensure adequate airflow around the speaker components.
- Moisture: Do not expose speakers to moisture or extreme temperatures. These speakers are not designed for outdoor or high-humidity environments.
- Cleaning: Use only a dry, soft cloth for cleaning. Avoid harsh chemicals or abrasives.
3. Package Contents
Verify that all items are present in your package:
- 2 x Acoustic Audio by Goldwood CSi63S In-Wall/Ceiling Speakers
- 2 x Removable Speaker Grilles
- 1 x Cut-out Template
- 1 x Instruction Manual (this document)

Image 3.1: Included Instruction Manual and Cut-out Template
4. Installation
4.1. Planning and Location
Before installation, carefully plan the speaker placement. Consider the acoustics of the room, potential obstructions (studs, wiring, plumbing), and the desired sound coverage. Ensure there is sufficient clear space behind the wall or ceiling surface for the speaker's mounting depth.
4.2. Preparing the Mounting Hole
- Using a stud finder, locate any studs or joists in the desired installation area to avoid cutting into them.
- Place the provided cut-out template on the wall or ceiling at the chosen location. Use a pencil to trace the inner line of the template.
- Carefully cut along the traced line using a drywall saw or rotary tool. The required hole cutout size is approximately 8.19 inches x 8.19 inches (20.8 cm x 20.8 cm).
- Ensure the mounting depth of 3.46 inches (8.8 cm) is available behind the surface.

Image 4.1: Speaker Dimensions and Cutout Guide
4.3. Mounting the Speaker
- Once the hole is cut and wiring is prepared (see Section 5), feed the speaker wire through the hole.
- Connect the speaker wires to the speaker terminals (see Section 5).
- Insert the speaker into the cutout hole. The speaker features a pressure lock mounting system.
- Tighten the mounting screws located on the front baffle of the speaker. As you tighten, the mounting tabs will pivot outwards and clamp firmly against the back of the wall or ceiling surface, securing the speaker in place. Do not overtighten.
- Once the speaker is securely mounted, attach the removable grille. The grille is held in place by friction or magnets.
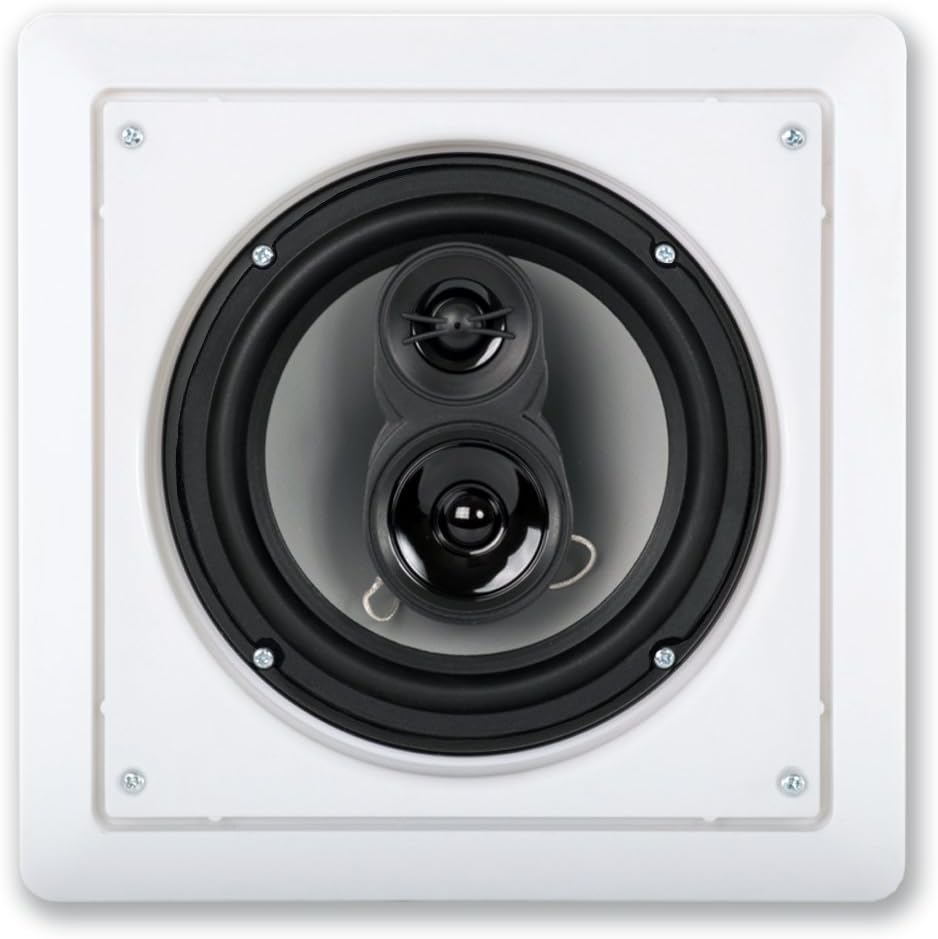
Image 4.2: Front View of CSi63S Speaker Components
5. Wiring
Proper wiring is crucial for optimal performance and safety. Always ensure power to your amplifier or receiver is OFF before making any connections.
5.1. Speaker Wire Requirements
- Use high-quality, CL3 rated in-wall speaker wire to connect your speakers to your audio receiver or amplifier.
- The gauge of the wire should be appropriate for the length of the run. For most home installations, 16-gauge wire is sufficient for runs up to 50 feet, while longer runs may require 14-gauge or thicker wire.
5.2. Connecting to Speakers
The CSi63S speakers are equipped with spring-loaded push terminals for easy and secure connections.
- Strip approximately 1/2 inch (1.2 cm) of insulation from the ends of your speaker wire.
- Identify the positive (+) and negative (-) terminals on both your speaker and your amplifier/receiver. Consistency in polarity is essential for proper sound reproduction. The positive terminal is typically red, and the negative is black.
- Press down on the spring-loaded terminal tab on the speaker.
- Insert the stripped end of the positive wire into the red (+) terminal and the negative wire into the black (-) terminal.
- Release the tab to secure the wire. Gently tug on the wire to ensure a firm connection.

Image 5.1: Rear View of Speaker with Wiring Terminals
5.3. Amplifier/Receiver Requirements
Your amplifier or receiver should provide power between 10 and 300 watts per channel. Using an amplifier outside this range may damage the speakers or result in poor performance.
6. Operation
Once your speakers are correctly installed and wired to your audio system, you can begin enjoying your audio. Turn on your amplifier/receiver and select the appropriate input source. Start with a low volume level and gradually increase it to your desired listening level. Adjust your amplifier's settings (bass, treble, balance) to fine-tune the sound to your preference.
7. Maintenance
7.1. Cleaning
To clean your speakers, gently wipe the grilles and speaker frames with a dry, soft cloth. Do not use liquid cleaners, aerosols, or abrasive materials, as these can damage the finish or components.
7.2. Painting Grilles
The speaker grilles are paintable to match your room's decor. To paint the grilles:
- Remove the grilles from the speakers.
- Use a light coat of spray paint. Avoid applying thick layers that could clog the grille perforations, affecting sound quality.
- Allow the paint to dry completely before reattaching the grilles to the speakers.
8. Troubleshooting
If you encounter issues with your CSi63S speakers, refer to the following common troubleshooting steps:
- No Sound:
- Ensure your amplifier/receiver is powered on and the correct input source is selected.
- Check all speaker wire connections at both the speaker and the amplifier for proper polarity and secure contact.
- Verify that the volume on your amplifier/receiver is not muted or set too low.
- Distorted Sound:
- Reduce the volume level on your amplifier/receiver. Overdriving the speakers can cause distortion.
- Check speaker wire connections for any loose strands that might be shorting out.
- Ensure the speaker wires are not damaged or pinched.
- Verify that the amplifier's power output is within the recommended range (10-300 watts per channel).
- Uneven Sound (one speaker louder/quieter):
- Check the balance settings on your amplifier/receiver.
- Inspect wiring connections for the affected speaker.
If these steps do not resolve the issue, please contact Acoustic Audio by Goldwood customer support.
9. Specifications
| Feature | Specification |
|---|---|
| Speaker Type | 3-Way In-Wall/In-Ceiling Speaker |
| Woofer | 6.5" High Rigidity Poly Cone with Butyl Rubber Surround |
| Midrange | Poly Mica |
| Tweeter | 13mm Soft Dome |
| Power Handling | 300 Watts (Max) |
| Frequency Response | 45Hz - 20kHz |
| Sensitivity | 93dB |
| Impedance | 8 Ohm |
| Overall Dimensions | 9.41" x 9.41" (23.9 cm x 23.9 cm) |
| Cutout Dimensions | 8.19" x 8.19" (20.8 cm x 20.8 cm) |
| Mounting Depth | 3.46" (8.8 cm) |
| Housing Material | Durable ABS |
| Connectivity | Spring-Loaded Push Terminals |
10. Warranty and Support
For warranty information or technical support, please contact Acoustic Audio by Goldwood directly. Keep your purchase receipt as proof of purchase. Details for contacting support can typically be found on the manufacturer's website or product packaging.