1. Introduction
This manual provides essential information for the proper installation, operation, and maintenance of your Lewmar Profish 1000 Free Fall Windlass. The Profish 1000 is designed for efficient anchoring, featuring an automatic freefall function for rapid anchor deployment and powerful retrieval capabilities. It is constructed from 100% 316 stainless steel for durability in marine environments.
Please read this manual thoroughly before attempting to install or operate the windlass to ensure safe and optimal performance.
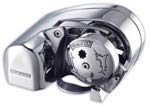
Image showing the Lewmar Profish 1000 Free Fall Windlass unit, typically mounted on a boat deck. This horizontal windlass is designed for efficient anchor deployment and retrieval.
2. Safety Information
WARNING: Failure to follow these safety instructions could result in serious injury or property damage.
- Always disconnect power to the windlass before performing any maintenance, inspection, or repair.
- Ensure all electrical connections are properly insulated and protected from the marine environment to prevent corrosion and short circuits.
- Never operate the windlass with body parts or clothing near moving parts.
- Do not use the windlass to haul the boat or for any purpose other than anchoring.
- Always ensure the anchor is properly stowed and secured when underway.
- Be aware of the anchor rode (line/chain) at all times during deployment and retrieval. Keep hands and feet clear.
- The windlass is not a mooring cleat. Always secure the anchor rode to a separate cleat once the anchor is set.
- Consult a qualified marine electrician or technician if you are unsure about any part of the installation or wiring.
3. Components Included
The Lewmar Profish 1000 windlass kit typically includes the following components:
- Profish 1000 Windlass Unit
- Base Gasket Seal
- Fast Mounting Studs
- Installation Wrench
- Rocker Switch
- Contactor
- Circuit Breaker
Note: The 700 model includes a toggle switch instead of a rocker switch and contactor. This manual specifically addresses the 1000 model.
4. Setup and Installation
The Profish 1000 is designed for convenient above-deck installation. Proper installation is crucial for safe and reliable operation.
4.1 Mounting Location
- Select a flat, reinforced area on the deck, typically at the bow, where the windlass can be securely mounted.
- Ensure there is sufficient space below deck for the motor, gearbox, and rode locker.
- The anchor rode should feed smoothly into the hawse pipe and then into the rode locker, minimizing sharp bends.
4.2 Deck Preparation
- Use the provided template (if applicable, or create one from the windlass base) to mark the drilling points for the mounting studs and the hawse pipe opening.
- Drill pilot holes, then enlarge them to the appropriate size for the mounting studs and hawse pipe.
- Seal all drilled holes with a marine-grade sealant to prevent water ingress.
4.3 Mechanical Installation
- Place the base gasket seal on the deck over the drilled holes.
- Position the windlass unit over the gasket and align the mounting holes.
- Insert the fast mounting studs through the windlass base, gasket, and deck.
- From below deck, secure the studs with washers and nuts, tightening them evenly to compress the gasket and create a watertight seal. Do not overtighten.
4.4 Electrical Wiring
IMPORTANT: All electrical wiring should be performed by a qualified marine electrician.
- Connect the windlass motor to the supplied contactor.
- Wire the rocker switch to the contactor according to the wiring diagram (refer to the diagram provided with your product packaging).
- Install the circuit breaker in the main power supply line to the windlass, ensuring it is easily accessible and appropriately rated for the windlass's current draw.
- Connect the main power supply from the boat's battery bank to the circuit breaker, then to the contactor. Ensure proper gauge wiring is used for the length of the run to minimize voltage drop.
- Verify all connections are secure and protected from moisture.
5. Operating Instructions
5.1 Pre-Operation Check
- Ensure the anchor rode is properly flaked in the locker and free of tangles.
- Verify that the power to the windlass is engaged at the circuit breaker.
- Confirm the area around the windlass and anchor is clear of obstructions and personnel.
5.2 Automatic Freefall Deployment
- Position your vessel over the desired anchoring spot.
- Press and hold the "DOWN" button on the rocker switch. The windlass will automatically release the anchor rode, allowing the anchor to freefall rapidly.
- Release the "DOWN" button when the desired amount of rode has been deployed or the anchor has reached the seabed. The freefall will stop.
- Allow the boat to drift back to set the anchor.
5.3 Anchor Retrieval
- Maneuver your vessel slowly towards the anchor, reducing the load on the windlass.
- Press and hold the "UP" button on the rocker switch. The windlass will begin to retrieve the anchor rode.
- Continue to retrieve until the anchor is clear of the water and properly stowed.
- Once the anchor is stowed, secure the rode to a separate mooring cleat. Do not leave the load on the windlass.
5.4 Manual Recovery Operation
In the event of a power failure or malfunction, the windlass can be operated manually.
- Ensure power to the windlass is disconnected at the circuit breaker.
- Locate the manual override port on the windlass unit.
- Insert a common 1/2" (12mm) socket wrench into the manual override port.
- Turn the wrench clockwise to retrieve the anchor rode.
6. Maintenance
Regular maintenance ensures the longevity and reliable operation of your windlass.
6.1 Routine Checks (Before Each Use)
- Inspect the anchor rode for wear, fraying, or damage. Replace if necessary.
- Check all visible electrical connections for corrosion or looseness.
- Ensure the windlass unit is free of debris and obstructions.
6.2 Periodic Maintenance (Monthly/Seasonally)
- Clean the exterior of the windlass with fresh water and a mild detergent. Rinse thoroughly.
- Inspect the gypsy (chain wheel) and drum for wear.
- Check the mounting bolts for tightness.
- Lubricate any moving parts as recommended by Lewmar (refer to specific lubrication points in the full technical manual if available).
- Inspect the rode locker for cleanliness and proper drainage.
6.3 Winterization
- Thoroughly clean and dry the windlass.
- Disconnect power at the circuit breaker.
- If the boat is stored in freezing temperatures, ensure any water trapped in the hawse pipe or motor housing is drained or protected with antifreeze.
- Consider covering the windlass to protect it from the elements during extended storage.
7. Troubleshooting
This section addresses common issues you might encounter with your windlass. For more complex problems, contact Lewmar support or a qualified technician.
| Problem | Possible Cause | Solution |
|---|---|---|
| Windlass does not operate. | No power; tripped circuit breaker; faulty switch/contactor; loose wiring. | Check circuit breaker; verify battery connections; test switch/contactor (if comfortable and qualified); inspect wiring for looseness or corrosion. |
| Windlass operates slowly or weakly. | Low battery voltage; undersized wiring; excessive load; motor issue. | Check battery charge; ensure correct wire gauge; reduce load on windlass (motor boat towards anchor); consult technician for motor inspection. |
| Anchor rode jams or slips. | Incorrect rode size/type; worn gypsy; rode locker full/tangled. | Ensure correct rode for gypsy; inspect gypsy for wear; clear rode locker of tangles and debris. |
| Freefall not engaging. | Mechanical obstruction; electrical issue with freefall mechanism. | Inspect for debris; check electrical connections related to freefall (if applicable); consult technician. |
8. Specifications
- Model: Profish 1000 Free Fall Windlass
- Part Number: 6656411108-102
- Line Size Compatibility: 9/16"
- Chain Size Compatibility: 5/16" G4
- Maximum Pulling Power: 1000 lbs (454 Kg)
- Construction Material: 100% 316 Stainless Steel
- Item Weight: Approximately 33 Pounds
- Item Dimensions (LxWxH): Approximately 18 x 10 x 6 inches
- Gearbox Type: Reliable Spur Gear-box
- Installation: Above Deck
9. Warranty & Support
9.1 Warranty Information
The Lewmar Profish 1000 Free Fall Windlass comes with a 5-year warranty. This warranty covers defects in materials and workmanship under normal use and service. Please retain your proof of purchase for warranty claims. For full terms and conditions, refer to the official Lewmar warranty documentation provided with your product or visit the Lewmar website.
9.2 Customer Support
For technical assistance, spare parts, or warranty inquiries, please contact Lewmar customer support. You can typically find contact information on the official Lewmar website or within the product packaging. When contacting support, please have your model number (6656411108-102) and purchase date available.
Lewmar Official Website: www.lewmar.com