CME Tools 8-inch Precision Horizontal & Vertical Rotary Table (Model B01KU1VCS2)
Instruction Manual for CME Tools 8" Precision Horizontal & Vertical Rotary Table
Model: 8-inch Precision Horizontal & Vertical Rotary Table (B01KU1VCS2)
1. Introduction
This manual provides comprehensive instructions for the safe and effective operation, setup, and maintenance of your CME Tools 8-inch Precision Horizontal & Vertical Rotary Table. This versatile tool is designed for precise angular positioning and machining operations on various machine tools, including milling machines, drilling machines, lathes, and grinding machines. It features an 8-inch table, a 3-jaw chuck with reversible jaws, and two index plates for accurate indexing.
2. Safety Instructions
Always prioritize safety when operating machinery. Failure to follow these instructions may result in serious injury or damage to the equipment.
- Read and understand all instructions before operating the rotary table.
- Wear appropriate personal protective equipment (PPE), including safety glasses, hearing protection, and gloves.
- Ensure the rotary table is securely mounted to a stable and level surface before use.
- Always disconnect power to the machine tool before making adjustments or performing maintenance on the rotary table.
- Keep hands and clothing clear of moving parts during operation.
- Do not exceed the maximum load capacity of the rotary table or chuck.
- Regularly inspect the rotary table and its components for wear or damage. Do not operate if damaged.
- Keep the work area clean and well-lit.
3. Product Overview
The CME Tools 8-inch Precision Rotary Table is a robust and accurate device designed for various machining applications. It can be used in both horizontal and vertical orientations, offering flexibility for different workpieces and operations.
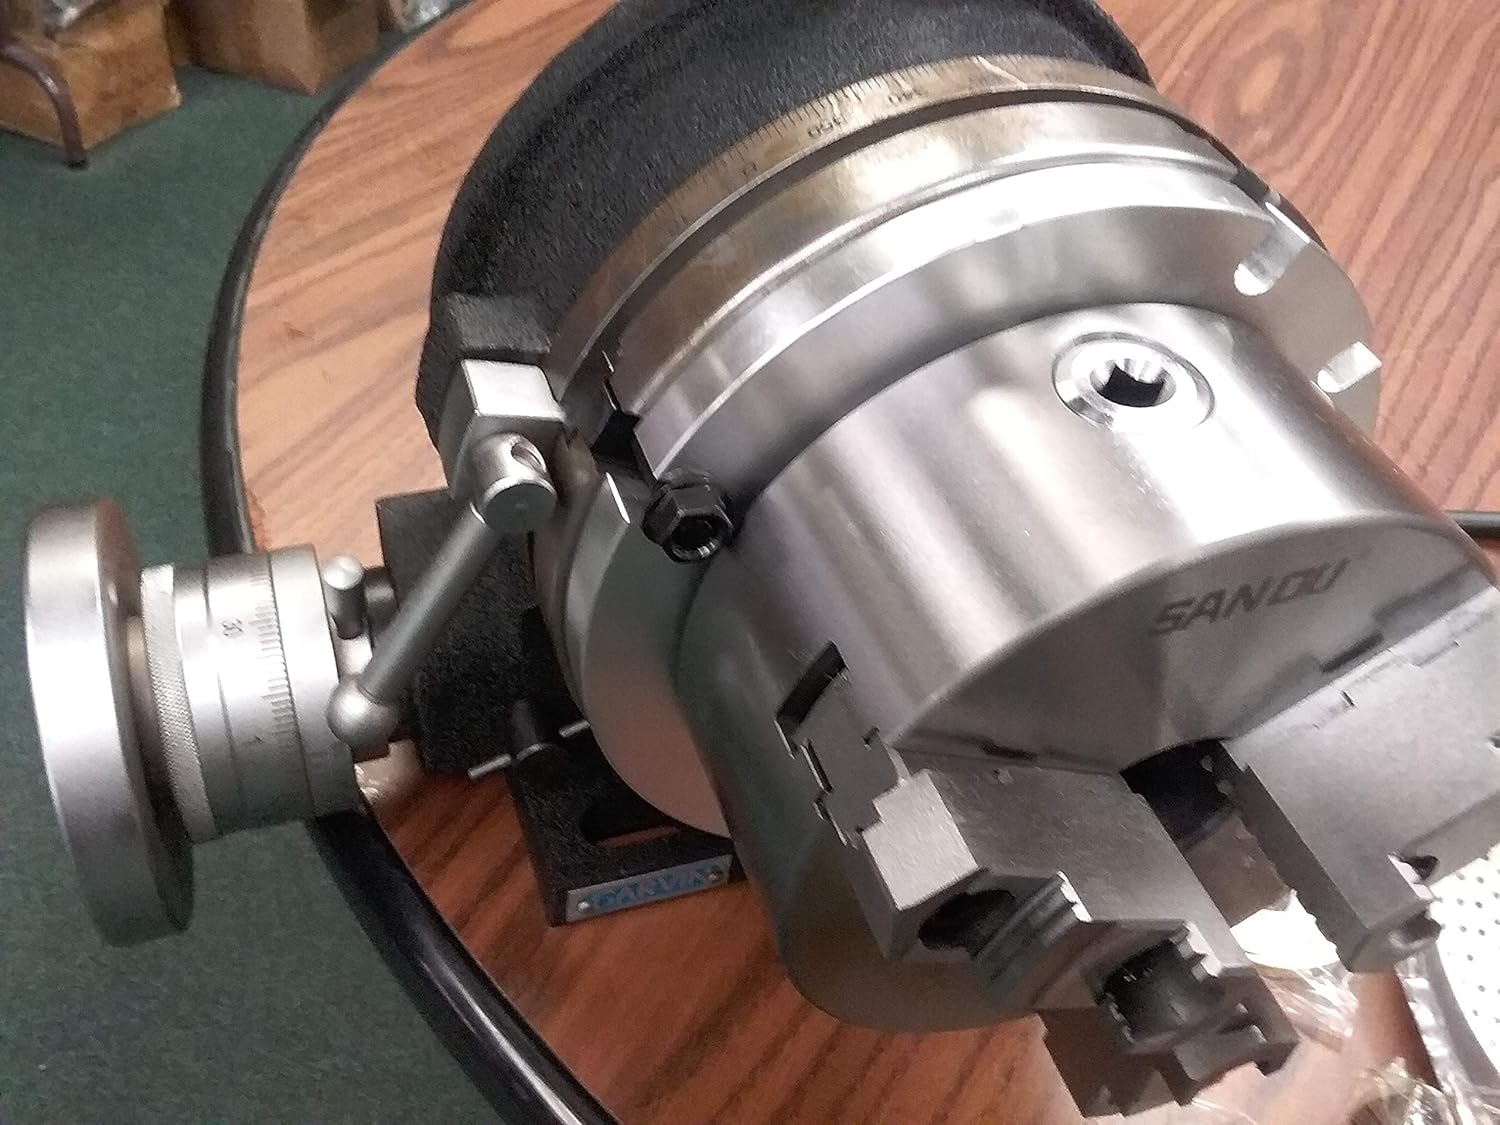
3.1 Main Components
- Rotary Table Body: The main casting that houses the worm gear mechanism.
- Table Platen: The rotating top surface with T-slots for clamping workpieces or chucks.
- Handwheel and Dial: Used for precise angular adjustments, featuring satin chrome dials and a 10-second vernier reading.
- Dual Positive Action Locks: Mechanisms to securely lock the table in position.
- 3-Jaw Chuck: A 6-inch chuck with top and bottom reversible jaws for holding cylindrical workpieces.
- Index Plates (DP-2): Two precision-drilled plates used with an indexing pin for accurate division of circles into specific angles.
- Mounting Bolts: Hardware for securing the chuck and index plates.
- Chuck Key: Tool for tightening and loosening the chuck jaws.
3.2 Product Views


4. Setup
4.1 Unpacking and Inspection
Carefully unpack all components. Inspect for any shipping damage. Verify that all parts listed in the "What's in the Box" section are present:
- 8-inch Precision Horizontal & Vertical Rotary Table
- 6-inch 3-Jaw Chuck with reversible jaws
- 2 pcs Index Plates (DP-2)
- Mounting Bolts for chuck and index plates
- Chuck Key
4.2 Mounting the Rotary Table
The rotary table can be mounted horizontally or vertically on your machine tool's table. Use appropriate T-slot nuts and bolts to secure the base of the rotary table firmly to the machine table. Ensure it is level and stable before proceeding.
4.3 Attaching the 3-Jaw Chuck
- Align the mounting holes on the back of the 3-jaw chuck with the T-slots or pre-drilled holes on the rotary table platen.
- Insert the provided mounting bolts through the chuck and into the T-slots.
- Tighten the mounting bolts securely to prevent any movement of the chuck during operation.
- Familiarize yourself with the chuck key and how to open and close the jaws. The jaws are reversible for internal and external gripping.
4.4 Installing Index Plates
The index plates are used for precise angular divisions. Refer to the specific indexing instructions for your desired division. The index plates attach to the side of the rotary table mechanism.
- Select the appropriate index plate for your desired division.
- Mount the index plate onto the designated spindle on the side of the rotary table.
- Secure the index plate with the provided fasteners.
- Ensure the indexing pin engages correctly with the holes on the plate.
5. Operating Instructions
5.1 Basic Rotation
To rotate the table, loosen the dual positive action locks. Turn the handwheel to achieve the desired angular position. The satin chrome dials provide clear readings. For fine adjustments, utilize the 10-second vernier reading.
Once the desired position is reached, tighten the dual positive action locks firmly to prevent rotation during machining operations.
5.2 Using the 3-Jaw Chuck
- Insert the chuck key into the chuck's pinion.
- Rotate the chuck key to open or close the jaws.
- Place the workpiece securely within the jaws. Ensure the workpiece is centered and held firmly.
- Tighten the jaws using the chuck key. Always remove the chuck key before operating the machine tool.
- To reverse the jaws, fully open them, remove them from their slots, flip them, and reinsert them. Ensure they are correctly seated.
5.3 Precision Indexing with Index Plates
Indexing allows for precise angular division of a circle. The DP-2 index plates provide various hole circles for different divisions.
- Determine the required number of divisions and select the appropriate hole circle on the index plate.
- Engage the indexing pin into the correct hole on the chosen circle.
- Rotate the handwheel until the indexing pin aligns with the next desired hole for the division.
- Ensure the dual positive action locks are engaged after each indexing step to maintain accuracy.
6. Maintenance
Regular maintenance ensures the longevity and accuracy of your rotary table.
- Cleaning: After each use, clean the rotary table, chuck, and index plates to remove chips, dust, and coolant residue. Use a soft cloth and a suitable cleaning agent.
- Lubrication: The gear drive is immersed in oil. Periodically check the oil level and replenish as needed with a high-quality machine oil. Lubricate all moving parts, including the handwheel mechanism and chuck jaws, with light machine oil to ensure smooth operation and prevent corrosion.
- Inspection: Regularly inspect for signs of wear, damage, or loose fasteners. Pay close attention to the worm gear, bearings, and locking mechanisms. Replace worn or damaged parts immediately.
- Storage: When not in use, store the rotary table in a clean, dry environment to prevent rust and corrosion. Apply a thin layer of rust preventative oil to all exposed metal surfaces.
7. Troubleshooting
This section addresses common issues you might encounter with your rotary table.
| Problem | Possible Cause | Solution |
|---|---|---|
| Table difficult to rotate | Locks engaged; lack of lubrication; debris in mechanism | Disengage locks; apply lubricant; clean mechanism thoroughly |
| Inaccurate indexing | Indexing pin not fully engaged; incorrect hole circle selected; loose table locks | Ensure pin is fully engaged; verify hole circle; tighten table locks |
| Chuck jaws not gripping securely | Jaws worn or damaged; debris in jaw mechanism; chuck key not fully tightened | Inspect and replace jaws if necessary; clean jaw slides; ensure chuck key is fully tightened and removed |
| Excessive backlash in handwheel | Worn worm gear; improper adjustment | Consult a qualified technician for inspection and adjustment or replacement of worm gear. |
If you encounter issues not listed here or require further assistance, please contact CME Tools customer support.
8. Specifications
| Feature | Detail |
|---|---|
| Model | 8-inch Precision Horizontal & Vertical Rotary Table (B01KU1VCS2) |
| Table Size | 8 inches (200mm) |
| Center Bore | 3MT (Morse Taper) |
| Chuck Size | 6 inches (3-jaw, reversible jaws) |
| Indexing Plates | DP-2 (2 pieces included) |
| Vernier Reading | 10 seconds |
| Locks | Dual Positive Action Locks |
| Dials | Satin Chrome |
| Material | Alloy Steel |
| Item Weight | 95 Pounds (approx. 43 kg) |
| Compatible Devices | Drilling Machine, Grinding Machine, Lathe, Milling Machine |
| Thread Size | 1/2-20 UNC |
| Handle Type | Hand-tightened |
9. Warranty and Support
9.1 Return Policy
This product is eligible for a 30-day easy return policy, allowing for refund or replacement. Please refer to your purchase documentation for specific terms and conditions.
9.2 Customer Support
For technical assistance, parts inquiries, or any questions regarding your CME Tools 8-inch Precision Horizontal & Vertical Rotary Table, please contact CME Tools customer support. Contact information can typically be found on the product packaging or the official CME Tools website.
Manufacturer: CME
Brand: CME Tools
Ask a question about this manual
Ask about setup, troubleshooting, compatibility, parts, safety, or missing instructions. Manuals+ will review the question and use this page’s manual context to help answer it.