Product Overview
The Whitmor 18-Pair Over-the-Door Shoe Organizer, Model 6905-6019, is a heavy-duty metal shoe rack designed for efficient storage. It features 6 tiers and can neatly store up to 18 pairs of shoes, helping to organize your closet or entryway. The organizer is constructed from durable metal with a sleek gunmetal gray finish, accommodating various shoe styles and heights, including sneakers, flats, short boots, and heels.
This versatile unit includes non-slip door pads to stabilize the rack and protect your door from scuffs. Brackets are also provided for optional wall-mounting, offering flexible installation options. It is designed to work on most residential interior doors that are approximately 1.5 inches deep.

Image: The Whitmor 18-Pair Over-the-Door Shoe Organizer, fully assembled and holding various shoes, hanging on a white interior door.
Components
Before assembly, ensure all components are present. The package includes:
- Main frame components (vertical bars)
- 6 tiers of shoe racks (horizontal bars)
- Mounting brackets for over-the-door installation
- Non-slip door pads
- Tools required for assembly (typically an Allen wrench)
- Optional wall-mounting hardware

Image: A close-up view of the over-the-door bracket, showing its design for hanging the organizer.

Image: A detailed view of how the horizontal shoe rack bars connect to the vertical frame, indicating the assembly points.
Assembly Instructions
Assembly is straightforward and typically takes about 20-30 minutes. Tools are provided. Follow the included assembly instructions carefully.
- Unpack Components: Carefully remove all parts from the packaging and lay them out on a clean, flat surface. Verify all components listed in the "Components" section are present.
- Assemble the Frame: Connect the vertical frame pieces according to the instructions. Ensure all connections are secure.
- Attach Shoe Tiers: Secure each of the 6 shoe tiers to the main frame. The tiers are designed to hold shoes at an angle for easy access. Ensure screws are tightened firmly but do not overtighten.
- Install Over-the-Door Brackets: Attach the over-the-door brackets to the top of the assembled frame. These brackets are designed to fit over most standard interior doors (approximately 1.5 inches deep).
- Apply Non-Slip Pads: Place the non-slip door pads on the lower contact points of the organizer where it meets the door. This prevents movement and protects the door surface.
- Optional Wall Mounting: If you prefer wall mounting, use the provided brackets and appropriate hardware for your wall type. Ensure the rack is securely fastened to wall studs for stability.
- Final Check: Once assembled, gently shake the unit to ensure all connections are stable and secure before placing shoes on it.
Safety Note:
- Always follow the assembly instructions provided.
- Do not overload the rack with more than 36 pairs of shoes.
- Ensure the rack is securely mounted to the door and the non-slip pads are properly attached to prevent slippage and potential injury.
- Always supervise children when using the shoe rack.
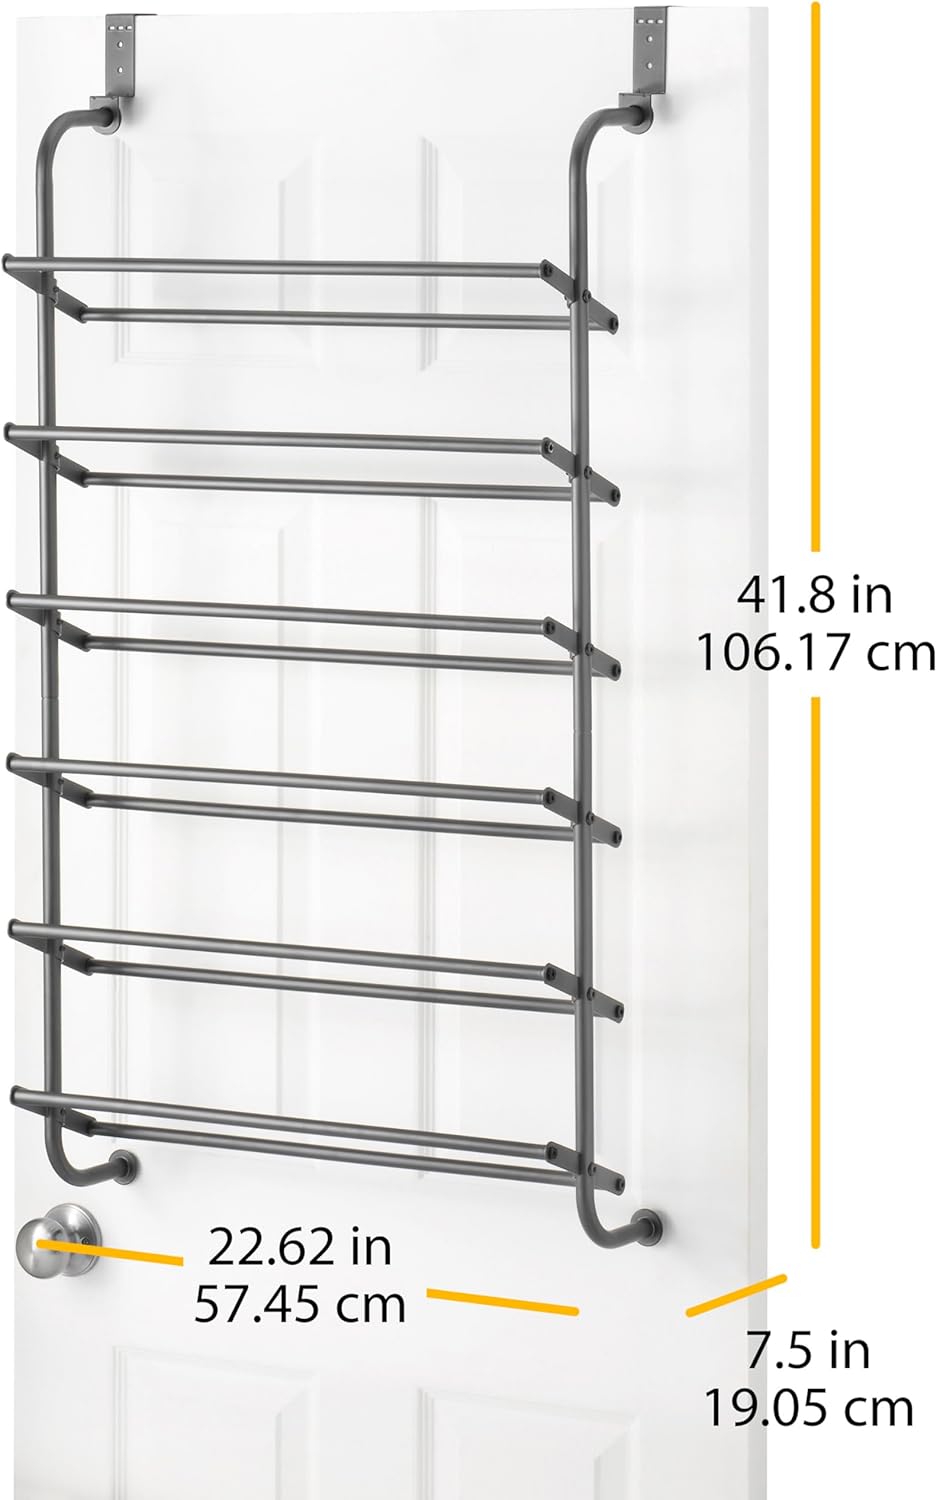
Image: Diagram showing the dimensions of the assembled shoe organizer: 41.8 inches (106.17 cm) in length, 22.62 inches (57.45 cm) in width, and 7.5 inches (19.05 cm) in depth.

Image: A front view of the empty 6-tier over-the-door shoe organizer, showcasing its gunmetal gray metal frame.
Operating Instructions
Using your Whitmor shoe organizer is simple:
- Place one pair of shoes on each tier, with the toe facing outwards for easy visibility and access.
- The angled design of the tiers helps keep shoes securely in place.
- The rack can hold up to 18 pairs of shoes. Distribute weight evenly across the tiers.
- Ensure the door closes properly after installation. If the door does not close smoothly, check for proper alignment of the rack and ensure the non-slip pads are correctly positioned.
Maintenance
To keep your shoe organizer in optimal condition:
- Wipe down the metal frame with a soft, damp cloth as needed to remove dust and dirt.
- Avoid using abrasive cleaners or harsh chemicals, as these may damage the finish.
- Periodically check all screws and connections to ensure they remain tight. Retighten if necessary.
- Ensure the non-slip pads are intact and providing adequate protection to your door. Replace if worn.
Troubleshooting
- Rack is unstable or wobbly:
- Ensure all screws are fully tightened.
- Verify the over-the-door brackets are seated correctly and the non-slip pads are making firm contact with the door.
- If wall-mounted, ensure it is securely fastened to wall studs for stability.
- Door does not close properly:
- Check that the over-the-door brackets are not interfering with the door frame.
- Ensure the rack is centered and not catching on the door jamb.
- The product is designed for most residential interior doors (1.5 inches deep). If your door is thicker, it may not close completely.
- Shoes do not fit well on tiers:
- The rack accommodates many shoe styles and heights. For larger shoes (e.g., men's size 12 or larger), you may need to place them toe-side in or adjust their position.
- Taller items like boots may not fit upright on every tier due to spacing.
- Missing parts or damaged components:
- Contact Whitmor customer support for assistance.
Specifications
| Feature | Detail |
|---|---|
| Model Number | 6905-6019 |
| Dimensions (L x W x H) | 41.8"D x 7.5"W x 22.63"H (approx. 42" L x 22.7" W x 7.5" H) |
| Number of Tiers | 6 |
| Capacity | Up to 18 pairs of shoes |
| Material | Durable Metal (Gunmetal Gray finish) |
| Installation Type | Over the Door, Wall Mount |
| Special Features | Non-slip door pads, accommodates various shoe styles |
| Item Weight | 4.7 Pounds |
Warranty and Support
Whitmor is committed to providing quality organization solutions. If you have any questions, problems, or require assistance with your product, please contact Whitmor customer support for immediate help.
For over 70 years, Whitmor has been dedicated to bringing organization home. Our full-time Consumer Care team is available to assist you with any of our products.
Please refer to the product packaging or the official Whitmor website for the most current warranty information and contact details.


