1. Introduction
This user manual provides comprehensive instructions for the installation, operation, and maintenance of the Chieftec CMR-425 Hard Drive/SSD Enclosure. This device is designed to house 2.5-inch SATA hard drives or solid-state drives, providing a secure and efficient storage solution for personal computers.
2. Product Overview
The Chieftec CMR-425 is a robust enclosure designed for multiple 2.5-inch SATA drives. It features a durable black metal construction and is compatible with SATA I, II, and III interfaces. The enclosure supports drives up to 9.5mm in height and offers a data transfer rate of up to 12 Gigabits per second.

Figure 2.1: Front view of the Chieftec CMR-425 Hard Drive/SSD Enclosure, showing multiple drive bays.

Figure 2.2: Angled view of the enclosure, highlighting the individual drive bay design.

Figure 2.3: Close-up view of an open drive bay, demonstrating the hot-swap mechanism.
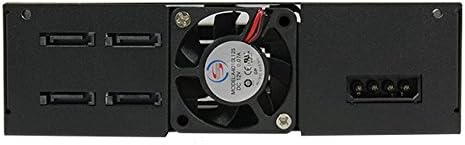
Figure 2.4: Rear view of the enclosure, showing the cooling fan and power/data connectors.

Figure 2.5: Top-down view illustrating the process of inserting a 2.5-inch drive into a bay.
3. Package Contents
Verify that all items are present in the package:
- Chieftec CMR-425 Hard Drive/SSD Enclosure
- Mounting screws (if applicable, typically included for installation)
- User Manual (this document)
Note: Specific accessories may vary. Refer to the product packaging for a complete list.
4. Setup Instructions
Follow these steps to install your 2.5-inch SATA hard drives or SSDs into the CMR-425 enclosure:
- Prepare the Enclosure: Ensure the enclosure is powered off and disconnected from any computer.
- Open a Drive Bay: Gently press the release latch or mechanism on the desired drive bay and pull the tray out. Refer to Figure 2.3 for visual guidance.
- Install the Drive: Place your 2.5-inch SATA HDD or SSD into the drive tray. Ensure the SATA data and power connectors on the drive align with the connectors on the tray. Secure the drive to the tray using the provided screws, if necessary.
- Insert the Drive Tray: Carefully slide the loaded drive tray back into the enclosure bay until it clicks securely into place.
- Connect to PC: Connect the enclosure to your computer using appropriate SATA data cables and power cables. Ensure all connections are firm.
- Power On: Power on the enclosure, then power on your computer. The operating system should detect the new drives.
- Initialize/Format Drives: For new drives, you may need to initialize and format them through your operating system's Disk Management (Windows) or Disk Utility (macOS) before use.
Important: Always handle drives with care to prevent damage from static electricity. Use an anti-static wrist strap if available.
5. Operation
Once installed and recognized by your system, the drives within the CMR-425 enclosure operate like any internal storage device. You can access, read, and write data to them as needed.
- Hot-Swap Functionality: The CMR-425 supports hot-swapping of drives. This means you can remove and insert drives while the enclosure is powered on, provided your operating system and motherboard support this feature and the drives are safely ejected or unmounted first.
- LED Indicators: Each drive bay typically has an LED indicator. A solid light usually indicates power, while a blinking light indicates drive activity (read/write operations).
- Cooling: The enclosure includes a cooling fan (refer to Figure 2.4) to maintain optimal operating temperatures for the installed drives. Ensure proper airflow around the enclosure.
6. Maintenance
Regular maintenance ensures the longevity and optimal performance of your Chieftec CMR-425 enclosure:
- Cleaning: Periodically clean the exterior of the enclosure with a soft, dry cloth. Do not use liquid cleaners or solvents.
- Dust Removal: Ensure the cooling fan and ventilation grilles are free from dust accumulation. Use compressed air to gently clear dust from these areas.
- Firmware Updates: Check the Chieftec official website periodically for any available firmware updates for the CMR-425, which may improve performance or compatibility.
- Environmental Conditions: Operate the enclosure in a well-ventilated area, away from direct sunlight, excessive heat, humidity, and strong magnetic fields.
7. Troubleshooting
If you encounter issues with your CMR-425 enclosure, refer to the following common problems and solutions:
| Problem | Possible Cause | Solution |
|---|---|---|
| Enclosure not detected by PC. | Loose cables, insufficient power, incorrect SATA port. |
|
| Drives not appearing in OS. | Drives not initialized/formatted, driver issues. |
|
| Slow data transfer speeds. | Cable quality, SATA port speed, drive health. |
|
| Enclosure overheating. | Poor ventilation, fan malfunction, excessive load. |
|
If the problem persists after attempting these solutions, please contact Chieftec customer support.
8. Specifications
| Feature | Detail |
|---|---|
| Brand | Chieftec |
| Model Number | CMR-425 |
| Compatible Devices | Personal Computer |
| Hard Disk Form Factor | 2.5 Inches |
| Max Number of Supported Devices | 1 (per bay, total depends on enclosure configuration) |
| Data Transfer Rate | 12 Gigabits Per Second |
| Product Dimensions | 5.75 x 6.61 x 1.65 inches |
| Item Weight | 1.68 pounds (764 Grams) |
| Hardware Interface | Solid State Drive (SATA I/II/III compatible) |
| Color | Black |
| Material | Metal |
| Date First Available | July 22, 2016 |
9. Warranty and Support
The Chieftec CMR-425 Hard Drive/SSD Enclosure comes with a 2-year warranty from the date of purchase. This warranty covers defects in materials and workmanship under normal use.
For technical support, warranty claims, or further assistance, please visit the official Chieftec website or contact their customer service department. Keep your proof of purchase for warranty validation.


