1. Introduction
The SunSun Biological Filter CBF-200A with an integrated 9W UV unit is designed to provide effective biological and mechanical filtration for garden ponds. This system helps maintain clear and healthy pond water by removing suspended particles and reducing algae growth without the need for harsh chemicals. It is suitable for ponds up to 8000 liters without fish or 4000 liters with fish.

Image 1.1: SunSun Biological Filter CBF-200A in a pond environment.
2. Safety Instructions
Please read and understand all safety instructions before operating this device. Failure to follow these instructions may result in electric shock, fire, or serious injury.
- Always disconnect the power supply before performing any maintenance, cleaning, or installation work.
- Do not operate the filter if any part is damaged, especially the power cord or UV lamp housing.
- Ensure the electrical outlet is properly grounded and protected by a Residual Current Device (RCD) with a tripping current not exceeding 30 mA.
- Keep the device out of reach of children and pets.
- Do not immerse the electrical components in water.
- The UV-C lamp emits harmful radiation. Never look directly at the illuminated UV-C lamp. Replace the UV-C lamp only when the device is disconnected from the power supply.
- Install the filter on a stable, level surface to prevent tipping and ensure proper water flow.
3. Product Overview and Components
The SunSun CBF-200A filter system combines mechanical and biological filtration with a UV-C clarifier for comprehensive water treatment. Key components include:
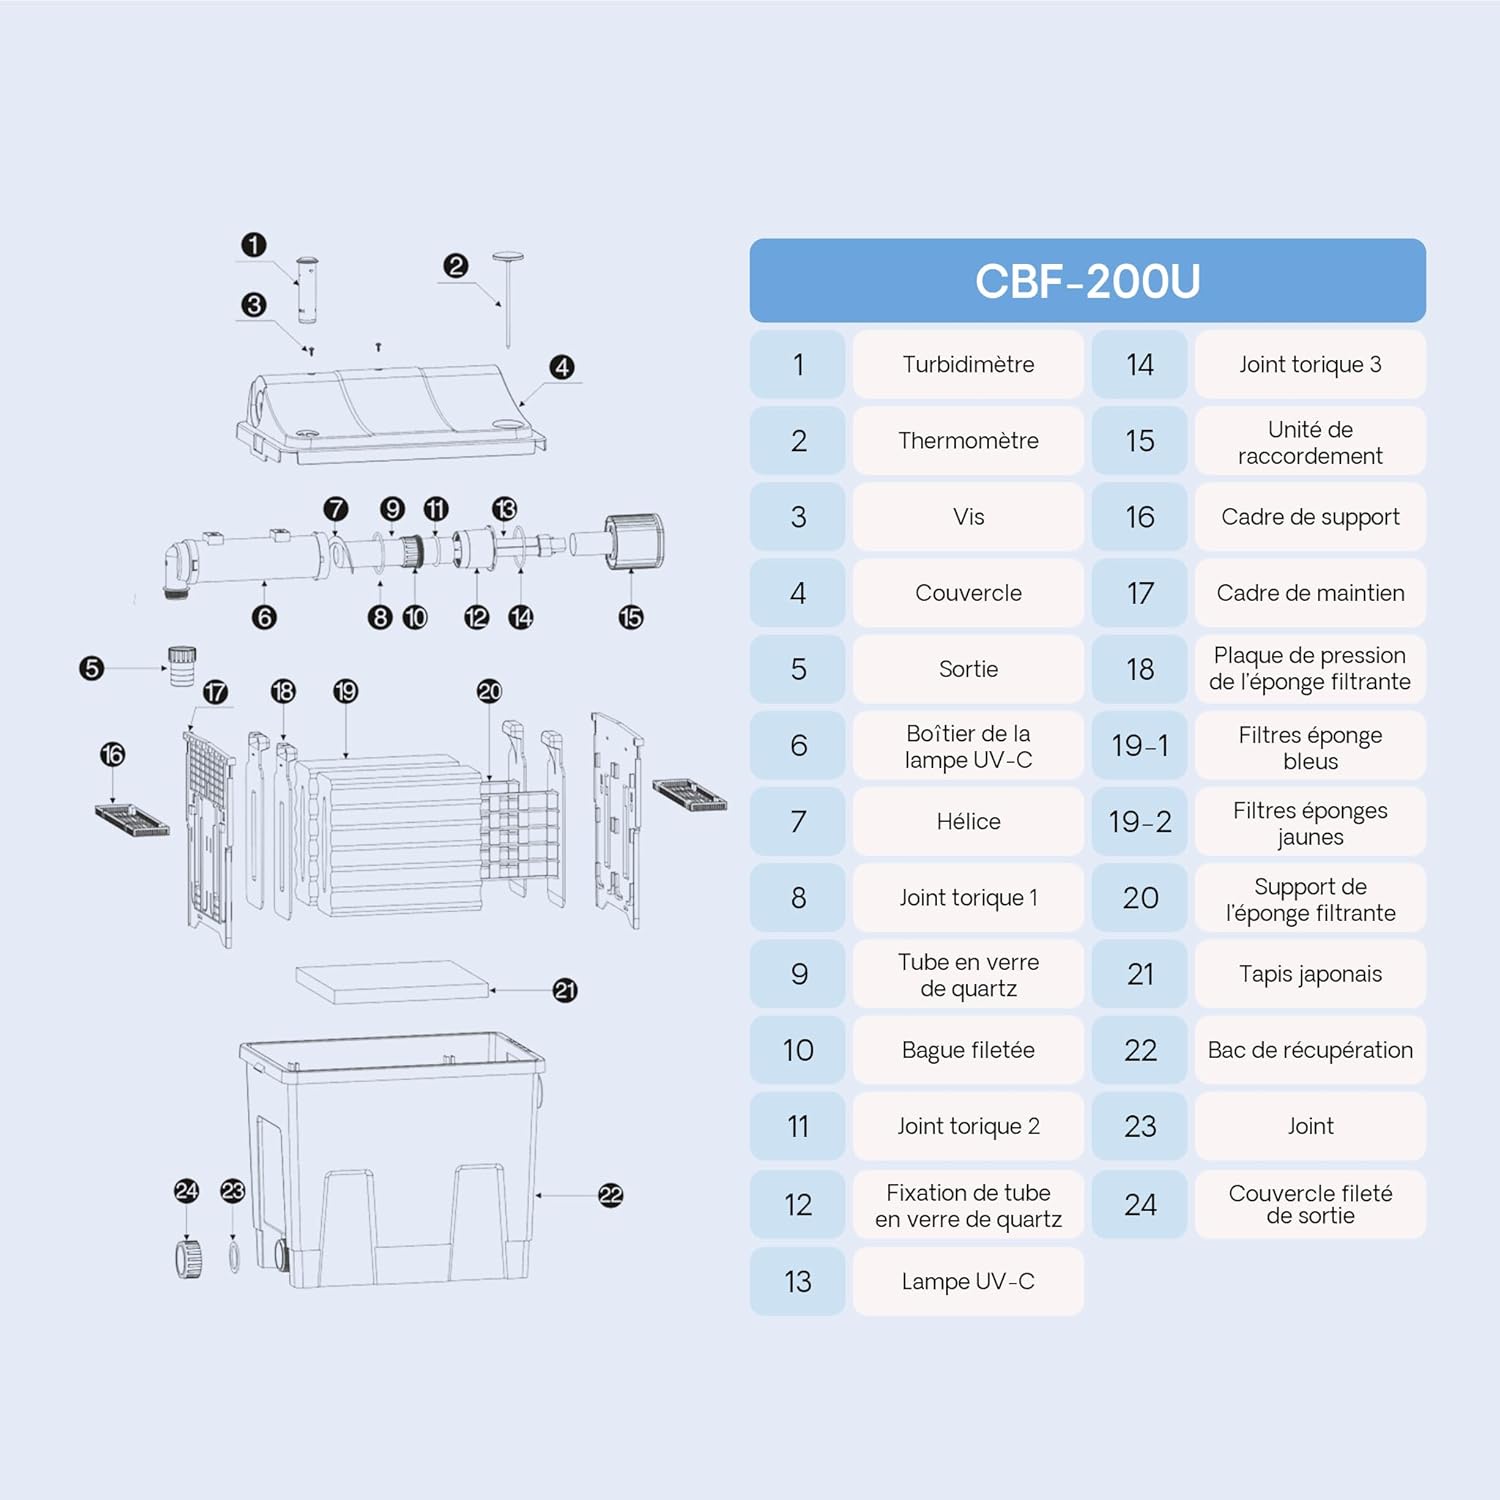
Image 3.1: Exploded view of the CBF-200A filter components.
| No. | Component | No. | Component |
|---|---|---|---|
| 1 | Turbidimeter | 14 | O-ring 3 |
| 2 | Thermometer | 15 | Connection Unit |
| 3 | Screw | 16 | Support Frame |
| 4 | Lid | 17 | Filter Sponge Pressure Plate |
| 5 | Outlet | 18 | Blue Filter Sponges |
| 6 | UV-C Lamp Housing | 19-1 | Yellow Filter Sponges |
| 7 | Impeller | 19-2 | Filter Sponge Support |
| 8 | O-ring 1 | 20 | Japanese Mat |
| 9 | Quartz Glass Tube | 21 | Collection Tray |
| 10 | Threaded Ring | 22 | Gasket |
| 11 | O-ring 2 | 23 | Threaded Outlet Cover |
| 12 | Quartz Glass Tube Holder | 24 | |
| 13 | UV-C Lamp |
Filtration Media

Image 3.2: Internal filtration materials.
- Filter Sponges: Two specific sponges (blue and yellow) provide mechanical filtration, trapping fine and coarse particles.
- Japanese Mat: A polyester monofilament mat offers an ideal colonization surface for nitrifying bacteria, promoting biological purification.
- Bio-balls: Approximately 15 bio-balls provide additional surface area for beneficial bacteria to thrive, enhancing biological filtration.
4. Setup and Installation
The filter system is designed for simple and autonomous operation, requiring a standard pond pump and hose (not included).
4.1 Placement
- Place the filter on a firm, level surface next to your pond. It must be stable and not prone to tipping.
- Ensure the filter is positioned lower than the pond's water level to allow for gravity-fed return flow, or ensure your pump is capable of pushing water to the desired outlet height.
4.2 Connections
- Inlet Connection: Connect a suitable pond pump (not included) to the filter's inlet port. Ensure a tight, leak-free connection.
- Outlet Connection: Connect a hose to the filter's outlet port to return filtered water to the pond.
- UV Lamp Connection: Ensure the UV lamp is correctly seated within its housing and the electrical connection is secure. The UV lamp is pre-installed but verify its position.

Image 4.1: Product dimensions and connection points.
5. Operating Instructions
5.1 Initial Startup
- After all connections are secure and the filter is properly placed, turn on the pond pump.
- Allow water to fill the filter chamber. Check for any leaks.
- Once water is flowing smoothly through the outlet, connect the filter's power supply to activate the UV unit.
5.2 Monitoring

Image 5.1: Efficient pond filter flow diagram.
- Turbidimeter: The integrated orange float (turbidimeter) indicates when the filter media requires cleaning. When the float rises, it signifies increased resistance due to accumulated dirt.
- Thermometer: The built-in thermometer displays the water temperature, ranging from 8°C to 40°C, allowing you to monitor pond conditions.
- Flow Rate: The system supports a maximum flow rate of 6000 liters per hour.

Image 5.2: Thermometer and Turbidimeter details.
6. Maintenance
Regular maintenance ensures optimal performance and longevity of your filter system.
6.1 Cleaning Filter Media
Clean the filter sponges and Japanese mat when the turbidimeter indicates a need for cleaning (orange float rises).
- Disconnect Power: Always disconnect the filter and pump from the power supply before cleaning.
- Open Filter: Carefully open the filter lid.
- Remove Sponges: Remove the filter sponges one by one. Important: Do not clean all filter sponges at once. Clean only one or two at a time to preserve beneficial bacteria colonies.
- Rinse Sponges: Squeeze and rinse the removed sponges thoroughly with pond water (not tap water, as chlorine can kill beneficial bacteria).
- Drain Dirty Water: Open the drainage port to allow dirty water to drain from the filter housing.
- Reassemble: Place the cleaned sponges back into the filter, close the lid securely, and reconnect power.

Image 6.1: Filter media cleaning process.
6.2 UV Lamp Replacement
The UV-C lamp has a limited lifespan and should be replaced approximately every 8000 operating hours or annually, even if it still appears to be working, as its germicidal effectiveness diminishes over time.
- Disconnect Power: Absolutely ensure the filter is disconnected from the power supply.
- Access UV Unit: Follow the instructions in the exploded view (Image 3.1) to safely access the UV-C lamp housing.
- Remove Old Lamp: Carefully remove the old UV-C lamp and quartz glass tube. Handle the new lamp by its base to avoid touching the glass.
- Install New Lamp: Insert the new 9W UV-C lamp and reassemble the unit, ensuring all seals and O-rings are correctly seated to prevent water ingress.
- Reconnect Power: Once fully reassembled, reconnect the power supply.

Image 6.2: UV-C lamp and quartz glass tube.
7. Troubleshooting
| Problem | Possible Cause | Solution |
|---|---|---|
| Water remains cloudy/green | Clogged filter media; UV lamp ineffective or faulty; Pond too large for filter capacity; Insufficient pump flow. | Clean filter sponges and mat. Check/replace UV lamp. Verify pond size against filter capacity. Ensure pump is providing adequate flow. |
| Reduced water flow from outlet | Clogged filter media; Blockage in inlet/outlet hoses; Pump issue. | Clean filter media. Check hoses for blockages. Inspect pond pump for proper operation. |
| UV lamp not illuminating | Lamp faulty; Electrical connection loose; UV ballast failure. | Disconnect power, check lamp connection. Replace UV lamp. If still not working, contact support for ballast inspection. |
| Water leaking from filter | Lid not properly sealed; Damaged O-rings; Loose hose connections. | Ensure lid is securely fastened. Check O-rings for damage and proper seating. Tighten all hose connections. |
8. Specifications
- Model: CBF-200A
- Item Model Number: 51189
- Dimensions (L x W x H): 40 x 27 x 40 cm
- Item Weight: 3.9 Kilograms
- UV-C Power: 9 W
- Maximum Flow Rate: 6000 L/h
- Recommended Pond Volume (without fish): Up to 8000 L
- Recommended Pond Volume (with fish): Up to 4000 L
- Filter Media: Filter sponges (fine/coarse), Japanese mat, Bio-balls
- Features: Integrated thermometer, turbidimeter (dirt indicator)
- Manufacturer: SunSun
- Country of Origin: China
9. Warranty and Support
For warranty information, please refer to the documentation provided with your purchase or contact your retailer. SunSun products are typically covered by a manufacturer's warranty against defects in materials and workmanship.
For technical support, spare parts, or further assistance, please contact your point of purchase or visit the official SunSun website for contact details.


