1. Safety Information
Please read this manual carefully before using the device to ensure proper operation and to prevent damage. Keep this manual for future reference.
- Do not expose the device to extreme temperatures, direct sunlight for prolonged periods, or high humidity.
- Ensure the device is securely mounted and does not obstruct the driver's view or interfere with vehicle controls.
- Use only the provided power adapter to prevent damage to the device and vehicle electrical system.
- Do not attempt to disassemble or repair the device yourself. Contact qualified service personnel for assistance.
- Insert and remove the microSD card only when the device is powered off to prevent data corruption.
2. Package Contents
Verify that all items are present in the package:
- FOREVER VR-110 Dash Camera
- Suction Cup Mount
- Car Charger (USB power adapter)
- USB Cable
- User Manual
3. Product Overview
Familiarize yourself with the components of your VR-110 dash camera.
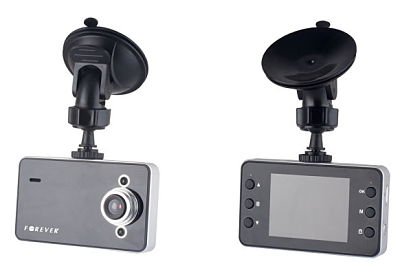
Figure 3.1: Front view of the FOREVER VR-110 Dash Camera attached to its suction cup mount. The camera features a screen on the front face and control buttons on the sides.
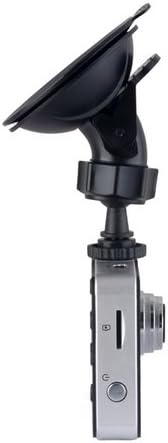
Figure 3.2: Side view of the FOREVER VR-110 Dash Camera, showing the microSD card slot and the power button. The lens is visible on the opposite side.
3.1. Device Layout
- Lens: Records video footage.
- 2.4" Display Screen: Shows live view, recorded videos, and menu options.
- Control Buttons: Navigate menus, start/stop recording, and access functions. (Specific button functions will be detailed in the Operating section).
- MicroSD Card Slot: For inserting the memory card (up to 32GB, not included).
- USB Port: For power supply and data transfer.
- Mounting Point: Connects to the suction cup mount.
4. Setup
4.1. Inserting the MicroSD Card
- Ensure the dash camera is powered off.
- Locate the microSD card slot on the side of the device (refer to Figure 3.2).
- Gently insert the microSD card with the gold contacts facing the back of the camera until it clicks into place.
- To remove, push the card in slightly until it springs out.
Note: A Class 10 or higher microSD card (up to 32GB) is recommended for reliable recording. Format the card in the camera's settings before first use.
4.2. Mounting the Dash Camera
- Clean the desired area on your windshield thoroughly.
- Attach the suction cup mount to the dash camera's mounting point.
- Press the suction cup firmly against the windshield and flip the lever to secure it.
- Adjust the camera angle to ensure a clear view of the road ahead, without obstructing your driving visibility.

Figure 4.1: The FOREVER VR-110 Dash Camera mounted on a car windshield, showing its position relative to the dashboard and road view.
4.3. Powering the Device
- Connect the car charger to the USB port on the dash camera.
- Plug the other end of the car charger into your vehicle's 12V power outlet (cigarette lighter socket).
- The camera will typically power on automatically when the vehicle's ignition is turned on and begin recording.
5. Operating the Dash Camera
5.1. Basic Recording
Once powered on, the VR-110 will automatically start recording. A red indicator or icon on the screen will confirm recording is active.
- Start/Stop Recording: Press the designated button (usually 'OK' or a record icon) to manually start or stop recording if auto-record is off.
- Loop Recording: The camera records video in segments (e.g., 1, 3, or 5 minutes). When the memory card is full, the oldest unlocked files are overwritten. This ensures continuous recording.
5.2. G-Sensor Function
The built-in G-sensor detects sudden impacts or rapid acceleration/deceleration. When triggered, it automatically locks the current video segment, preventing it from being overwritten by loop recording. This protects important footage in case of an accident.
- Sensitivity Adjustment: The G-sensor sensitivity can usually be adjusted in the camera's settings menu (e.g., Low, Medium, High, Off). A higher sensitivity will trigger the lock function more easily.
5.3. Menu Navigation
Use the control buttons on the device to navigate through the settings menu.
- Menu Button: Press to enter the main menu.
- Up/Down Buttons: Scroll through menu options.
- OK Button: Select an option or confirm a setting.
- Mode Button: Switch between video recording, photo mode, and playback mode.
5.4. Video Resolution Settings
The VR-110 supports the following video resolutions:
- 1280 x 720 (HD): Provides higher detail.
- 640 x 480: Standard definition, uses less storage space.
You can select your preferred resolution in the camera's video settings menu.
6. Maintenance
6.1. Cleaning the Device
- Use a soft, dry cloth to clean the camera body and screen.
- For the lens, use a specialized lens cleaning cloth to avoid scratches.
- Do not use liquid cleaners or abrasive materials.
6.2. MicroSD Card Management
- Formatting: It is recommended to format the microSD card regularly (e.g., once a month) using the camera's format function to ensure optimal performance and prevent data corruption. Formatting will erase all data on the card.
- Storage: If not using the camera for an extended period, remove the microSD card and store it safely.
7. Troubleshooting
If you encounter issues with your VR-110 dash camera, refer to the following common problems and solutions:
| Problem | Possible Cause | Solution |
|---|---|---|
| Camera does not power on. | No power supply; faulty car charger; loose connection. | Check car charger connection; ensure vehicle's 12V outlet is working; try a different USB cable/charger. |
| Camera stops recording or shows 'Card Error'. | MicroSD card full; card not formatted; faulty card; slow card speed. | Format the microSD card; replace with a new Class 10 or higher card; check for physical damage to the card. |
| Video footage is blurry. | Protective film on lens; dirty lens; incorrect focus (rare). | Remove any protective film from the lens; clean the lens with a soft cloth. |
| G-sensor is too sensitive/not sensitive enough. | G-sensor sensitivity setting is inappropriate. | Adjust G-sensor sensitivity in the camera's settings menu. |
8. Specifications
- Model Name: VR-110
- Display Size: 2.4 inches
- Video Resolution: 1280 x 720 (HD), 640 x 480 / 30 fps
- File Formats: AVI (Video), JPEG (Photo)
- Special Features: G-sensor, Loop Recording
- Memory Card Slot: MicroSD (up to 32GB, Class 10 recommended)
- Connectivity: USB
- Mounting Type: Suction Cup Mount
- Color: Grey
9. Warranty and Support
For warranty information and technical support, please refer to the documentation provided at the time of purchase or contact your retailer. Keep your proof of purchase for any warranty claims.