1. Introduction
Thank you for choosing the iCarsoft i906 Multi-System Diagnostic Scanner. This device is specifically designed for Volvo and Saab vehicles, offering comprehensive diagnostic capabilities to help you identify and resolve vehicle issues. This manual provides detailed instructions on how to set up, operate, and maintain your i906 scanner. Please read this manual thoroughly before using the device to ensure proper operation and to prevent damage.
2. Product Overview
2.1 Package Contents
Upon opening the package, please verify that all the following items are included:
- iCarsoft i906 Diagnostic Tool (available in various colors)
- Main Diagnostic Cable (OBD-II to device connector)
- PC Connecting Cable (USB cable)
- TF Card (pre-installed or included separately)
- User's Manual
- Nylon Carry Case
- Product Packaging

Figure 2.1: Contents of the iCarsoft i906 package. This image displays the diagnostic tool in various colors (red, blue, black, orange), along with its accessories: the main diagnostic cable, PC connecting cable, TF card, user manual, and a nylon carry case, all neatly arranged next to the product packaging.
2.2 Key Features
The iCarsoft i906 scanner offers a range of powerful features for vehicle diagnostics:
- Read and clear Diagnostic Trouble Codes (DTCs) from various systems.
- Supports multiple vehicle systems for Volvo and Saab.
- Live data stream display.
- Full system diagnosis.
- Oil Service Reset.
- Electronic Parking Brake (EPB) system maintenance.
- Battery Management System (BMS) reset.
- Diesel Particulate Filter (DPF) regeneration.
- Electronic Throttle Control System (ETC) learning.
- Steering Angle Sensor (SAS) calibration.
- Injector coding.
- ABS Bleeding.
- Easy-to-use interface with a clear display.
- Software updates via PC.

Figure 2.2: Multiple iCarsoft i906 units showcasing the available color variations. The image features four diagnostic scanners, each in a distinct color (black, red, blue, and orange), standing upright on a circular white platform.
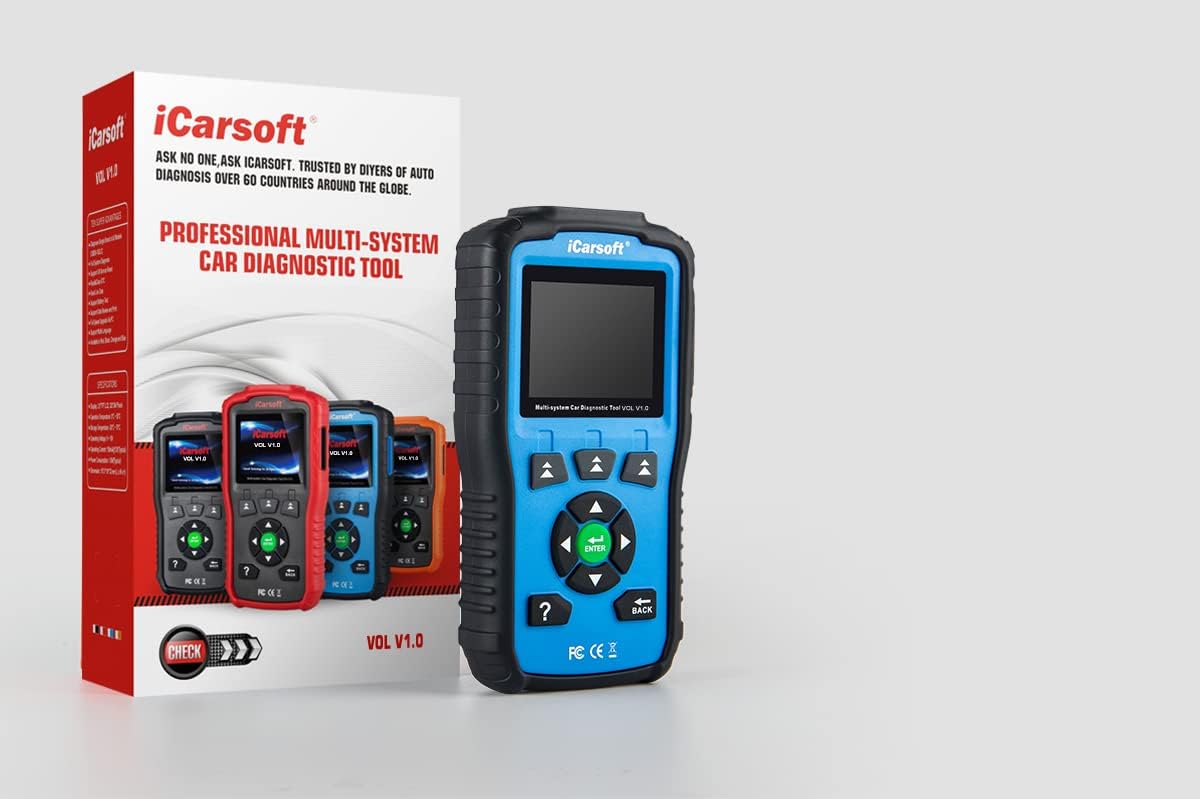
Figure 2.3: iCarsoft i906 diagnostic scanner with its retail packaging. This image shows a blue iCarsoft i906 device positioned to the right of its white and red product box, highlighting the device's design and branding.

Figure 2.4: Detailed view of the iCarsoft i906's connection ports. The image provides a close-up of the bottom of the diagnostic tool, clearly showing a standard USB port and a larger multi-pin diagnostic connector, which is used to attach the main diagnostic cable.
3. Setup
3.1 Connecting to the Vehicle
- Locate the vehicle's Data Link Connector (DLC), typically an OBD-II port. This is usually found under the dashboard on the driver's side.
- Ensure the vehicle's ignition is in the "OFF" position.
- Connect the main diagnostic cable to the i906 scanner's multi-pin port.
- Connect the other end of the main diagnostic cable (OBD-II connector) to the vehicle's DLC.
- Once connected, turn the vehicle's ignition to the "ON" position (engine can be off). The scanner will power on automatically.

Figure 3.1: iCarsoft i906 scanner connected to its OBD-II diagnostic cable. The image shows the blue diagnostic tool with its multi-pin port connected to the coiled black OBD-II cable, illustrating how the device connects to the vehicle's diagnostic port.
3.2 Initial Device Setup
Upon first use or after a factory reset, you may be prompted to select your preferred language and region settings. Follow the on-screen instructions to complete this initial setup.
4. Operating Instructions
4.1 Navigating the Menu
The i906 scanner features a user-friendly interface with directional buttons and an ENTER button for navigation.
- Use the UP and DOWN arrows to scroll through menu options.
- Use the LEFT and RIGHT arrows to navigate between screens or adjust settings.
- Press the ENTER button to confirm a selection or enter a submenu.
- Press the BACK button to return to the previous screen.
- The ? button typically provides help or information about the current screen.
4.2 Reading Diagnostic Trouble Codes (DTCs)
- From the main menu, select "Diagnose" or "Scan".
- Choose the vehicle make (Volvo or Saab) and model if prompted.
- Select the system you wish to scan (e.g., Engine, ABS, Airbag, Transmission).
- The scanner will communicate with the vehicle's ECU and display any detected DTCs. Each DTC will typically include a code and a brief description.
4.3 Clearing Diagnostic Trouble Codes (DTCs)
After addressing the underlying issue that caused the DTC, you can clear the codes from the vehicle's memory.
- Ensure the vehicle's ignition is ON and the engine is OFF.
- Navigate to the "Clear Codes" or "Erase DTCs" option within the diagnostic menu for the relevant system.
- Confirm your selection when prompted.
- The scanner will attempt to clear the codes. A confirmation message will appear upon successful completion.
- Note: Clearing DTCs without fixing the underlying problem will result in the codes reappearing.
4.4 Live Data Stream
The Live Data Stream function allows you to view real-time sensor data from the vehicle's systems. This can be invaluable for diagnosing intermittent issues.
- From the diagnostic menu, select "Live Data" or "Data Stream".
- Choose the parameters you wish to monitor.
- The data will be displayed in numerical or graphical format.
4.5 Special Functions
The i906 supports various special functions for specific vehicle maintenance tasks. These may include Oil Service Reset, EPB Reset, BMS Reset, DPF Regeneration, ETC Learning, SAS Calibration, Injector Coding, and ABS Bleeding.
- Access these functions from the "Special Functions" or "Service" menu.
- Follow the on-screen prompts carefully, as incorrect procedures can cause damage.
- Refer to your vehicle's service manual for specific requirements for these procedures.
5. Maintenance
5.1 Cleaning the Device
To maintain the longevity and performance of your i906 scanner:
- Use a soft, damp cloth to clean the exterior of the device.
- Do not use abrasive cleaners or solvents.
- Keep the screen clean and free of scratches.
5.2 Storage
When not in use, store the i906 scanner in its nylon carry case in a dry, cool place, away from direct sunlight and extreme temperatures.
5.3 Software Updates
iCarsoft regularly releases software updates to improve functionality, add new vehicle models, and fix bugs. It is recommended to keep your device's software up to date.
- Visit the official iCarsoft website (www.icarsoft.com) to download the latest update tool and firmware.
- Connect the i906 scanner to your computer using the provided PC connecting cable.
- Follow the instructions provided by the update tool to perform the software update.
6. Troubleshooting
| Problem | Possible Cause | Solution |
|---|---|---|
| Device does not power on. |
|
|
| Communication error with vehicle. |
|
|
| Codes cannot be cleared. |
|
|
7. Specifications
| Attribute | Value |
|---|---|
| Manufacturer | iCarsoft |
| Brand | iCarsoft |
| Model | i906 (VOL V1.0) |
| Item Weight | 540 g |
| Package Dimensions | 23.6 x 14.2 x 5.8 cm |
| Screen Size | 2.8 Inches |
| Power Source | Electric Cable (via OBD-II port) |
| Operating System (for PC connection) | Windows 7 and above |
| ASIN | B01IEZRXYI |
8. Warranty and Support
For warranty information, please refer to the warranty card included with your product or visit the official iCarsoft website.
If you encounter any issues or have questions regarding the operation of your iCarsoft i906 scanner, please contact iCarsoft customer support through their official website: www.icarsoft.com.


