1. Introduction
This manual provides essential instructions for the safe assembly, operation, and maintenance of your Greenworks 40V 8-inch Pole Saw and Pole Hedge Trimmer Combo Kit. This kit includes a pole saw attachment and a pole hedge trimmer attachment, designed for trimming branches and hedges. Please read this manual thoroughly before using the product and retain it for future reference.

Image 1.1: The Greenworks 40V Pole Saw and Pole Hedge Trimmer Combo Kit, including the main unit, pole saw attachment, hedge trimmer attachment, 40V 2.0Ah battery, and charger.
2. Safety Instructions
Always observe basic safety precautions to reduce the risk of fire, electric shock, and personal injury when operating power tools. Failure to follow these instructions may result in serious injury.
General Safety Warnings
- Read All Instructions: Familiarize yourself with the controls and proper use of the tool.
- Wear Appropriate Personal Protective Equipment (PPE): Always wear safety glasses or goggles, hearing protection, heavy-duty gloves, and non-slip footwear. A hard hat is recommended when using the pole saw.
- Maintain a Safe Working Area: Keep the area clear of bystanders, children, and pets. Ensure good footing and balance, especially when working at height.
- Inspect the Tool Before Use: Check for damaged parts, loose fasteners, or any other condition that may affect safe operation. Do not use if damaged.
- Avoid Dangerous Environments: Do not use power tools in damp or wet locations, or expose them to rain.
- Secure the Workpiece: Ensure branches or hedges are stable before cutting.
- Battery Safety: Use only the specified battery and charger. Do not charge batteries in wet or explosive atmospheres.
- Proper Handling: Carry the tool with the motor stopped and the chain/blade guard in place.
- Electrical Safety: Avoid contact with power lines. Maintain a safe distance from electrical wires.
Specific Pole Saw Safety
- Kickback Prevention: Be aware of the chain saw kickback zone. Avoid contact of the guide bar tip with any object.
- Proper Cutting Technique: Always make a shallow undercut first, then the main cut from above to prevent pinching.
- Chain Tension: Ensure the chain is properly tensioned before and during operation. A loose chain can derail and cause injury.
Specific Pole Hedge Trimmer Safety
- Blade Contact: Keep hands and all body parts away from the blades.
- Clear Debris: Ensure the area is clear of debris before starting.
3. Package Contents
Verify that all items are present and undamaged upon unpacking:
- Power Head Unit
- Pole Saw Attachment (8-inch bar and chain)
- Pole Hedge Trimmer Attachment (20-inch dual-action blade)
- Extension Pole (3-piece aluminum shaft)
- 2.0Ah 40V Lithium-Ion Battery
- 40V Battery Charger
- Blade Cover
- Owner's Manual

Image 3.1: Front view of the Greenworks 40V Pole Saw and Pole Hedge Trimmer Combo Kit, showing the main components.
4. Assembly and Setup
Before assembly, ensure the battery is removed from the tool.
4.1 Attaching the Extension Pole
- Align the male end of the extension pole with the female receptacle on the power head unit.
- Push the two sections together until the spring-loaded button locks into place.
- Tighten the coupling nut securely by hand.
- Repeat for additional extension pole sections if desired, up to the maximum recommended length.
4.2 Attaching the Pole Saw Attachment
- Ensure the chain is correctly installed on the guide bar and the bar is properly seated.
- Align the male end of the pole saw attachment with the female receptacle of the last extension pole section (or power head if no extension is used).
- Push the sections together until the spring-loaded button locks into place.
- Tighten the coupling nut securely by hand.
- Fill the automatic oiler reservoir with appropriate bar and chain oil.
4.3 Attaching the Pole Hedge Trimmer Attachment
- Align the male end of the pole hedge trimmer attachment with the female receptacle of the last extension pole section (or power head if no extension is used).
- Push the sections together until the spring-loaded button locks into place.
- Tighten the coupling nut securely by hand.

Image 4.1: Illustration of the interchangeable design, allowing easy switching between the pole saw and pole hedge trimmer attachments.
5. Operating Instructions
Always ensure the battery is fully charged before beginning operation.
5.1 Battery Installation and Charging
- To install the battery, slide it into the battery port on the power head until it clicks into place.
- To remove, press the battery release button and slide the battery out.
- To charge, connect the charger to a power outlet and slide the battery onto the charger. Refer to the charger manual for specific charging indicators and times.

Image 5.1: The Greenworks 40V 2.0Ah Lithium-Ion battery and its dedicated charger.
5.2 Operating the Pole Saw
- Ensure the chain is properly tensioned and the oil reservoir is filled.
- Grip the tool firmly with both hands.
- Engage the safety lock-off button, then press the trigger to start the saw.
- Position the saw blade against the branch. Make a shallow undercut first, then complete the cut from the top.
- Allow the saw to cut without forcing it. The 8-inch bar is designed for efficient trimming of branches.

Image 5.2: A user operating the pole saw to trim branches at an elevated height, demonstrating the reach provided by the durable 3-piece aluminum shaft.
5.3 Operating the Pole Hedge Trimmer
- Grip the tool firmly with both hands.
- Engage the safety lock-off button, then press the trigger to start the hedge trimmer.
- The 7-position pivoting head allows for trimming at various angles. Adjust the head by pressing the pivot release button and rotating to the desired angle.
- Move the trimmer smoothly along the hedge, allowing the 20-inch dual-action blades to cut.

Image 5.3: A user demonstrating the Greenworks 40V pole hedge trimmer, highlighting the 7-position pivoting head for versatile trimming angles.
6. Maintenance
Regular maintenance ensures optimal performance and extends the life of your tool. Always remove the battery before performing any maintenance.
6.1 Pole Saw Maintenance
- Chain Tensioning: Regularly check and adjust chain tension. The chain should be snug but still able to be pulled around the guide bar by hand. The tool features easy adjust tensioning for quick adjustments.
- Automatic Oiler: The automatic oiler applies oil to the bar and chain during operation. Regularly check the oil level and refill with appropriate bar and chain oil to ensure durability and extend chain life.
- Chain Sharpening: A dull chain requires more force and can cause kickback. Sharpen the chain as needed or replace it.
- Cleaning: After each use, clean sawdust and debris from the guide bar, chain, and motor housing.

Image 6.1: Close-up view of the pole saw in action, illustrating the automatic oiler feature that lubricates the bar and chain for optimal use.

Image 6.2: Close-up of the pole saw's cutting mechanism, highlighting the tool-free chain tensioning system for quick and easy adjustments.
6.2 Pole Hedge Trimmer Maintenance
- Blade Cleaning: After each use, clean the blades of sap and debris. Apply a light coat of machine oil to prevent rust.
- Blade Sharpening: If the blades become dull, they can be sharpened by a qualified service technician.
- Blade Cover: Always store the hedge trimmer with the blade cover in place to prevent accidental injury and protect the blades.
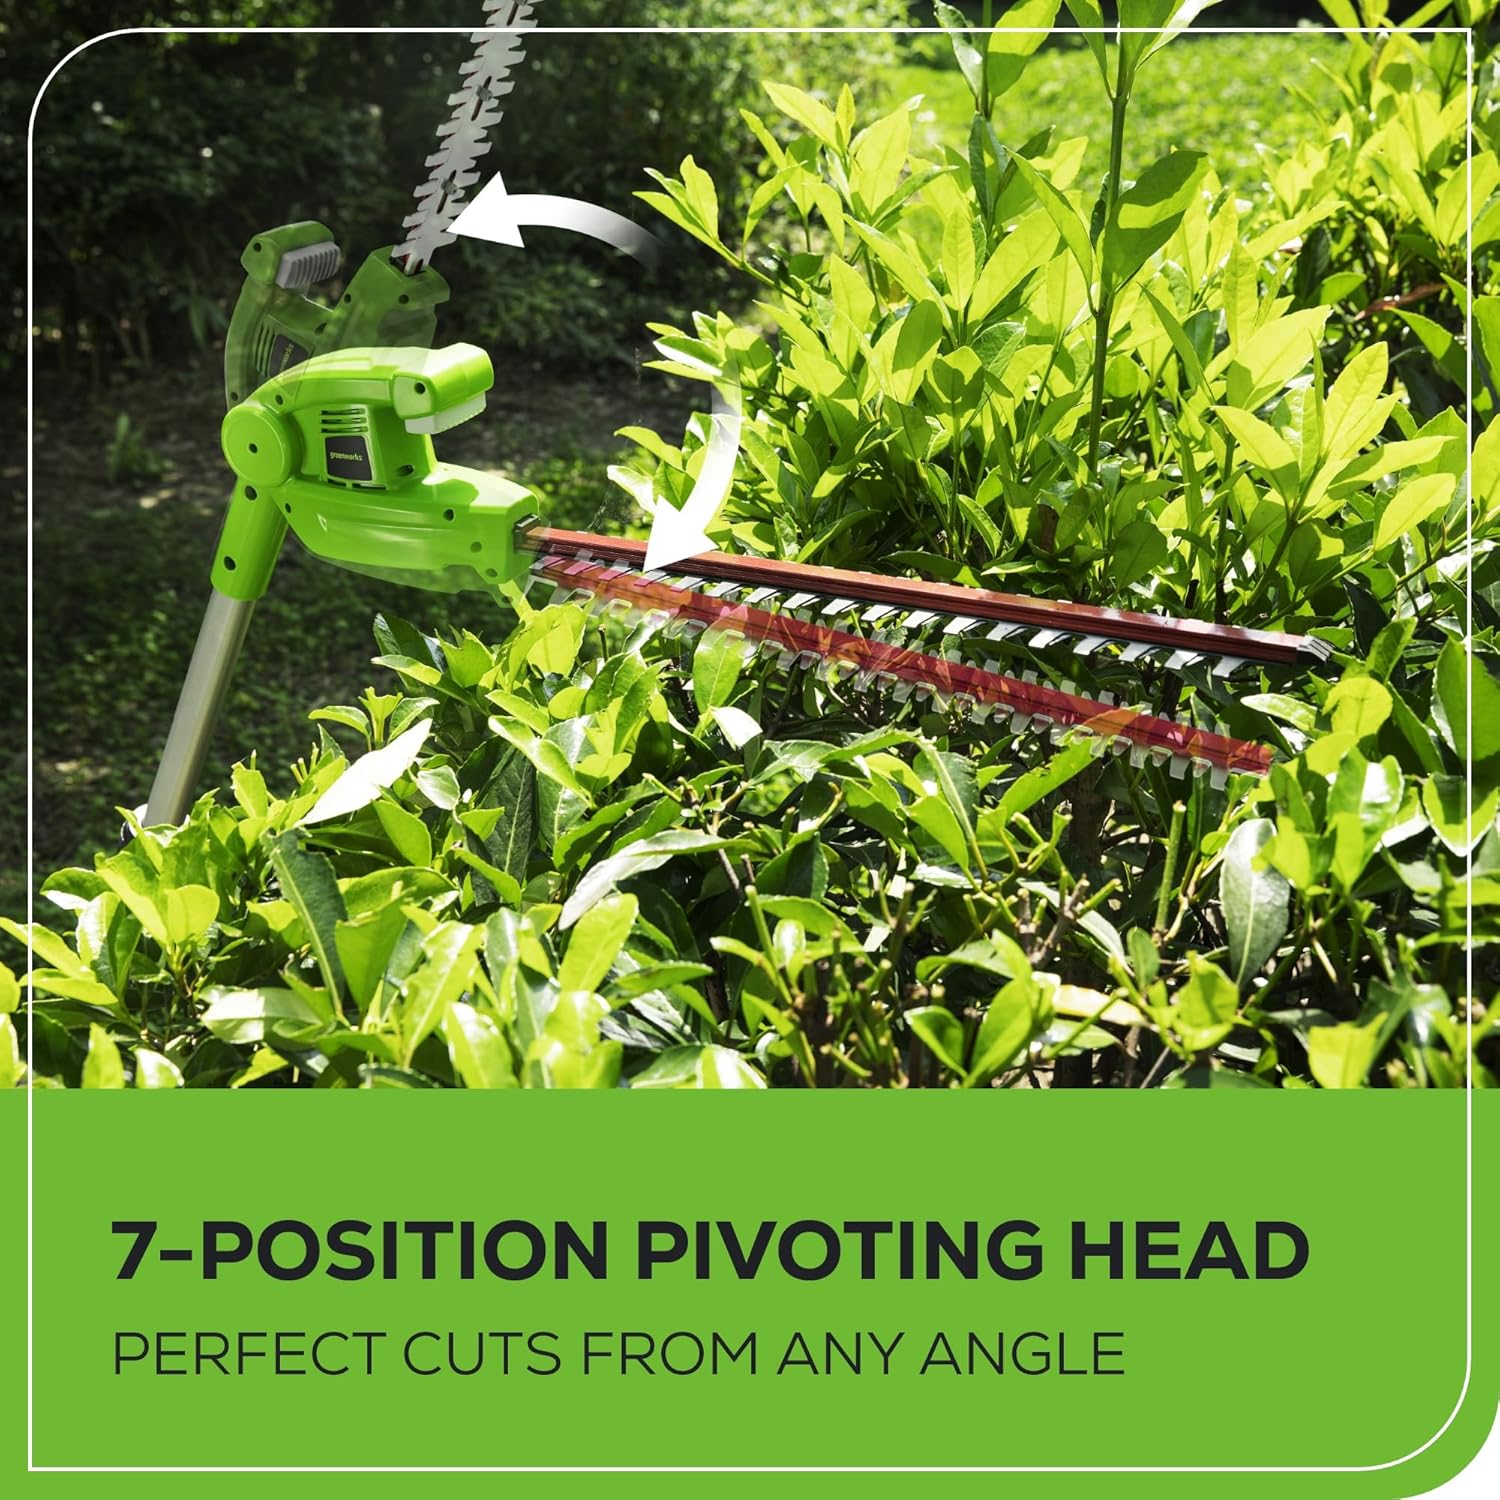
Image 6.3: Close-up of the 20-inch dual-action laser cut blades of the pole hedge trimmer, designed for extreme cutting performance.
7. Troubleshooting
Refer to this section for common issues and their solutions.
| Problem | Possible Cause | Solution |
|---|---|---|
| Tool does not start | Battery not charged or improperly installed. Safety lock-off not engaged. | Ensure battery is fully charged and properly seated. Press safety lock-off button before pressing trigger. |
| Pole saw chain not cutting efficiently | Dull chain. Incorrect chain tension. Low bar and chain oil. | Sharpen or replace chain. Adjust chain tension. Refill bar and chain oil reservoir. |
| Hedge trimmer blades not cutting cleanly | Dull or dirty blades. | Clean blades of sap and debris. Have blades sharpened by a professional. |
| Battery not charging | Charger not plugged in. Faulty battery or charger. | Ensure charger is securely plugged into a working outlet. Contact customer support if issue persists. |
8. Specifications
Technical details for the Greenworks 40V 8-inch Pole Saw and Pole Hedge Trimmer Combo Kit:
- Model Number: PSPH40B210
- Voltage: 40 Volts
- Power Source: Battery Powered (Lithium Ion)
- Pole Saw Bar Length: 8 inches
- Hedge Trimmer Blade Length: 20 inches
- Hedge Trimmer Blade Type: Dual-action
- Hedge Trimmer Head: 7-position pivoting
- Battery Capacity: 2.0 Amp Hours
- Shaft Material: 3-piece Aluminum
- Item Weight: Approximately 11 pounds (without battery)
- Product Dimensions: 77.8"L x 4.5"W x 8"H (assembled)
9. Warranty and Customer Support
Greenworks provides a limited warranty for this product.
9.1 Warranty Information
This Greenworks 40V Pole Saw and Pole Hedge Trimmer Combo Kit (PSPH40B210) is covered by a 3-Year Limited Warranty for both the tool and the battery. This warranty covers defects in material or workmanship from the date of purchase. Please retain your proof of purchase for warranty claims.

Image 9.1: Official Greenworks logo indicating a 3-year warranty for both the tool and battery.
9.2 Customer Support
For technical assistance, warranty claims, or to order replacement parts, please contact Greenworks Customer Support. Refer to the contact information provided in your warranty card or visit the official Greenworks website.
Online Resources: www.greenworkstools.com