1. Introduction
This manual provides instructions for the proper setup, operation, and maintenance of your NEEWER Professional Heavy Duty Metal 360-Degree Panoramic Gimbal Tripod Head. Please read this manual thoroughly before use to ensure optimal performance and longevity of the product.
2. Product Overview
The NEEWER Gimbal Tripod Head is designed for stable and smooth camera movement, particularly beneficial for photography with long telephoto lenses. It supports DSLR cameras up to 30lbs (13.6kg) and features robust metal construction.

The NEEWER Gimbal Tripod Head provides stable support for DSLR cameras, especially with long telephoto lenses, allowing for smooth movement and precise positioning.
Key Features:
- Rugged metal construction for durability.
- Smooth, fast tracking horizontally and vertically.
- Horizontal adjustment of the lens platform for precise center of gravity positioning.
- Calibrated scale for repeatable lens positioning.
- 360-degree rotation capability for both panning base and vertical arm.
- Includes Arca-Swiss type standard 1/4'' quick release plate and bubble level.
- Non-skid slip design on the quick release plate.
3. Setup
3.1 Mounting to a Tripod
The gimbal head features a standard 3/8" screw thread at its base for attachment to a tripod. An adapter for 1/4" screw threads is also included for broader compatibility.
- Ensure your tripod is stable and capable of supporting the combined weight of the gimbal head, camera, and lens.
- Screw the base of the gimbal head onto your tripod's mounting screw until secure.
3.2 Attaching the Camera
The gimbal head uses an Arca-Swiss type standard 1/4'' quick release plate for camera attachment.

The quick release plate features a locking knob for secure camera attachment and an integrated bubble level for accurate horizontal alignment.
- Attach the quick release plate to the bottom of your camera or lens collar using the 1/4'' screw. Ensure it is tightened securely.
- Loosen the locking knob on the quick release clamp of the gimbal head.
- Slide the quick release plate with your camera into the clamp.
- Tighten the locking knob firmly to secure the camera in place.
3.3 Balancing the Camera and Lens
Proper balancing is crucial for smooth operation and to prevent strain on the gimbal head and tripod.
- Horizontal Balance: Adjust the horizontal position of the quick release plate within the clamp until the camera and lens are balanced. The lens should remain level when the horizontal lock is loosened. Use the calibrated scale on the horizontal platform for precise adjustments.
- Vertical Balance: Adjust the height of the vertical arm by loosening its locking knob and sliding it up or down until the camera and lens are balanced vertically. The camera should remain in position when the vertical lock is loosened. Use the graduated lead rail for precise vertical positioning.
4. Operating Instructions
4.1 Panning (Horizontal Movement)
The panning base allows for smooth 360-degree horizontal rotation.
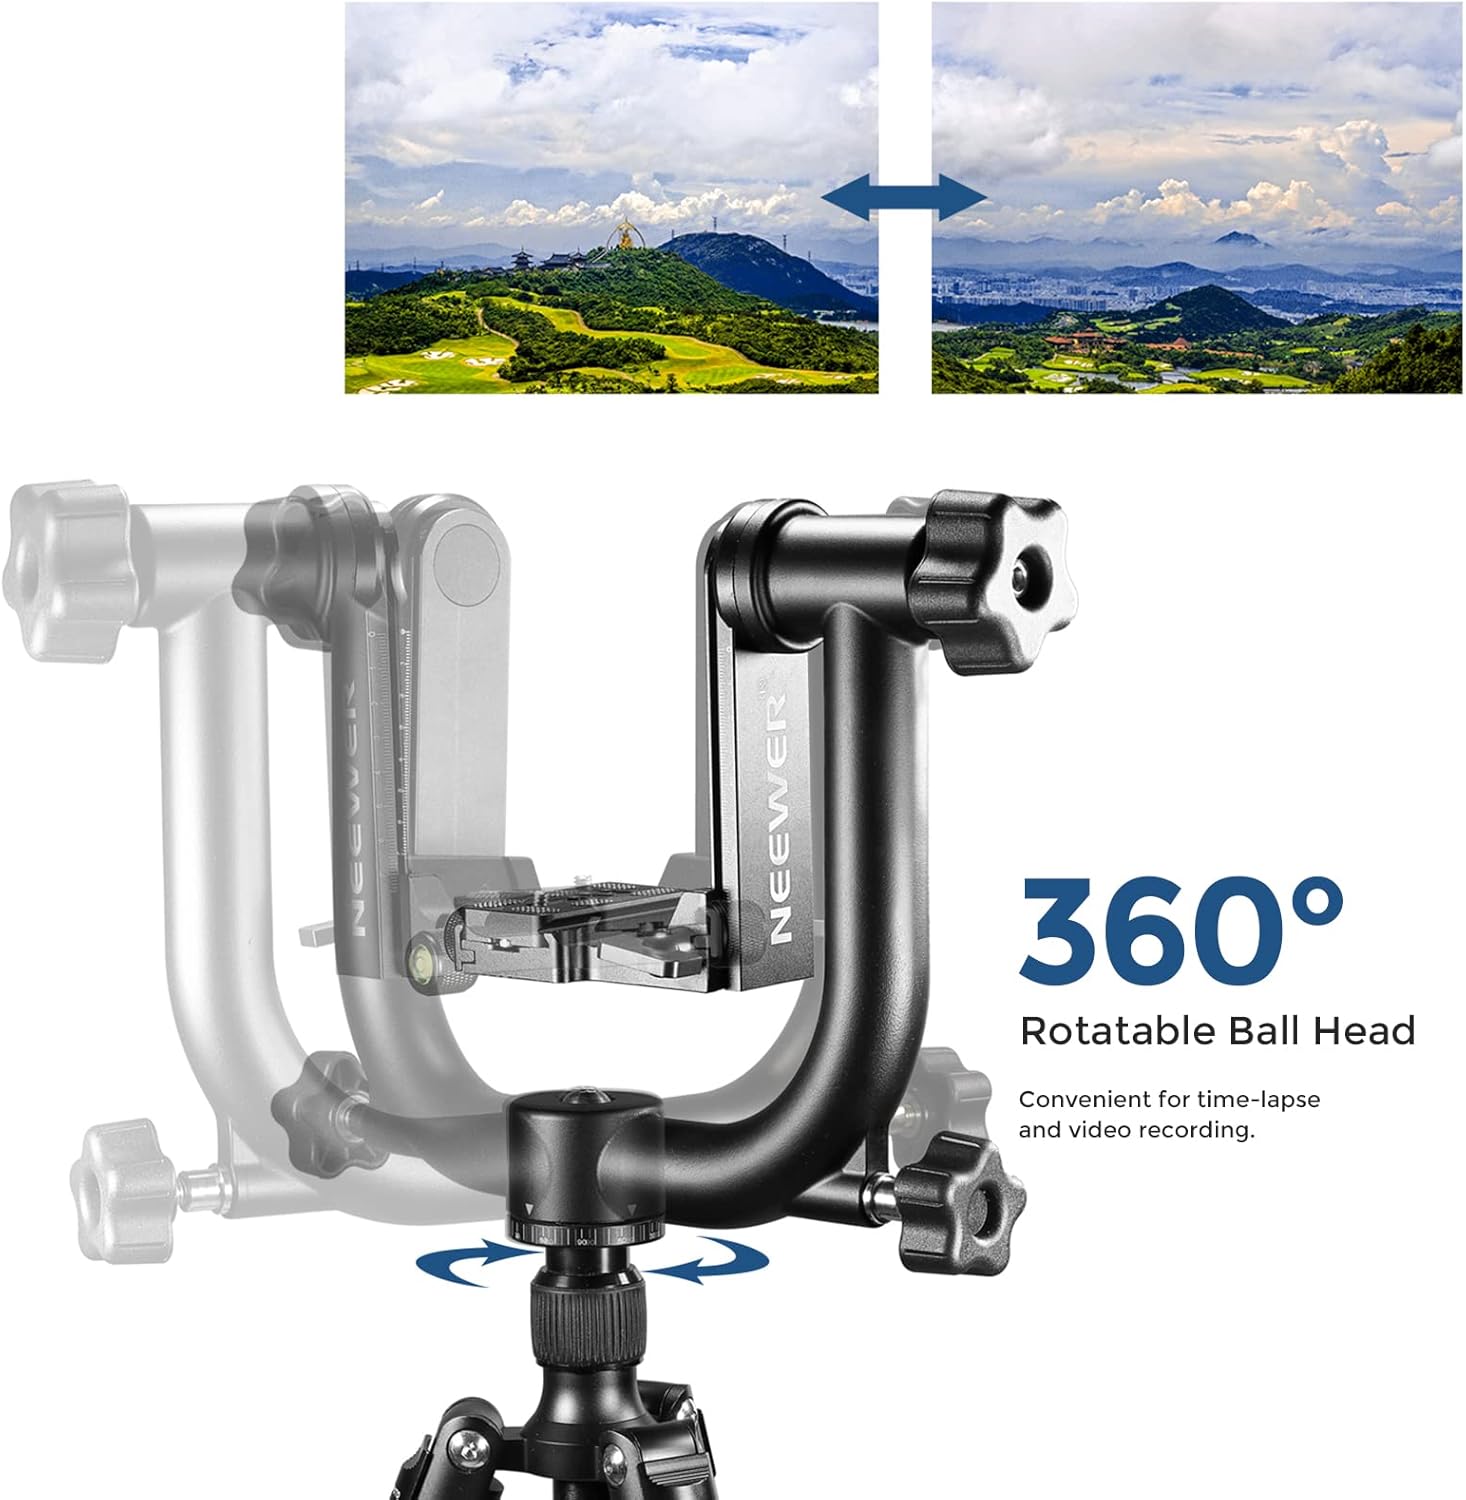
The gimbal head's design allows for smooth 360-degree rotation, ideal for capturing panoramic scenes and tracking moving subjects.
- Loosen the panning lock knob located at the base of the gimbal head.
- Gently rotate the camera to the desired horizontal position.
- Tighten the panning lock knob to secure the position, or leave it slightly loose for fluid tracking.
4.2 Tilting (Vertical Movement)
The vertical arm allows for smooth tilting movement.

The vertical arm can be adjusted to accommodate various camera and lens setups, facilitating high-angle or low-angle shots with ease.
- Loosen the vertical tilt lock knob on the side of the vertical arm.
- Adjust the camera to the desired vertical angle.
- Tighten the vertical tilt lock knob to secure the position, or leave it slightly loose for fluid tracking.
4.3 Using Calibrated Scales
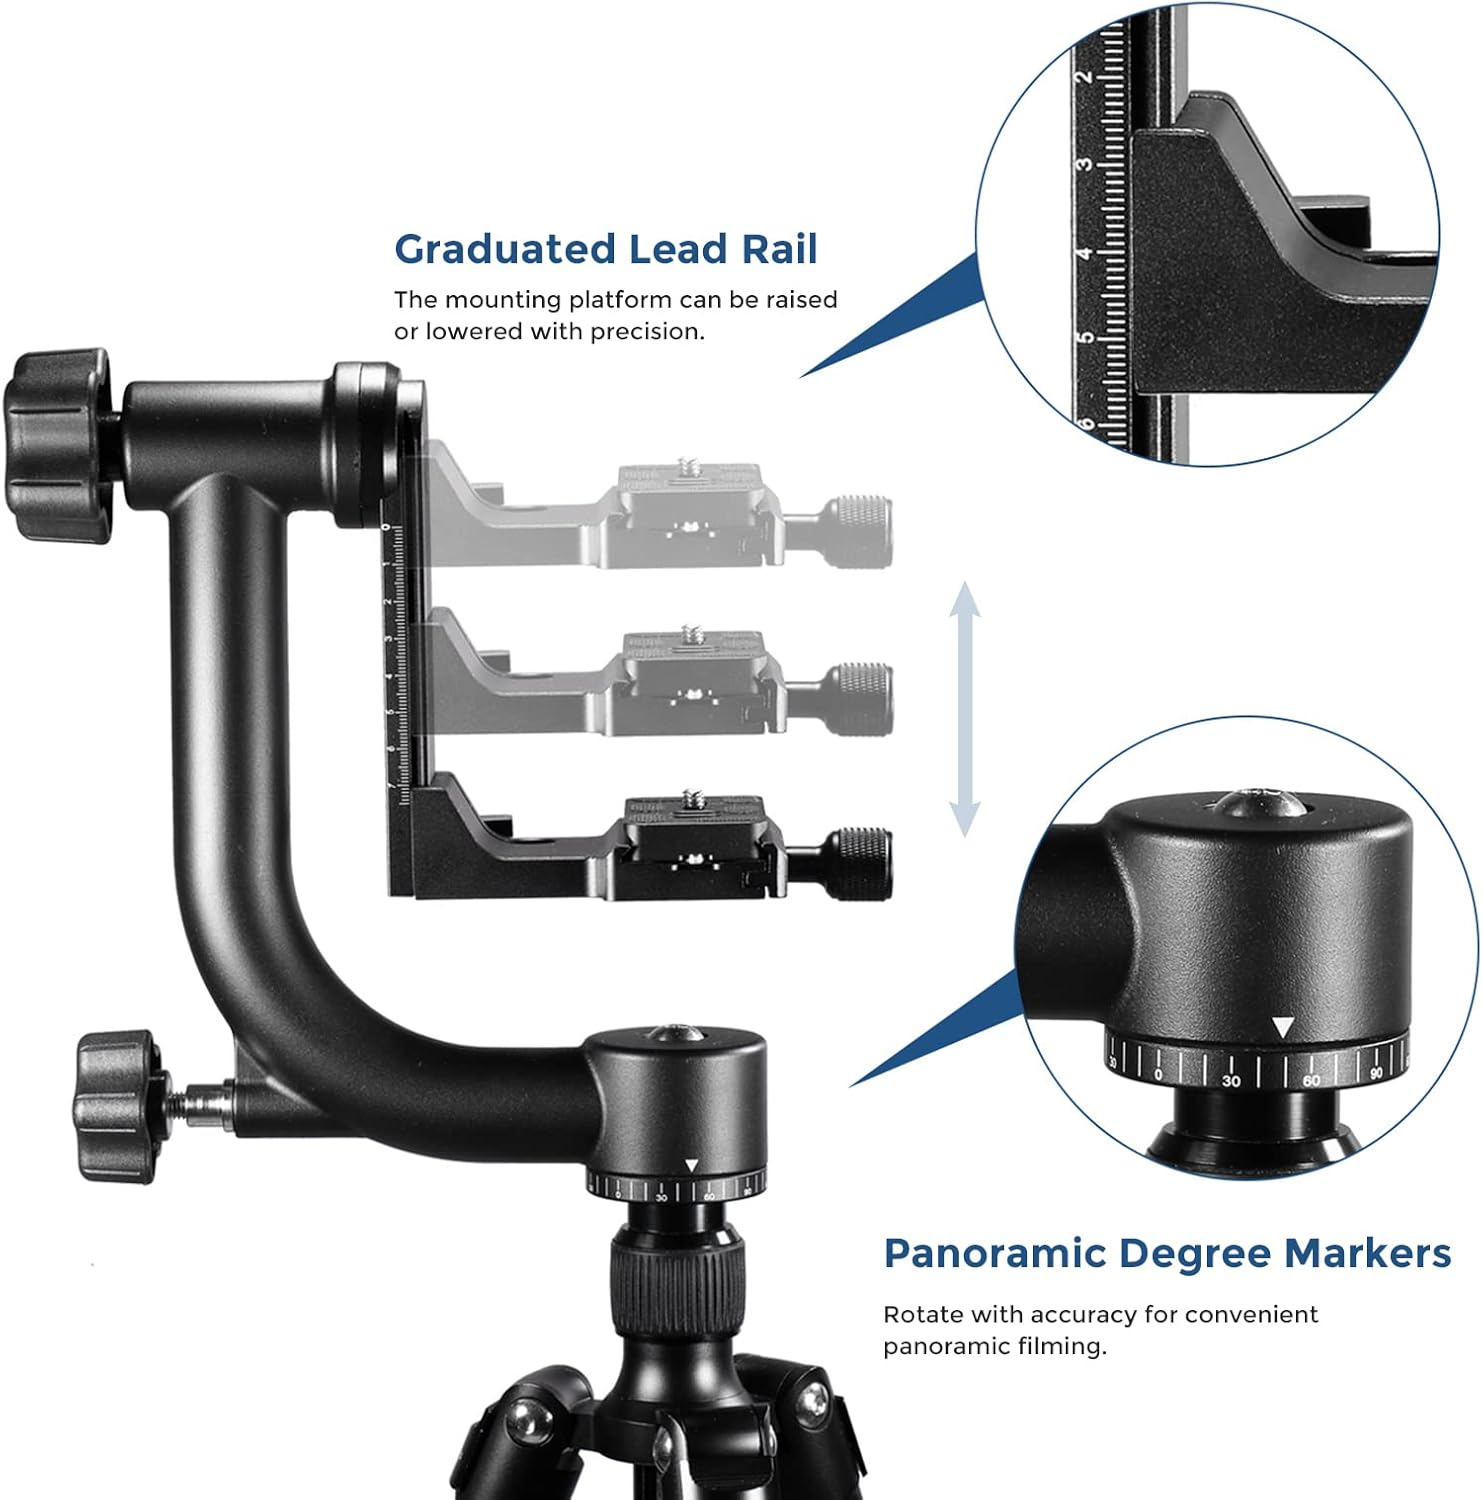
The graduated lead rail allows for precise vertical positioning of the camera, while the panoramic degree markers on the base enable accurate 360-degree rotation for panoramic photography.
The gimbal head features calibrated scales on both the horizontal platform and the panning base. These scales allow for precise and repeatable positioning, which is useful for panoramic stitching or returning to specific angles.
5. Maintenance
To ensure the longevity and smooth operation of your gimbal head, follow these maintenance guidelines:
- Cleaning: Wipe the gimbal head with a soft, dry cloth after each use to remove dust and debris. For stubborn dirt, use a slightly damp cloth and then dry thoroughly. Avoid harsh chemicals or abrasive materials.
- Lubrication: The moving parts are pre-lubricated. If movements become stiff over time, a small amount of high-quality, non-corrosive lubricant designed for metal mechanisms can be applied to the pivot points. Consult a professional if unsure.
- Storage: Store the gimbal head in a dry, clean environment, preferably in its original packaging or a protective bag, to prevent dust accumulation and potential damage.
- Inspection: Periodically check all screws and knobs to ensure they are tight. Do not overtighten.
6. Troubleshooting
6.1 Stiff Movement
- Issue: Panning or tilting movements feel stiff or jerky.
- Solution: Ensure all locking knobs are sufficiently loosened. If the issue persists, the internal lubrication might be too viscous, especially in cold conditions. Consider applying a small amount of appropriate lubricant as described in the Maintenance section.
6.2 Camera Not Balancing
- Issue: The camera and lens tilt when locks are loosened, even after initial adjustment.
- Solution: Re-evaluate the horizontal and vertical balance. Ensure the quick release plate is correctly positioned to find the center of gravity for your specific camera and lens setup. Make small, incremental adjustments.
6.3 Quick Release Plate Loosening
- Issue: The quick release plate becomes loose during use.
- Solution: Ensure the 1/4'' screw attaching the plate to your camera/lens is tightened firmly. Always double-check the quick release clamp's locking knob before and during use.
7. Specifications
| Model Number | 10086839 |
| Product Dimensions | 11.4 x 10.1 x 3 inches (29 x 25.7 x 7.6 cm) |
| Item Weight | 3.4 pounds (1.54 kg) |
| Load Capacity | Up to 30 lbs (13.6 kg) |
| Material | Metal |
| Quick Release Plate | Arca-Swiss type standard 1/4'' |
| Tripod Mount Thread | 3/8'' (with 1/4'' adapter included) |
8. Warranty and Support
For warranty information and customer support, please refer to the documentation included with your purchase or visit the official NEEWER website. Keep your proof of purchase for any warranty claims.


