1. Introduction
Thank you for choosing the LukLoy Floor Mount Single Pedal Valve. This hands-free faucet control system is designed to provide a sanitary and convenient water flow solution for various applications. This manual provides essential information for the safe and correct installation, operation, and maintenance of your new pedal valve. Please read it thoroughly before installation and keep it for future reference.
2. Product Overview
The LukLoy Floor Mount Single Pedal Valve is constructed from high-quality brass with a polished chrome finish, ensuring durability and a clean aesthetic. It features a robust copper core and a specially designed pedal for reliable, hands-free operation.
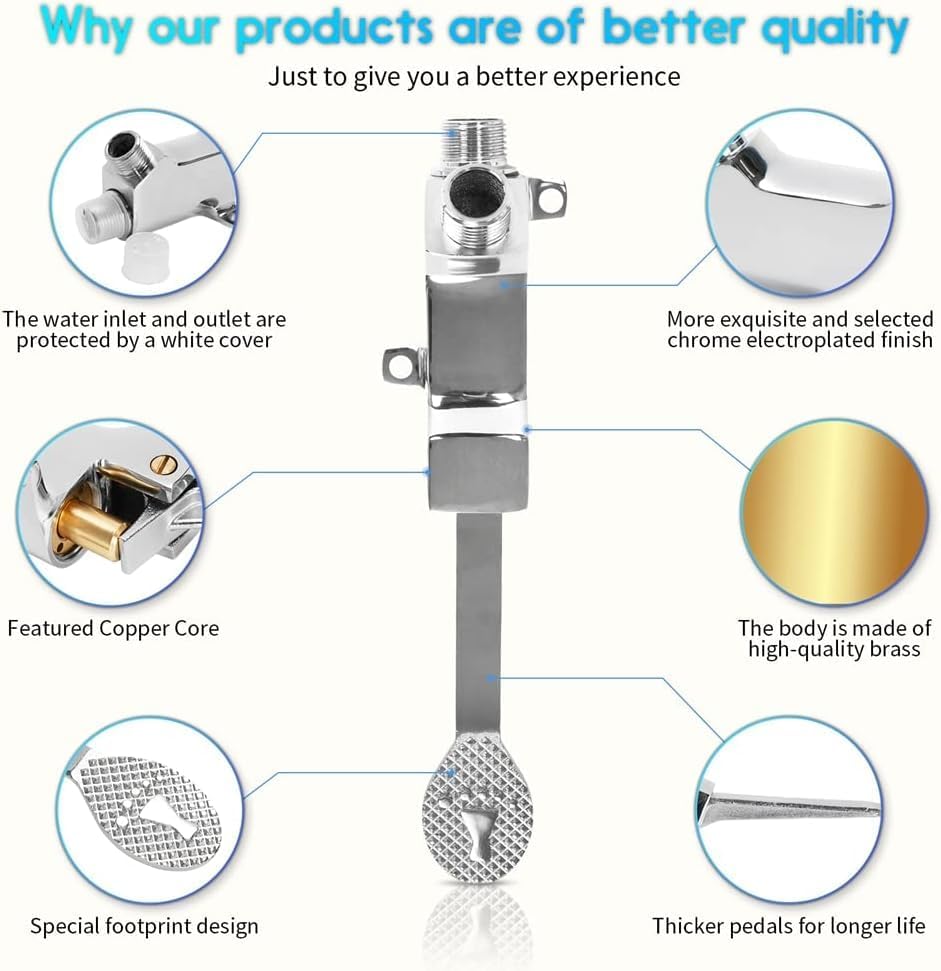
Image: Key features of the LukLoy Floor Mount Single Pedal Valve, highlighting the brass body, chrome finish, copper core, and pedal design.
Key Features:
- Material: High-quality brass construction with a durable copper core.
- Finish: Exquisite chrome electroplated finish.
- Hands-Free Operation: Foot-controlled pedal for sanitary water activation.
- Easy Installation: Designed for floor mounting with included accessories.
- Applications: Suitable for kitchens, bathrooms, hospitals, medical facilities, laboratories, and other public spaces requiring hygienic water access.
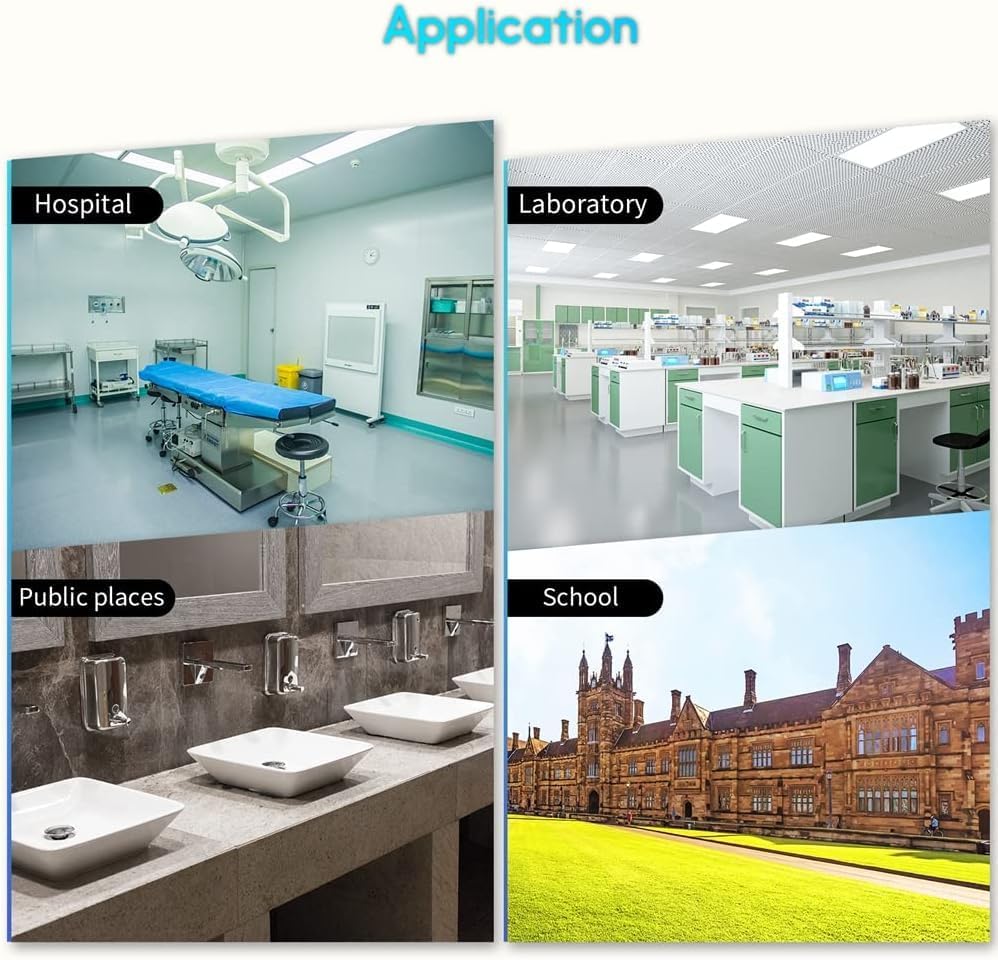
Image: Examples of typical applications for the pedal valve, including hospitals, laboratories, public restrooms, and schools.
3. Safety Information
- Always turn off the main water supply before beginning any installation or maintenance.
- Ensure all connections are secure and watertight to prevent leaks.
- Do not apply excessive force to the pedal beyond its natural range of motion, as this may cause damage.
- If you are unsure about any part of the installation process, consult a qualified plumber.
- Keep small parts out of reach of children.
4. Package Contents
Verify that all components are present before beginning installation:
- LukLoy Floor Mount Single Pedal Valve (x2 for pack of 2)
- Floor mounting screws and anchors
- Instruction Manual (this document)
5. Setup and Installation
Proper installation is crucial for the optimal performance and longevity of your pedal valve. Follow these steps carefully:
5.1 Pre-Installation Checks
- Water Supply: Ensure the main water supply to the installation area is turned off.
- Drain Pipes: For newly installed water pipes, flush them thoroughly before connecting to the valve. This prevents debris from entering and potentially jamming the valve core, which could lead to leaks.
- Required Tools (not included): Adjustable wrench, screwdriver, drill, Teflon tape (plumber's tape).
5.2 Connecting the Valve
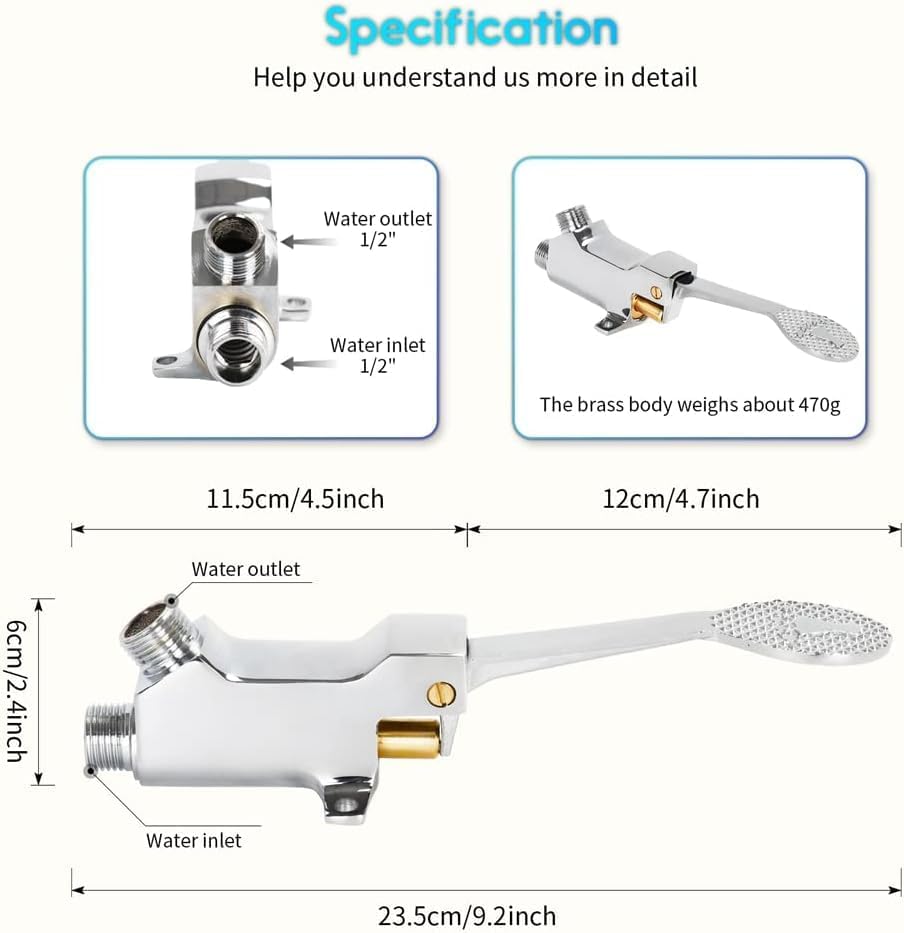
Image: Diagram showing the water inlet and outlet connections, both 1/2-inch NPT.
- Identify the Water Inlet and Water Outlet ports on the pedal valve. The inlet is typically the lower, straight connection at the back, and the outlet is the upper, angled connection. Refer to the diagram above.
- Apply Teflon tape clockwise to the threads of both the water supply line and the faucet connection hose.
- Connect the water supply line (1/2-inch NPT) to the Water Inlet port. Ensure this connection is tight but do not overtighten.
- Connect the faucet hose (1/2-inch NPT) to the Water Outlet port.
- Important: Connecting the water supply to the correct inlet is critical. If the pressurized supply is connected to the outlet port, the water pressure may push against the internal spring, causing the valve to remain partially open and leak.
5.3 Floor Mounting
- Position the pedal valve on the floor in the desired location, ensuring the pedal has a clear range of motion.
- Mark the locations for the mounting screws through the holes on the valve's base.
- Drill pilot holes if necessary, then secure the valve to the floor using the provided screws and anchors.
- Note on Pedal Travel: The valve is designed to be fully open when the end of the pedal lever reaches the floor. Do not attempt to force the pedal further once it has reached its full travel, as this can bend or break the lever. If mounting on a raised platform, ensure the platform extends to support the full travel of the pedal.
5.4 Post-Installation
- Slowly turn on the main water supply.
- Check all connections for leaks. Tighten any leaking connections gently.
- Test the pedal operation.
6. Operating Instructions
The LukLoy Single Pedal Valve provides convenient, hands-free control of water flow.

Image: A foot operating the pedal valve to activate water flow from a faucet, demonstrating hands-free use.
- To activate water flow, gently press down on the pedal with your foot.
- To stop water flow, release the pedal. The valve will automatically close.
- While primarily an on/off valve, you can achieve some variation in water flow by partially pressing the pedal. However, precise flow control may be challenging due to the short travel distance of the valve.
7. Maintenance
Regular maintenance helps ensure the longevity and proper function of your pedal valve.
7.1 Cleaning
- Clean the exterior chrome finish with a soft, damp cloth and mild soap.
- Avoid abrasive cleaners, scouring pads, or harsh chemicals, as these can damage the finish.
7.2 Internal Components
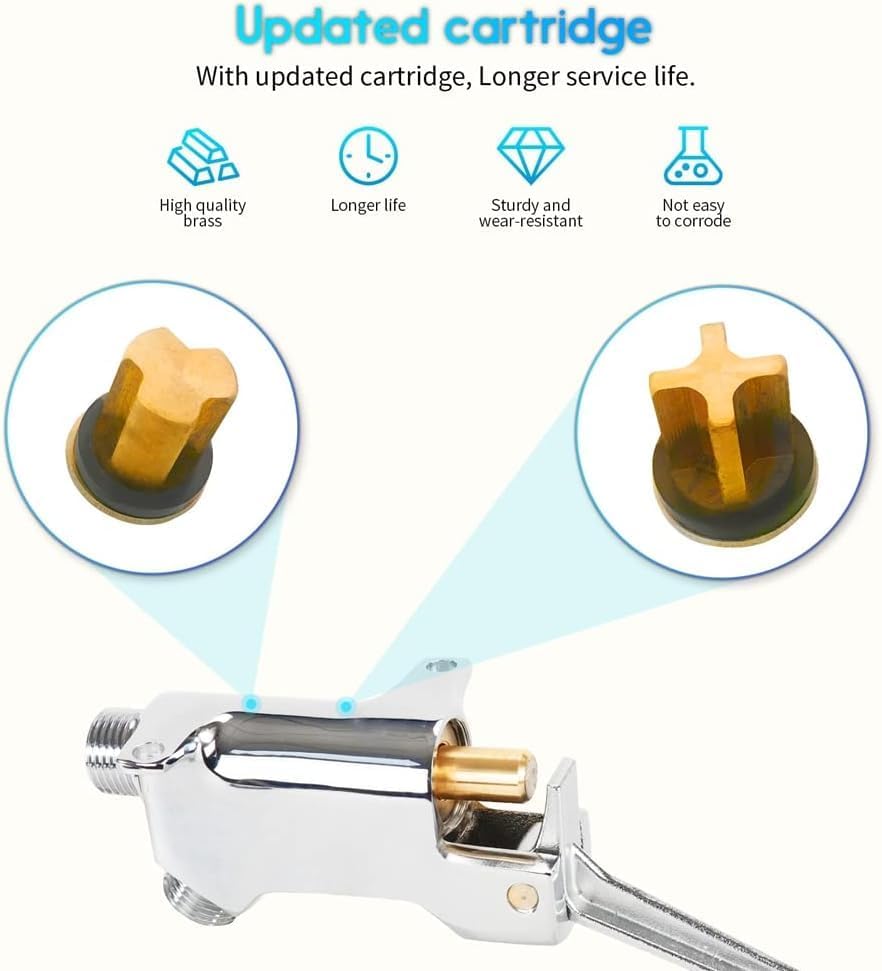
Image: Detailed view of the updated cartridge, emphasizing its high-quality brass, longer life, sturdy, wear-resistant, and corrosion-resistant properties.
- The valve features an updated, durable cartridge designed for long service life.
- If water flow becomes inconsistent or the valve begins to leak internally, the cartridge may need inspection or replacement. This typically requires professional plumbing assistance.
7.3 Leak Checks
- Periodically inspect all connections for any signs of leaks.
- Address any leaks promptly by tightening connections or replacing worn washers/seals.
8. Troubleshooting
| Problem | Possible Cause | Solution |
|---|---|---|
| Water leaks from connections | Loose connections, worn Teflon tape, incorrect inlet/outlet connection. | Ensure all connections are tight. Reapply Teflon tape if necessary. Verify water supply is connected to the correct inlet port (lower, straight connection). |
| No water flow or weak flow | Main water supply off, debris in valve, kinked hose. | Check if the main water supply is on. Flush pipes before connecting. Inspect hoses for kinks. |
| Pedal is stiff or damaged | Excessive force applied, improper mounting. | Do not force the pedal beyond its natural travel. Ensure the valve is mounted correctly to the floor or a supportive surface. |
| Valve does not close completely (constant drip) | Debris in valve core, worn cartridge, incorrect inlet connection. | Flush water lines before installation. If problem persists, the internal cartridge may need replacement by a professional. Verify correct inlet connection. |
9. Specifications
Image: Detailed dimensions and weight of the LukLoy Floor Mount Single Pedal Valve.
| Brand | LukLoy |
| Model Name | singlevalve-P2 |
| Mounting Type | Floor Mount |
| Finish Type | Chrome |
| Material | Brass (Handle Material), Copper (Valve Body) |
| Number of Handles | 1 (Pedal) |
| Hole Count | 2 (for mounting) |
| Inlet/Outlet Pipe Size | 1/2-Inch NPT |
| Item Weight | Approximately 1.11 Kilograms (per valve) |
| Dimensions (approx.) | 23.5cm (9.2in) Length x 6cm (2.4in) Height x 12cm (4.7in) Width (valve body) |
10. Warranty and Support
For warranty information or technical support, please refer to the product packaging or contact LukLoy customer service directly through their official website or the retailer where the product was purchased. Please have your model number (singlevalve-P2) and purchase date available when contacting support.