La Crosse Technology C86224
La Crosse Technology C86224 Dual USB Charging Alarm with Nap Timer User Manual
Model: C86224 | Brand: La Crosse Technology
Introduction
This manual provides comprehensive instructions for the La Crosse Technology C86224 Dual USB Charging Alarm with Nap Timer. It covers setup, operation, maintenance, and troubleshooting to ensure optimal use of your device. This alarm clock features a dynamic LCD screen, dual USB charging ports, an alarm with multiple settings, and a nap timer, along with displaying time, full calendar view, room temperature, and humidity.
Key Features
- Dual USB Charging Ports: Two USB ports (1 Amp and 2 Amp output) for charging devices, includes a dual-tip tangle-free USB to micro-USB/lightning cable.
- Color LCD Display: Bright, dynamic color LCD screen with adjustable backlight (Hi/Lo/Off) for clear visibility.
- Nap Timer: Programmable nap timer with duration settings from 5 minutes to 120 minutes.
- Indoor Environment Monitoring: Displays indoor temperature (Fahrenheit/Celsius) and humidity (%RH).
- Customizable Alarm: Crescendo alarm with settings for single, Monday-Friday, and weekend alarms.
- Full Calendar View: Displays full day, month, and year.
Package Contents
- La Crosse Technology C86224 Alarm Clock
- AC Power Adapter
- 2 AAA Alkaline Batteries (for backup)
- Instructional Manual (this document)
Product Overview
Familiarize yourself with the components of your C86224 alarm clock.

Figure 1: Front View of the C86224 Alarm Clock
This image displays the main screen with time (12:34 PM), day (Wednesday), date (Oct 24), indoor temperature (72°F), and humidity (45%). Below the screen are two USB charging ports, labeled 1 Amp and 2 Amp.
Top Buttons:
- +/- Buttons: Adjust values during setting, or change display options.
- Alarm Button (Bell icon): Access and set alarm times.
- NAP Button: Activate and adjust the nap timer.
- SET Button: Enter and confirm settings for time, date, and other functions.
- Zz/Light Button: Snooze active alarm or adjust display backlight brightness (Hi, Lo, Off).
Front Panel:
- LCD Display: Shows time, date, temperature, humidity, and charging indicators.
- 1 Amp USB Charging Port: For charging smaller devices.
- 2 Amp USB Charging Port: For faster charging of compatible devices.
Rear Panel:
- DC 5V Power Jack: Connects to the included AC power adapter.
- Battery Compartment: Holds 2 AAA batteries for time and setting backup during power outages.
- Cable Hook: Helps manage charging cables.
Setup
- Install Backup Batteries:
Open the battery compartment on the back of the clock. Insert 2 new AAA alkaline batteries, observing the correct polarity (+ and -). These batteries provide backup power to maintain time and settings during a power outage.
- Connect AC Power Adapter:
Plug the AC power adapter into the DC 5V power jack on the back of the clock, then plug the adapter into a standard wall outlet. The display will illuminate.
- Initial Settings (Time, Date, Temperature Unit):
Press and hold the SET button for 3 seconds to enter the settings menu. Use the +/- buttons to adjust values and the SET button to confirm and move to the next setting. The sequence is typically: 12/24 Hour Format → Hour → Minute → Year → Month → Date → Fahrenheit/Celsius → Snooze Duration.
Video 1: Setting Time and Date on La Crosse Technology C86224
This video demonstrates how to navigate the settings menu using the SET and +/- buttons to adjust the time, date, and other preferences on the alarm clock. - Language Selection:
The clock may offer English and Spanish language options for the calendar and menu. Navigate through the settings using the SET button until the language option appears, then use +/- to select your preferred language.
Operation
Reading the Display:
The multi-color LCD display shows the following information:
- Time: Large digits at the top, with AM/PM indicator.
- Day & Date: Full day of the week, month, and day.
- Indoor Temperature: Current room temperature in °F or °C.
- Indoor Humidity: Current room humidity in %RH.
- USB Charging Indicators: Icons illuminate when devices are connected and charging.
Setting Alarms:
- Press the Alarm button (bell icon) to view the current alarm time.
- Press and hold the Alarm button for 3 seconds to enter alarm setting mode. The alarm hour will flash.
- Use the +/- buttons to adjust the hour, then press Alarm to confirm.
- Repeat for minutes.
- Select alarm type: Single, Monday-Friday, or Weekend. Use +/- to cycle through options, then press Alarm to confirm.
- To activate/deactivate an alarm, press the Alarm button repeatedly until the desired alarm icon appears/disappears on the display.
Using the Nap Timer:
- Press the NAP button to activate the nap timer. The default nap time is 10 minutes.
- To adjust the nap time, press the NAP button repeatedly to cycle through preset times (e.g., 10, 20, 30, 60, 90, 120 minutes).
- The nap timer will count down, and an alarm will sound when it reaches zero.
- To cancel the nap timer, press and hold the NAP button.
Adjusting Display Brightness:
Press the Zz/Light button repeatedly to cycle through the backlight brightness settings: High, Low, and Off. This allows you to customize visibility for different lighting conditions.
Using USB Charging Ports:
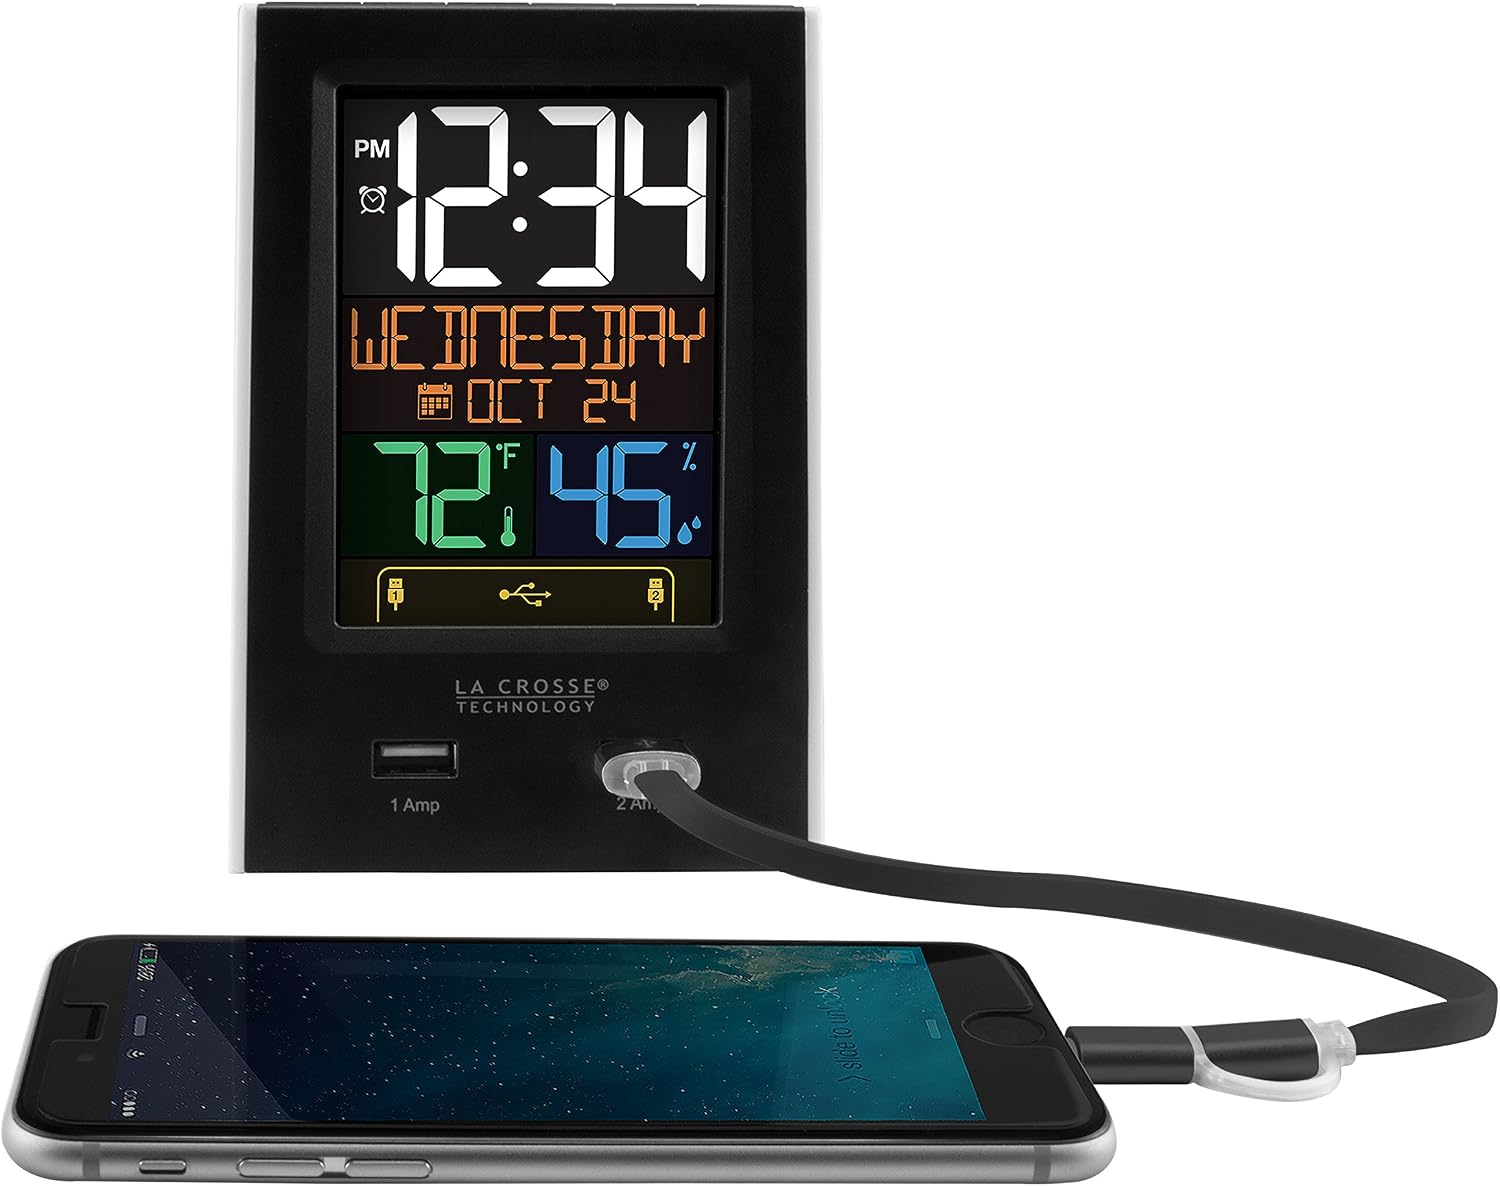
Figure 2: USB Charging in Use
This image shows a smartphone connected to the 2 Amp USB port on the C86224 alarm clock, indicating active charging.
The C86224 features two USB charging ports on the front:
- 1 Amp Port: Suitable for charging smaller electronic devices like smartphones.
- 2 Amp Port: Provides faster charging for compatible devices, including tablets or larger smartphones.
Simply connect your device's USB charging cable to the appropriate port. The display will show an indicator when a device is connected and charging.
Maintenance
- Cleaning: Use a soft, damp cloth to clean the display and casing. Avoid abrasive cleaners or solvents.
- Battery Replacement: Replace backup batteries annually or when the low battery indicator appears to ensure settings are retained during power outages.
- Placement: Place the clock on a stable, flat surface away from direct sunlight, heat sources, or excessive moisture.
Troubleshooting
| Problem | Solution |
|---|---|
| Display is dark or unreadable. |
|
| Time is incorrect or losing minutes. |
|
| USB charging ports are not working. |
|
| Alarm does not sound. |
|
Specifications
| Feature | Detail |
|---|---|
| Model Number | C86224 |
| Brand | La Crosse Technology |
| Display Type | Digital, Color LCD |
| Power Source | Corded Electric (AC Adapter) |
| Battery Backup | 2 AAA batteries (included) |
| USB Charging Ports | 1 Amp (x1), 2 Amp (x1) |
| Product Dimensions | 3.74"W x 5.24"H |
| Item Weight | 0.4 Pounds |
| Material | Plastic |
| Special Features | Adjustable brightness, Alarm, Programmable, Charging port, Temperature, Calendar, Nap timer |
Warranty and Support
The La Crosse Technology C86224 comes with a 1-year limited parts and labor warranty from the manufacturer.
For further assistance, troubleshooting, or to explore other products, please visit the official La Crosse Technology Store.
Ask a question about this manual
Ask about setup, troubleshooting, compatibility, parts, safety, or missing instructions. Manuals+ will review the question and use this page’s manual context to help answer it.