Product Overview
The Night Owl Security 1080p HD Wired Security Dome Camera (Model CAM-HDA10W-DMA) is designed to expand your existing Night Owl Security DVR System. This add-on camera provides 1080p HD video resolution with audio capabilities, suitable for both indoor and outdoor surveillance.
- High Definition Video: Captures video in 1080p HD resolution.
- Audio Enabled: Features audio recording with a range of up to 20 feet.
- Night Vision: Equipped with night vision up to 100 feet, utilizing an auto IR cut filter for clear day and night images.
- Durable Design: Comes with a 3-axis vandal-proof mounting bracket.
- Compatibility: Compatible with all Night Owl HD Analog Series DVRs (Note: Not compatible with AHD7 Series).
- Weather Resistant: IP67 waterproof rating for indoor and outdoor use.

Image: Night Owl 1080p HD Dome Camera highlighting its key features.
Package Contents
Verify that all items listed below are included in your package:
- 1 x 1080p HD Analog Wired Add-on Dome Camera (Audio Enabled) - White
- 1 x 60 ft. Bundles of Camera Cable (Video/Power/Audio)
- 3 x Mounting Hardware and Screws
- 1 x DC 12V Camera Power Adapter
- 2 x Quick Setup Guide
- 3 x Night Owl Security Stickers

Image: Contents included in the Night Owl 1080p HD Dome Camera package.
Setup and Installation
This camera is an add-on unit and requires connection to a compatible Night Owl HD Analog Series DVR (sold separately). Ensure your DVR is powered off before beginning installation.
1. Mounting the Camera
The camera features a 3-axis vandal-proof mounting bracket for flexible positioning on walls or ceilings.
- Select a suitable indoor or outdoor location for optimal surveillance coverage.
- Use the provided mounting hardware and screws to securely attach the camera bracket to the desired surface.
- Adjust the camera's angle to achieve the desired viewing area.

Image: Examples of ceiling and wall mounting for the dome camera.
2. Connecting the Camera
Use the included 60 ft. video/power/audio cable to connect the camera to your DVR and power source.
- Connect the BNC connector of the camera cable to an available video input port on your Night Owl DVR.
- Connect the power connector of the camera cable to the DC 12V Camera Power Adapter.
- Plug the DC 12V Camera Power Adapter into a standard electrical outlet.
- Connect the audio RCA connector from the camera cable to an audio input on your DVR, if available and desired for audio recording.

Image: The camera cable and power adapter for connection.
3. Initial Configuration
After connecting the camera, power on your DVR system. The camera feed should appear on your monitor. Refer to your DVR's manual for specific instructions on adding new cameras, configuring recording settings, and adjusting camera parameters.
Operating Instructions
Once installed and configured with your DVR, the camera will begin recording based on your DVR's settings. Key operational features include:
- Live View: Access the live video feed through your DVR's interface or compatible mobile application.
- Audio Monitoring: The integrated microphone captures audio within approximately 20 feet of the camera. This audio can be monitored live or recorded with video footage.
- Night Vision: The camera automatically switches to night vision mode in low-light conditions, providing clear black and white images up to 100 feet.
- Motion Detection: Utilize your DVR's motion detection features to trigger recordings or alerts based on activity detected by the camera.
Maintenance
Regular maintenance ensures optimal performance and longevity of your security camera.
- Cleaning: Periodically clean the camera lens with a soft, damp cloth to remove dust, dirt, or smudges that may affect image clarity. Avoid abrasive cleaners.
- Cable Inspection: Routinely check all cable connections for secure fit and signs of wear or damage. Ensure cables are protected from environmental elements.
- Firmware Updates: Check the Night Owl website for any available firmware updates for your DVR system, which may include improvements for connected cameras.
- Environmental Protection: While the camera is weather-resistant (IP67), extreme weather conditions can still impact performance. Ensure proper installation to minimize exposure to direct heavy rain or snow.
Troubleshooting
If you encounter issues with your camera, refer to the following common troubleshooting steps:
No Video Feed / Black Screen
- Check Connections: Ensure all video (BNC) and power connections are securely attached to both the camera and the DVR.
- Power Supply: Verify that the camera's power adapter is plugged into a working electrical outlet and that the camera is receiving power.
- DVR Compatibility: Confirm that your DVR is a Night Owl HD Analog Series DVR and not an AHD7 Series, as this camera is not compatible with AHD7.
- DVR Input: Try connecting the camera to a different video input port on your DVR to rule out a faulty port.
Fuzzy or Unclear Picture
- Clean Lens: Clean the camera lens as described in the Maintenance section.
- Cable Quality: Inspect the 60 ft. camera cable for any damage or kinks. A damaged cable can degrade video signal quality.
- Power Fluctuation: Ensure the camera is receiving stable power. Unstable power can affect image clarity, especially night vision.
- DVR Settings: Check your DVR's display settings for the camera to ensure it's configured for 1080p resolution.
No Audio
- Audio Connection: Verify the audio RCA connector is properly connected to an audio input on your DVR.
- DVR Audio Settings: Check your DVR's audio settings to ensure audio recording and playback are enabled for the specific camera channel.
- Microphone Obstruction: Ensure the camera's microphone is not obstructed.
Night Vision Issues
- Power Supply: Insufficient power can impact night vision performance. Ensure stable power.
- IR Emitters: Check if the infrared (IR) LEDs around the lens are illuminating in dark conditions (they typically emit a faint red glow).
- Obstructions: Ensure there are no obstructions directly in front of the camera that could reflect IR light back, causing a washed-out image.
Product Specifications
| Feature | Detail |
|---|---|
| Model Number | CAM-HDA10W-DMA |
| Resolution | 1080p |
| Image Sensor | 1/3" Color |
| Lens / Viewing Angle | 3.6 mm (100° Field of View) |
| Effective Pixels | 2.0 MP (1920 X 1080) |
| IR Cut Filter | Yes |
| Backlight Compensation | Auto |
| Audio Enabled | Yes |
| Audio Distance | 20 ft. |
| Night Vision Length | Up to 100 ft. |
| Number of LEDs | 12 LEDs |
| Minimum Illumination | 0 Lux (IR On) |
| Length of Cable | 60 ft. per Camera |
| Type of Cable | Video / Power / Audio - 24 AWG |
| Maximum Run Length of Cable | 180 ft. |
| Video Connection | BNC |
| Weatherproof Rating | IP67 (Weather Resistant) |
| Power Supply | DC 12V / 1.5A |
| Volts | 110 / 220 |
| Operating Temperature | -14°F to 122°F |
| Dimensions (L x W x H) | 3.94 x 3.94 x 2.76 inches |
| Signal | NTSC |
| S/N Ratio | >52dB |
| Power Consumption Per Camera | ≤4W |
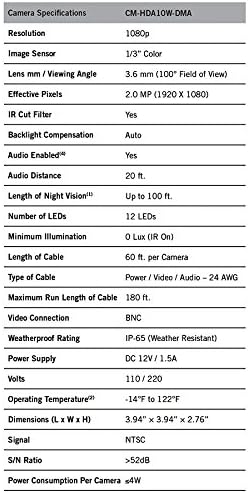
Image: Detailed technical specifications for the camera.
Warranty and Support
Night Owl Security aims to provide an incomparable experience for any technical support required. For detailed warranty information, technical assistance, or to access additional resources, please visit the official Night Owl Security website or contact their customer support.
Important: This product contains chemicals known to the State of California to cause cancer and birth defects or other reproductive harm. For more information, please visit www.p65warnings.ca.gov.