
1. Product Overview
The ECCPP Timing Belt Water Pump Kit (Model 052011) is designed to replace critical components in your vehicle's engine timing system. This kit ensures the precise synchronization of the engine's camshaft and crankshaft, which is essential for optimal engine performance and longevity. It includes a timing belt, water pump, tensioner, idler bearing, and seals, all manufactured to meet or exceed original equipment specifications.
2. Vehicle Fitment
This timing belt water pump kit is compatible with a range of Acura and Honda vehicles. Please verify compatibility with your specific vehicle model and year before installation.

Image: Detailed table showing compatible vehicle years, makes, models, and engine liter sizes.
Compatible Acura Models:
- 2003-2018 Acura MDX (3.5L, 3.7L V6)
- 2013-2018 Acura RDX (3.5L V6)
- 2005-2012 Acura RL (3.5L, 3.7L V6)
- 2014-2018 Acura RLX (3.5L V6)
- 2004-2014 Acura TL (3.2L, 3.5L V6)
- 2015-2018 Acura TLX (3.5L V6)
- 2010-2014 Acura TSX (3.5L V6)
- 2010-2013 Acura ZDX (3.7L V6)
Compatible Honda Models:
- 2003-2017 Honda Accord (3.0L, 3.5L V6)
- 2010-2015 Honda Accord Crosstour (3.5L V6)
- 2012-2015 Honda Crosstour (3.5L V6)
- 2005-2018 Honda Odyssey (3.5L V6)
- 2005-2018 Honda Pilot (3.5L V6)
- 2006-2018 Honda Ridgeline (3.5L V6)
3. Kit Contents
The ECCPP Timing Belt Water Pump Kit (Model 052011) includes the following components:

Image: An overhead view of all components included in the timing belt water pump kit, laid out on a gray surface.
- 1x Timing Belt (Part #14400-RCA-A01)
- 1x Water Pump with Gasket (Part #19200-RDV-J01)
- 1x Timing Belt Tensioner Bearing (Part #14550-RCA-A01)
- 1x Timing Belt Idler Bearing (Part #14510-RCA-A01)
- 1x Hydraulic Tensioner (Part #14520-RCA-A01)
- 2x Camshaft Seals
- 1x Crankshaft Seal (Part #91212-R70-A02)
4. Material Quality
The components in this kit are constructed from high-performance materials to ensure durability and reliable operation.

Image: Cross-section diagram of a timing belt showing its face layer (staple fiber rubber), skeleton (high modulus glass wire layer), rubber layer (high-modulus rubber), and fabric layer (quality nylon).
The timing belt features a robust internal structure with a staple fiber rubber face layer, high modulus glass wire skeleton, high-modulus rubber teeth layer, and quality nylon teeth fabric layer. This design provides resistance to abrasion, dynamic fatigue, aging, oil, and deformation, ensuring sustained stability and wear resistance.

Image: A side-by-side comparison of engine components made with HNBR rubber and CR rubber, highlighting the superior heat resistance, chemical resistance, and climate adaptability of HNBR rubber.
The use of HNBR (Hydrogenated Nitrile Butadiene Rubber) material offers significant heat resistance, better chemical resistance, and stronger climate adaptability compared to traditional CR (Chloroprene Rubber), contributing to an extended service life.
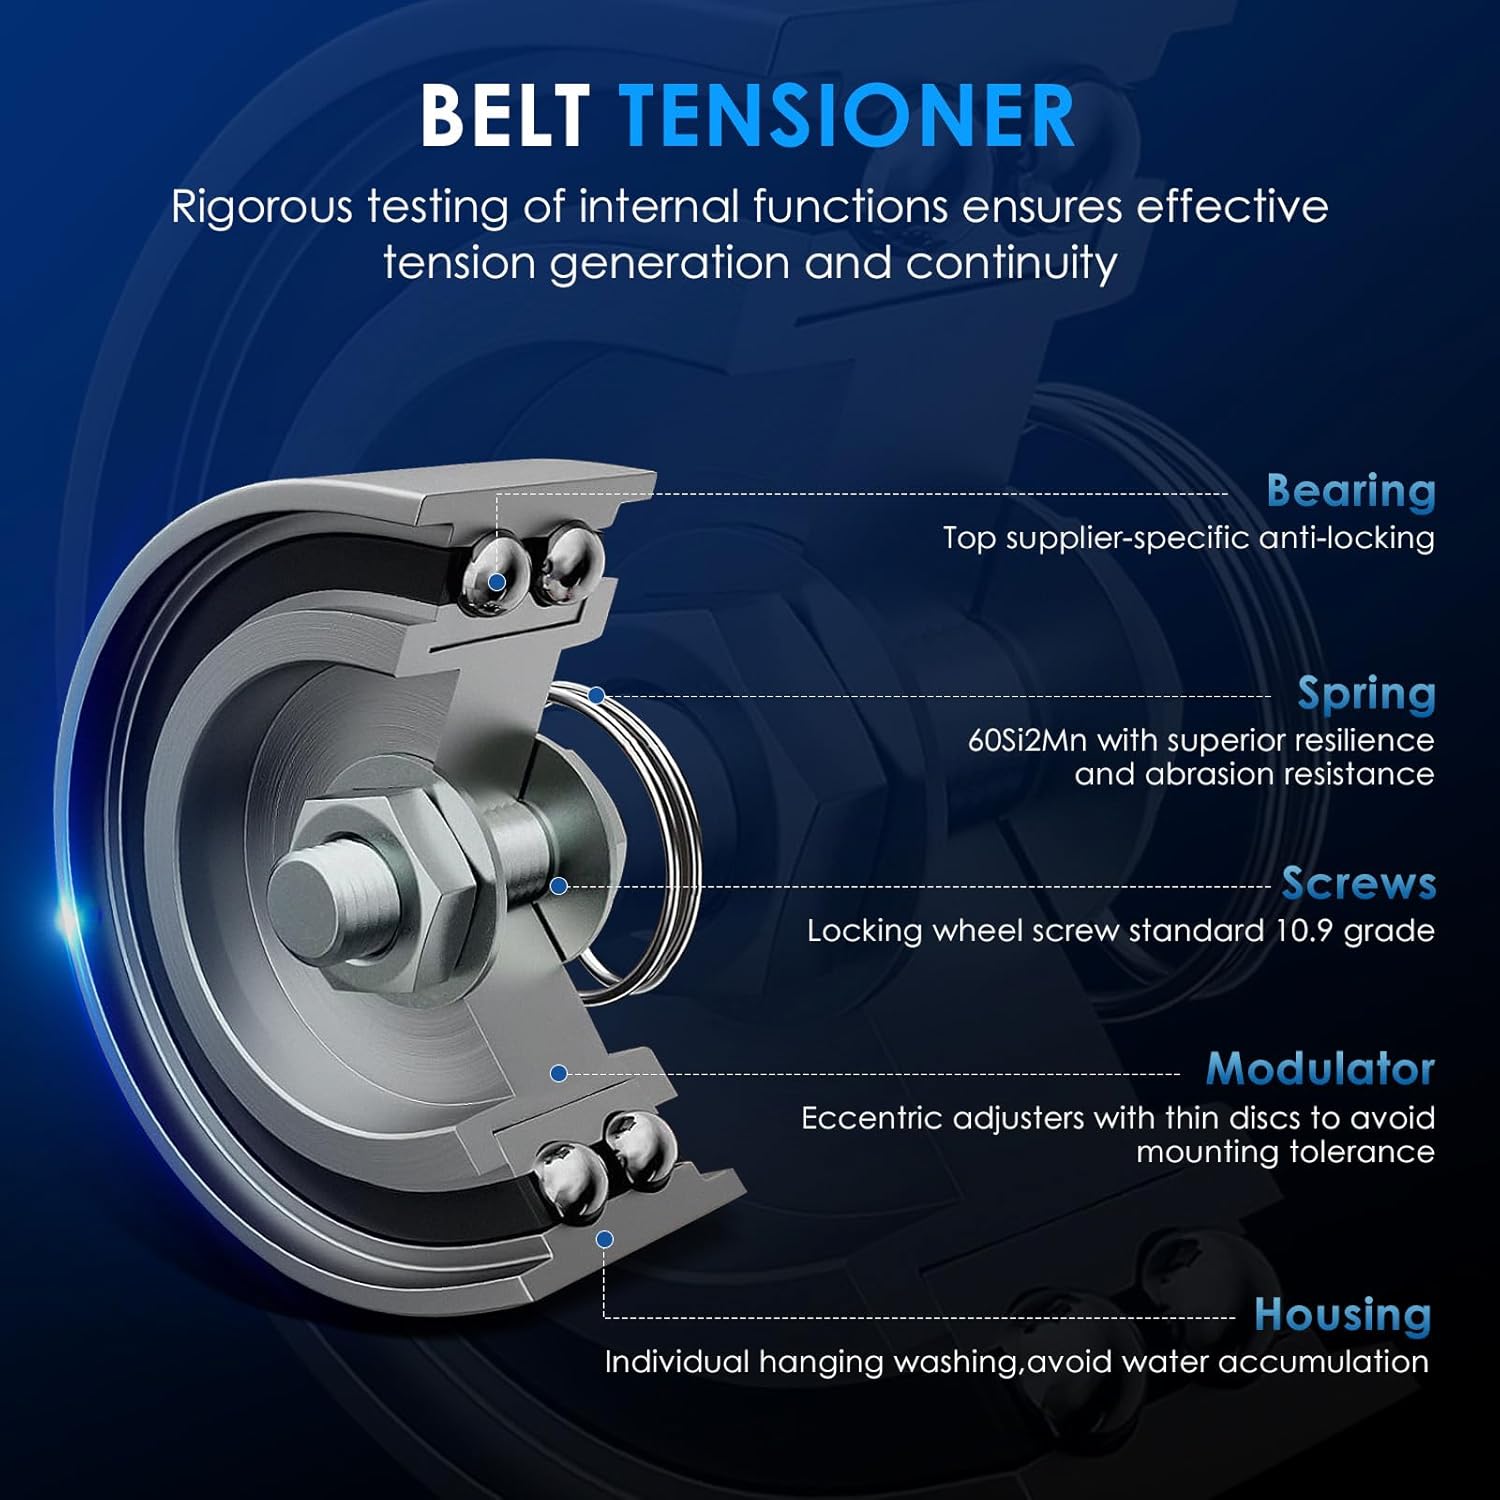
Image: A cutaway diagram of a belt tensioner, detailing its bearing, spring, screws, modulator, and housing components.
The belt tensioner undergoes rigorous testing to ensure effective tension generation and continuity. It features a top supplier-specific anti-locking bearing, a 60Si2Mn spring for superior resilience and abrasion resistance, 10.9 grade locking wheel screws, eccentric adjusters with thin discs to avoid mounting tolerance, and a housing designed to prevent water accumulation.

Image: Close-up views of crankshaft and camshaft seals, highlighting their premium rubber composition (anti-aging, high abrasion resistance, oil resistance, good sealing performance) and internal steel skeleton (heat resistance, strong tolerance, prevents deformation).
The crankshaft and camshaft seals are made from premium rubber, offering anti-aging properties, high abrasion resistance, oil resistance, and excellent sealing performance. An internal steel skeleton provides heat resistance, strong tolerance, and prevents deformation.

Image: A detailed view of an engine water pump, with a focus on its bearing components and their features, including well-lubricated polyurea-based grease, long-lasting radial clearance, high chromium bearing steel, double-layer sealing structure, and high-frequency quenching for strong tolerance.
The engine water pump adheres to IATF16949 quality management standards, ensuring a long lifespan with corrosion resistance. Key features of the water pump bearing include well-lubricated polyurea-based grease, long-lasting 15-35um radial clearance, hard and tough high chromium bearing steel, a double-layer sealing structure, and high-frequency quenching for strong tolerance.
5. Installation Steps
Proper installation is crucial for the correct function and longevity of the timing belt system. Always consult your vehicle's specific service manual for detailed instructions and torque specifications. The following are general steps:

Image: An infographic outlining the general steps for timing belt kit installation, including disconnecting the battery, removing covers, aligning timing marks, loosening and removing old components, installing new components, and reassembling.
- Empty the cooling circuit and wash it with clean water.
- Rotate the engine shaft to Top Dead Center (TDC).
- Ensure the timing system is aligned with specific locking tools.
- Loosen the tensioner roller.
- Remove the idler roller.
- Loosen the camshaft pulley.
- Remove the worn tensioner roller and the old belt.
- Replace the studs.
- Remove the worn water pump and clean the seal surfaces.
- Lubricate the mechanical seals with coolant.
- Fit the new water pump.
- Fit the new tensioner roller and lock its fixing bolt until moving.
- Fit the new idler roller.
- Preload the tensioner roller and lock its fixing bolt until the moving pointer is aligned with the indicator marker.
- Fix the camshaft pulley with a torque wrench according to the car manufacturer's requirements.
- Remove the locking tools.
- Fill the cooling circuit with new coolant. Start the engine and let it idle, continuing to fill up the coolant from the expansion tank until the level is stable.
Video: An official ECCPP video demonstrating the installation process for a timing belt kit, specifically for model 052011. This video provides visual guidance for the steps outlined above.
6. Maintenance
Regular maintenance of your vehicle's timing belt system is essential to prevent engine damage. It is generally recommended to replace your timing belt kit regularly, typically between 60,000 to 100,000 miles, or as specified by your vehicle manufacturer. Over time, the belt can expand or contract due to heat and age, leading to deterioration. When replacing the timing belt, it is advisable to replace the water pump and other timing components together to avoid potential future engine damage and ensure synchronized operation.
7. Specifications
| Feature | Detail |
|---|---|
| Brand | ECCPP |
| Model Number | 052011 |
| Material | High Performance Thermoplastic |
| Item Weight | 5.15 pounds |
| Product Dimensions | 9.84 x 5.91 x 4.72 inches |
| OEM Part Numbers | TCKWP329, WP329K1A, TB329LK1, 91213-R70-A02, 19200-RDM-A02, 38920-RCA-A03, 56992-R70-A01, 6PK-2135, TBK329, WP135-1530, 435-5767, 19200-RDV-J01, 91212-R70-A02, TBV329, TKH002, TBK285M, PWPK-0013, TWPHD07, 14400-RCA-A01, 14550-RCA-A01, 14510-RCA-A01, 14520-RCA-A01 |
| Vehicle Service Type | Van (and other compatible vehicles listed in fitment) |
| Automotive Fit Type | Vehicle Specific Fit |
8. Troubleshooting
If you encounter issues after installation, consider the following general troubleshooting steps:
- Incorrect Fitment: Double-check that the kit is indeed compatible with your specific vehicle year, make, model, and engine type. Refer to the vehicle fitment section and your car's service manual.
- Installation Errors: Review the installation steps carefully. Incorrect timing alignment, improper tensioner adjustment, or failure to properly seat seals can lead to problems. Professional installation is recommended if you are unsure.
- Component Defects: While rare, a component might be defective. If you suspect a part is faulty, contact ECCPP customer support.
- Coolant Leaks: Ensure all connections for the water pump and cooling system are secure and properly sealed. Check for any signs of leakage around the new water pump or hoses.
- Noise: Unusual noises (e.g., squealing, grinding) after installation can indicate improper belt tension, a faulty bearing, or interference with other engine components.
For persistent issues, it is highly recommended to consult a certified automotive technician.
9. Warranty and Support
For information regarding product warranty, returns, or technical support, please refer to the ECCPP official website or contact their customer service directly. Keep your purchase receipt and product information handy when contacting support.