1. Introduction
The YUCHENGTECH 752N UV-VIS Spectrophotometer is a precision analytical instrument designed for quantitative analysis in various scientific and industrial applications. It operates within the ultraviolet and visible light spectrum (200nm-1000nm) and is equipped with a 4nm spectral bandwidth, offering reliable and accurate measurements of transmittance, absorbance, and concentration. This manual provides essential information for the safe and effective operation, setup, and maintenance of the instrument.
2. Safety Information
- Electrical Safety: Ensure the instrument is connected to a grounded power outlet with the correct voltage (AC 220 V, 50 Hz or AC 110 V, 60 Hz). Do not operate with damaged power cords.
- Chemical Handling: Always wear appropriate personal protective equipment (PPE) such as gloves and safety glasses when handling chemical samples and reagents. Dispose of chemical waste according to local regulations.
- Ventilation: Ensure adequate ventilation around the instrument to prevent overheating and to dissipate any fumes from samples.
- Lamp Safety: The UV lamp emits ultraviolet radiation. Avoid direct exposure to the eyes and skin. Only qualified personnel should perform lamp replacement.
- Authorized Personnel: Only trained and authorized personnel should operate and maintain this instrument.
3. Product Overview
The 752N Spectrophotometer features a robust design with an integrated control panel and a versatile sample compartment. Key components include the light source, monochromator, sample compartment, detector, and data processing unit.

Figure 3.1: Rear Panel View
This image displays the rear panel of the spectrophotometer. On the left, a D-sub 9-pin RS232 serial port is visible for connecting to a computer. To the right, a standard AC power input socket and a power switch are present. The panel also features multiple ventilation grilles to ensure proper heat dissipation during operation.
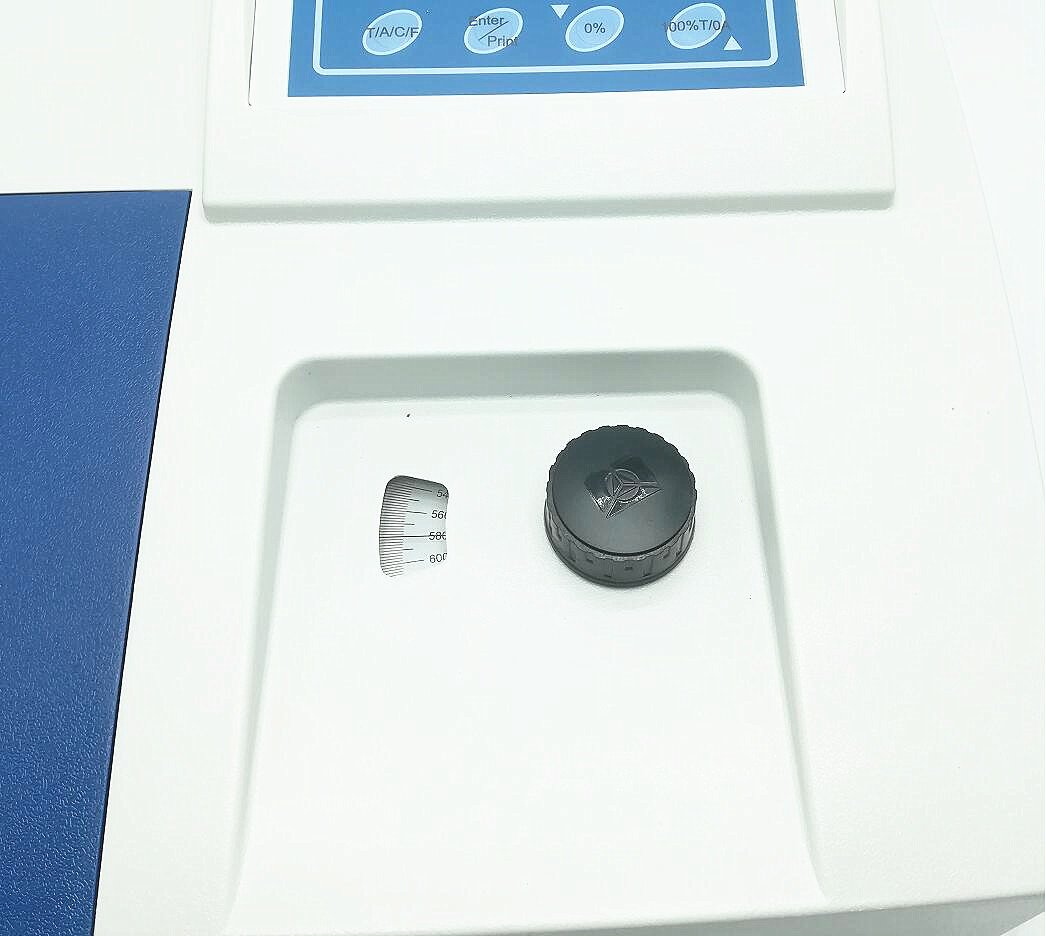
Figure 3.2: Top Panel View
This image shows the top surface of the spectrophotometer. In the foreground, the sample compartment is visible, designed to accommodate cuvettes of various path lengths (5-50 mm). A black cap covers a part of the compartment, likely for a solvent or waste reservoir. Behind the sample compartment, a control panel with buttons for functions like 'T/A/C/F', 'Enter/Print', '0%', and '100%T/0A' is present, indicating direct control over measurement parameters.
4. Setup
4.1 Unpacking and Inspection
- Carefully remove the spectrophotometer and all accessories from the packaging.
- Inspect the instrument for any signs of damage that may have occurred during transit. Report any damage to the supplier immediately.
- Verify that all components listed in the packing list are present.
4.2 Placement
- Place the spectrophotometer on a stable, level, and vibration-free surface.
- Ensure the operating environment is free from direct sunlight, strong magnetic fields, excessive dust, and corrosive gases.
- Maintain an ambient temperature between 10°C and 35°C and relative humidity below 80%.
4.3 Power Connection
- Connect the provided power cord to the instrument's power input socket on the rear panel.
- Plug the other end of the power cord into a grounded electrical outlet matching the instrument's power requirements (AC 220 V, 50 Hz or AC 110 V, 60 Hz).
4.4 Software Installation
- Connect the spectrophotometer to a computer using an RS232 serial cable.
- Install the provided software according to the instructions in the software manual. This software enables advanced data acquisition, analysis, and instrument control.
5. Operating Instructions
5.1 Power On and Warm-up
- Flip the power switch on the rear panel to the 'ON' position.
- Allow the instrument to warm up for at least 15-30 minutes to ensure stable lamp output and detector response.
5.2 Wavelength Setting
- Use the control panel buttons to set the desired measurement wavelength within the 200nm-1000nm range. Refer to the specific application for the optimal wavelength.
5.3 Calibration (Zero and Full Scale Adjustment)
- Insert a blank (reference) cuvette containing the solvent or matrix into the sample compartment.
- Press the '0%' or '0A' button on the control panel to perform an automatic zero adjustment for absorbance or 0% transmittance.
- For transmittance measurements, a 100%T adjustment may also be required using the blank.
5.4 Sample Handling
- The sample compartment accommodates cells ranging from 5mm to 50mm path length. Ensure the correct cell holder is used for the chosen cuvette size.
- Always use clean, scratch-free cuvettes. Fill cuvettes carefully to avoid air bubbles and ensure the light path is clear.
- Wipe the exterior of the cuvette with a lint-free tissue before placing it in the sample compartment.
5.5 Measurement Modes
- Transmittance (T): Measures the percentage of light that passes through the sample.
- Absorbance (A): Measures the amount of light absorbed by the sample.
- Concentration (C): Allows direct concentration read-out after setting a concentration factor or using a standard curve.
- Select the desired measurement mode using the 'T/A/C/F' button on the control panel.
- Insert the sample cuvette into the sample compartment and initiate the measurement.
5.6 Data Output
- Measurement results can be displayed on the instrument's screen.
- For data logging, analysis, and printing, connect the instrument to a computer via the RS232 port and use the provided software.
6. Maintenance
6.1 Cleaning
- Exterior: Wipe the exterior surfaces of the instrument with a soft, damp cloth. Avoid using abrasive cleaners or solvents that could damage the finish.
- Sample Compartment: Clean the sample compartment regularly to remove spills or dust. Use a soft cloth or cotton swab. Ensure no liquid enters the optical path.
- Cuvettes: Clean cuvettes thoroughly after each use with appropriate solvents and rinse with distilled water. Dry them completely before storage.
6.2 Lamp Replacement
- The spectrophotometer uses both a Deuterium lamp (for UV range) and a Tungsten Halogen lamp (for Visible range). These lamps have a finite lifespan.
- When lamp intensity decreases or errors related to the light source occur, replacement may be necessary.
- Warning: Lamp replacement should only be performed by trained service personnel. Disconnect the power cord before attempting any internal maintenance. Refer to the service manual for detailed instructions.
6.3 Storage
- When not in use for extended periods, power off the instrument and cover it with a dust cover to protect it from dust and environmental contaminants.
- Store in a dry, cool place, away from direct sunlight and extreme temperatures.
7. Troubleshooting
- No Power: Check the power cord connection, power switch, and the electrical outlet. Ensure the correct voltage is supplied.
- Unstable Readings: Allow sufficient warm-up time. Check for dirty cuvettes, air bubbles in samples, or vibrations in the environment. Ensure the sample compartment lid is closed properly.
- Software Connection Issues: Verify the RS232 cable connection. Ensure the correct COM port is selected in the software and that the software drivers are properly installed.
- High Stray Light: This may indicate a dirty optical component or a failing lamp. Contact service personnel if cleaning the sample compartment does not resolve the issue.
- Error Messages: Refer to the software manual or contact technical support with the specific error code for assistance.
8. Specifications
| Parameter | Specification |
|---|---|
| Model | 752N |
| Wavelength Range | 200 - 1000 nm |
| Wavelength Accuracy | <2 nm |
| Wavelength Repeatability | <1 nm |
| Spectrum Bandwidth | 4 nm |
| Transmittance Accuracy | +/- 0.5% (t) (NBS930D) |
| Transmittance Repeatability | <0.2% (t) |
| Transmittance Measuring Range | 0 - 100 T |
| Absorbance Measuring Range | 0 - 2 A |
| Stray Light | +/- 0.3% (t) (at 220 nm, NaNO2) |
| Drift | +/- 0.5% (t) / 3 min |
| Signal Noise | 0.2 T% |
| RS232 Port | Included |
| Cell Holder | 10 mm (supports 5-50 mm cells) |
| Power Supply | AC 220 V, 50 Hz; AC 110 V/ 60 Hz |
9. Warranty and Support
For warranty information, technical support, or service inquiries, please contact your supplier or the manufacturer, YUCHENGTECH. Keep your purchase receipt and product serial number readily available when contacting support.


