
1. Introduction
Thank you for purchasing the Panasonic 1.3 Cu. Ft. Microwave, Model NNSG626B. This appliance is designed for efficient and convenient cooking, reheating, and defrosting. Featuring an 1100W high-power setting and a 1.3 cu. ft. capacity with a 12.4-inch diameter glass turntable, it accommodates various cookware sizes. This manual provides essential information for safe and effective use of your microwave oven.
2. Important Safety Instructions
When using electrical appliances, basic safety precautions should be followed, including the following:
- Read all instructions before using the appliance.
- Do not operate the oven if it has a damaged cord or plug, if it is not working properly, or if it has been damaged or dropped.
- Do not heat liquids or other foods in sealed containers as they are liable to explode.
- Do not use corrosive chemicals or vapors in this appliance.
- Close supervision is necessary when the appliance is used by or near children.
- Do not use this appliance for commercial purposes. It is intended for household use only.
- Always ensure the turntable and roller ring are correctly positioned before operation.
- Do not attempt to operate this oven with the door open as this can result in harmful exposure to microwave energy.
- Only use utensils suitable for microwave ovens.
3. Package Contents
Verify that all components are present and in good condition:
- Panasonic Microwave Oven Unit (Model NNSG626B)
- Glass Turntable (12.4-inch diameter)
- Roller Ring
- Instruction Manual
4. Setup and Installation
4.1 Placement
Place the microwave oven on a flat, stable surface. Ensure there is adequate ventilation around the unit. Maintain a minimum clearance of 4 inches (10 cm) on the top, rear, and sides for proper airflow. Do not block the air vents.
4.2 Turntable Assembly
- Place the roller ring in the center of the oven cavity floor.
- Carefully place the glass turntable onto the roller ring, ensuring it sits securely in the center support.
The turntable must be in place during all cooking operations.
4.3 Power Connection
Plug the microwave oven into a grounded electrical outlet. Ensure the voltage matches the requirements specified on the appliance label.
5. Operating Instructions
5.1 Control Panel Overview
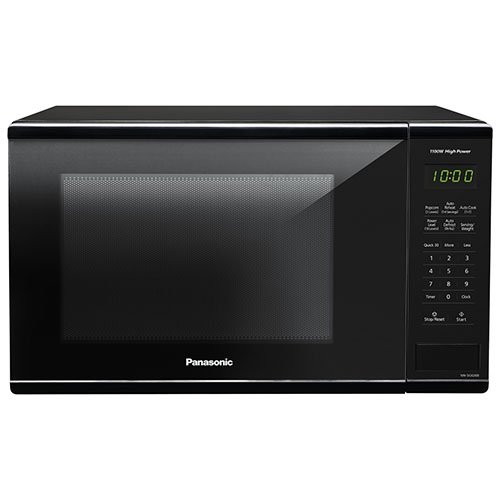
The microwave features a flat-touch control panel with a backlit green LED display. Key controls include number pads (0-9), Quick 30, Auto Cook buttons, Defrost options, Power Level, Clock, Kitchen Timer, Stop/Reset, and Start.
5.2 Setting the Clock
- Press the Clock button.
- Enter the current time using the number pads.
- Press the Clock button again to confirm.
5.3 Basic Microwave Cooking (Time Cook)
- Place food in a microwave-safe container inside the oven.
- Enter the desired cooking time using the number pads (e.g., 1 for 1 minute, 100 for 1 minute 00 seconds). Maximum setting time is 99 minutes 99 seconds.
- To adjust power level (default is 100%): Press Power Level, then enter a number from 1 to 10 (10 being 100%).
- Press Start.
5.4 Quick 30
The Quick 30 button allows for quick and convenient reheating. Each press adds 30 seconds of cooking time at full power. Press Quick 30, then press Start.
5.5 Auto Cook Functions
The microwave includes several pre-programmed auto-cook settings:
- Popcorn: For popping popcorn.
- Potato: For baking potatoes.
- Pizza: For reheating pizza slices.
- Frozen Food: For reheating various frozen meals.
- Beverage: For heating beverages.
To use: Press the desired Auto Cook button, select the quantity if prompted, then press Start.
5.6 Defrost Functions
The microwave offers two defrost methods:
- Defrost by Time: Press Defrost by Time, enter the desired defrosting time, then press Start.
- Defrost by Weight: Press Defrost by Weight, enter the weight of the food, then press Start.
5.7 Kitchen Timer
To use the kitchen timer without cooking:
- Press the Kitchen Timer button.
- Enter the desired time using the number pads.
- Press Start. The timer will count down without microwave operation.
5.8 Stop/Reset
Press Stop/Reset once to pause cooking or twice to cancel the current program and clear the display.
6. Maintenance and Cleaning
Regular cleaning helps maintain the performance and appearance of your microwave oven.
6.1 Cleaning the Interior
Wipe the interior cavity with a damp cloth after each use. For stubborn food splatters, place a bowl of water with lemon slices inside and microwave for 2-3 minutes to loosen residue, then wipe clean. Do not use abrasive cleaners or scouring pads.
6.2 Cleaning the Exterior
Clean the exterior surfaces, including the door and control panel, with a soft, damp cloth. Avoid excessive moisture, especially around the control panel. Dry thoroughly.
6.3 Cleaning the Turntable and Roller Ring
The glass turntable and roller ring can be removed and washed in warm, soapy water or in the dishwasher. Ensure they are completely dry before returning them to the oven.
7. Troubleshooting
If you encounter issues with your microwave, refer to the following common problems and solutions:
| Problem | Possible Cause / Solution |
|---|---|
| Oven does not start | Check if the plug is securely inserted into the outlet. Ensure the door is closed properly. Check for blown fuse or tripped circuit breaker. |
| Food not cooking evenly | Ensure the turntable is rotating freely. Stir or rearrange food during cooking. Use appropriate power levels and cooking times. |
| Display shows an error code | Unplug the oven for a few minutes, then plug it back in. If the error persists, contact customer support. |
| Light bulb not working | The light bulb is not user-replaceable. Contact qualified service personnel. |
8. Specifications
- Model: NNSG626B
- Oven Capacity: 1.3 cu. ft.
- Cooking Power: 1100 Watts
- Turntable Diameter: 12.4 inches (Glass)
- Control Panel Type: Electronic Touch
- Color: Black
- Product Dimensions (D x W x H): 42.2 cm x 51.9 cm x 31.5 cm (16.61 in x 20.43 in x 12.4 in)
- Weight: 16 kg
- Special Features: Auto Cook, Defrost, Quick 30
- Display: Backlit Green LED
9. Warranty and Support
9.1 Warranty Information
This Panasonic microwave oven comes with a limited warranty:
- Labour Warranty: 1 Year
- Parts Warranty: 1 Year
Please retain your proof of purchase for warranty claims. The warranty covers defects in materials and workmanship under normal use.
9.2 Customer Support
For technical assistance, service, or warranty inquiries, please contact Panasonic customer support. Refer to the official Panasonic website or your warranty card for the most current contact information.