GE GDT655SSJSS
GE APPLIANCES GDT655SSJSS Dishwasher User Manual
Model: GDT655SSJSS
1. Important Safety Information
Read all instructions before using this appliance to reduce the risk of fire, electric shock, or injury. Keep this manual for future reference.
- Electrical Safety: Ensure the dishwasher is properly grounded. Do not operate with a damaged power cord.
- Water Safety: Turn off water supply to the dishwasher if it will not be used for an extended period.
- Child Safety: Keep children away from the dishwasher, especially when it is operating. Do not allow children to play inside or on the appliance.
- Sharp Objects: Load sharp items (knives, skewers) with handles up to reduce the risk of cuts.
- Flammable Materials: Do not store or use flammable materials near the dishwasher.
2. Setup and Installation
Proper installation is crucial for the safe and efficient operation of your GE GDT655SSJSS dishwasher. It is recommended that installation be performed by a qualified technician.
2.1 Pre-Installation Checks
- Verify that the installation area meets the required dimensions for a built-in dishwasher.
- Ensure access to a dedicated 110-volt electrical outlet.
- Confirm hot water supply line and drain connection are available.
2.2 Installation Overview
The dishwasher requires connection to a hot water supply, a drain line, and an electrical power source. Secure the unit to prevent tipping. Refer to the comprehensive installation guide provided with your appliance for detailed step-by-step instructions, diagrams, and safety warnings specific to your model.

Figure 2.1: Front view of the GE GDT655SSJSS Stainless Steel Dishwasher. This image shows the sleek stainless steel finish and integrated handle, indicating a built-in design.
3. Operating Instructions
Follow these steps for optimal cleaning performance from your GE GDT655SSJSS dishwasher.
3.1 Loading the Dishwasher
Proper loading improves wash performance and prevents damage to dishes. Scrape off large food particles before loading.
- Lower Rack: Place larger items like plates, serving dishes, and pots. Ensure items do not block the spray arms.
- Upper Rack: Ideal for glasses, cups, small bowls, and plastic items that are dishwasher safe.
- Cutlery Basket: Place forks and spoons with handles up. Knives should be placed with handles up to minimize injury risk.

Figure 3.1: Interior view of the GE GDT655SSJSS dishwasher with dishes loaded in both upper and lower racks. This illustrates effective loading for various dish sizes.
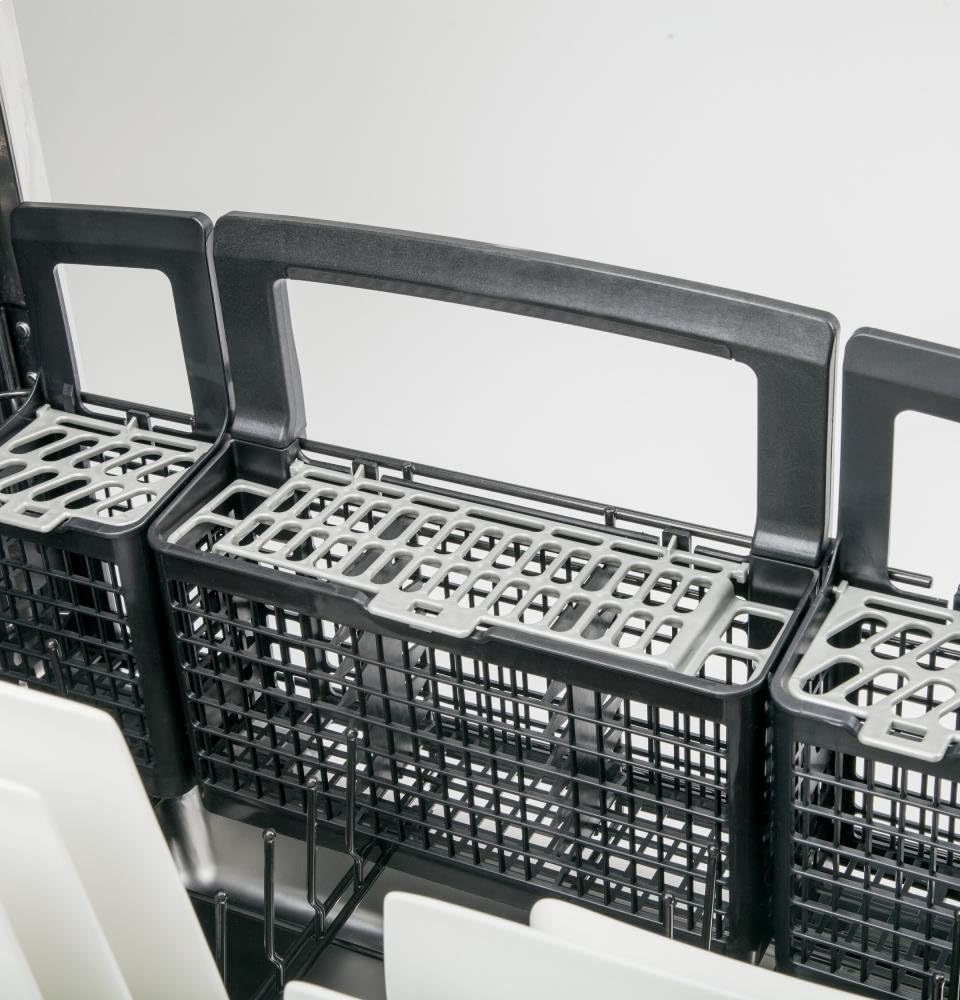
Figure 3.2: Close-up of the dishwasher's cutlery baskets, designed to hold various utensils securely during a wash cycle.

Figure 3.3: A hand demonstrating the adjustment of flexible tines within a dishwasher rack, allowing for versatile loading of different dish shapes and sizes.
3.2 Adding Detergent and Rinse Aid
Use automatic dishwasher detergent only. Fill the main detergent dispenser according to the soil level and water hardness. Fill the rinse aid dispenser to the indicated level; rinse aid helps with drying and prevents spots.
3.3 Selecting a Wash Cycle and Options
Your dishwasher offers several wash cycles and options to customize your wash.

Figure 3.4: The control panel of the GE GDT655SSJSS dishwasher, displaying various cycle selection buttons, a digital timer, and option buttons such as 'Wash Zones' and 'Heated Dry'.
- Cycle Options: Normal, Heavy, Light, Delicate, Rapid, Rinse. Select the cycle appropriate for the soil level of your dishes.
- Wash Zones: This feature allows you to wash only the upper or lower rack, saving water and energy when you have a smaller load.

Figure 3.5: Close-up of the 'Wash Zones' button on the control panel, showing indicators for 'Upper' and 'Lower' rack washing options.
- Heated Dry: Activates a heating element for improved drying performance.
- Bottle Jets: Directs water into tall items for thorough cleaning.
- Steam: Helps loosen tough soils before the main wash cycle.
3.4 Starting a Cycle
Close the dishwasher door firmly. Press the 'Start' button. The cycle will begin shortly after. If the door is opened during a cycle, close it promptly to resume operation.
4. Maintenance and Care
Regular maintenance helps ensure the longevity and performance of your dishwasher.
4.1 Cleaning the Exterior
Wipe the exterior with a soft, damp cloth. For stainless steel surfaces, use a stainless steel cleaner and polish. Avoid abrasive cleaners.
4.2 Cleaning the Interior
- Filter: Periodically check and clean the filter located at the bottom of the dishwasher tub. Remove any food particles or debris.
- Spray Arms: Ensure the spray arm nozzles are not clogged. Remove and rinse if necessary.
- Tub: Use a dishwasher cleaner or a mixture of vinegar and baking soda to remove mineral buildup and odors.
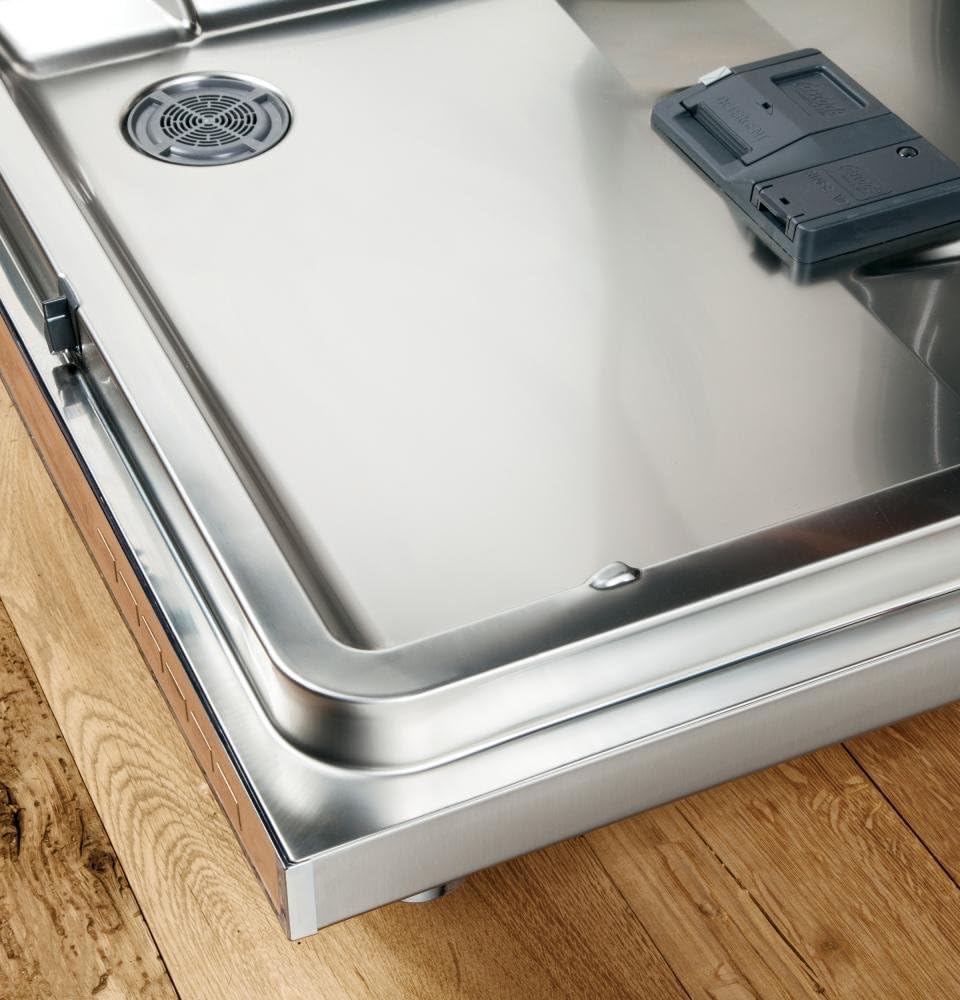
Figure 4.1: The interior base of the GE GDT655SSJSS dishwasher, highlighting the stainless steel tub and the removable filter assembly for easy cleaning.
4.3 Winterizing
If the dishwasher is left in an unheated place during winter, have a qualified service person drain the water lines and pump to prevent damage from freezing.
5. Troubleshooting
Before calling for service, review these common issues and their solutions.
- Dishwasher Does Not Start: Check if the power cord is plugged in, the circuit breaker is not tripped, and the door is fully latched. Ensure the 'Start' button was pressed.
- Dishes Not Clean: Verify proper loading, sufficient detergent, and that spray arms are not blocked. Check water temperature and pressure.
- Water Not Draining: Inspect the drain hose for kinks or blockages. Clean the filter.
- Leaks: Ensure the dishwasher is level. Check door gasket for debris or damage. Do not overfill the rinse aid dispenser.
- Unusual Noise: Ensure dishes are not interfering with spray arms. Check for foreign objects in the pump area.
If problems persist, consult the full troubleshooting section in your product manual or contact customer support.
6. Specifications
| Feature | Specification |
|---|---|
| Model Number | GDT655SSJSS |
| Brand | GE |
| Finish Type | Stainless Steel |
| Form Factor | Built-In |
| Item Weight | 102 Pounds |
| Voltage | 110 Volts |
| Cycle Options | Delicate, Heavy, Normal, Rapid, Rinse |
| Inner Material | Stainless Steel |
| Product Dimensions (D x W x H) | 40"D x 48"W x 40"H |
| Noise Level | 5 Decibels |
| Included Components | Dishwasher |
7. Warranty and Support
Your GE GDT655SSJSS dishwasher is covered by a limited warranty. Please refer to the warranty card included with your purchase for specific terms and conditions, including coverage duration and limitations.
For technical assistance, service scheduling, or to order replacement parts, please visit the official GE Appliances website or contact their customer support line. Have your model and serial number ready when contacting support.
Ask a question about this manual
Ask about setup, troubleshooting, compatibility, parts, safety, or missing instructions. Manuals+ will review the question and use this page’s manual context to help answer it.