MGM 523
MG Scientific Incubator Laboratory Lab 523 User Manual
Model: 523 | Brand: MGM
1. Introduction
This manual provides comprehensive instructions for the safe and efficient operation, setup, and maintenance of the MG Scientific Incubator Laboratory Lab 523. This general-purpose incubator is designed for laboratory applications requiring precise temperature control up to 70°C.
Please read this manual thoroughly before operating the incubator to ensure proper usage and to prevent damage or injury.
2. Safety Instructions
Adherence to the following safety guidelines is crucial for safe operation and to prevent damage to the unit or injury to personnel.
- Ensure the incubator is placed on a stable, level surface away from direct sunlight, heat sources, or excessive vibrations.
- Connect the unit only to a grounded power outlet with the specified voltage (220V/110V AC, 5 Hz, single phase).
- Do not operate the incubator with a damaged power cord or plug.
- Avoid placing flammable or explosive materials inside the incubator.
- Do not block ventilation openings.
- Always disconnect power before cleaning or performing maintenance.
- Do not immerse the unit in water or other liquids.
- Only qualified personnel should perform repairs or internal adjustments.
3. Product Overview
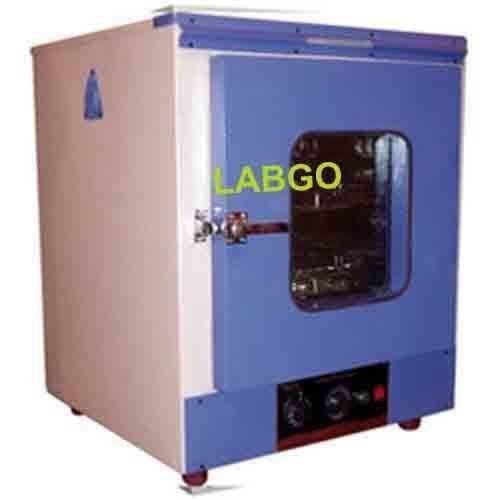
Image 3.1: Front view of the MG Scientific Incubator Lab 523. The incubator features a white outer casing with a blue front door, which includes a double glass window for observation. Control knobs are visible at the bottom front.
The MG Scientific Incubator Lab 523 is constructed with a standard double wall fabrication. The inner chamber is made of richly anodized aluminum or highly polished stainless steel, while the outer casing is made of thick mild steel finished in white stoving enamel or powder-coated paint with a matte finish.
It features a double wall door with a double glass window, allowing for observation of samples inside the chamber without disturbing the internal environment. Temperature control is managed by a thermostat, maintaining temperatures from room temperature up to 70°C.
4. Setup
Follow these steps to set up your incubator:
- Unpacking: Carefully remove the incubator from its packaging. Inspect for any visible damage incurred during transit. Report any damage to your supplier immediately.
- Placement: Position the incubator on a sturdy, level surface capable of supporting its weight and contents. Ensure adequate clearance around the unit for ventilation (at least 10 cm on all sides).
- Power Connection: Verify that the local power supply matches the specifications on the incubator's rating label (220V/110V AC, 5 Hz, single phase). Plug the power cord into a grounded electrical outlet.
- Internal Setup: Place any shelves or racks provided into the inner chamber as desired.
- Initial Cleaning: Before first use, wipe down the interior and exterior surfaces with a mild, non-abrasive cleaner and a soft cloth. Ensure the chamber is completely dry before proceeding.
5. Operating Instructions
This section details the basic operation of the incubator.
- Power On: Ensure the incubator is properly plugged in. Locate the power switch, typically on the front or side panel, and turn it to the 'ON' position.
- Setting Temperature: Use the thermostat control knob, usually located on the front panel, to set the desired temperature. Rotate the knob clockwise to increase the temperature and counter-clockwise to decrease it.
- Monitoring Temperature: Allow the incubator to stabilize at the set temperature before placing samples inside. The internal temperature can be observed through the double glass window.
- Loading Samples: Open the door and carefully place your samples inside the chamber. Ensure samples do not block air circulation or touch the chamber walls. Close the door securely.
- Observation: The double glass window allows for visual inspection of samples without opening the door, thus maintaining stable internal conditions.
- Power Off: When incubation is complete, turn the power switch to the 'OFF' position and disconnect the unit from the power supply if it will not be used for an extended period.
Note: The thermostat controls the heating element to maintain the set temperature. Fluctuations may occur during initial heat-up or when the door is opened.
6. Maintenance
Regular maintenance ensures the longevity and optimal performance of your incubator.
- Cleaning the Interior:
- Disconnect power before cleaning.
- Wipe the inner chamber with a soft cloth dampened with a mild, non-corrosive disinfectant or detergent.
- Rinse with a clean, damp cloth and dry thoroughly.
- For stubborn stains, use a specialized laboratory cleaner, ensuring it is safe for aluminum or stainless steel surfaces.
- Cleaning the Exterior: Wipe the outer surfaces with a soft cloth and a mild detergent. Avoid abrasive cleaners that could damage the paint finish.
- Door Seal Inspection: Periodically inspect the door gasket for cracks, tears, or signs of wear. A damaged seal can affect temperature stability. Replace if necessary.
- Ventilation Openings: Ensure that the ventilation openings are free from dust and debris to maintain proper airflow.
- Calibration: For applications requiring high precision, periodic calibration of the thermostat with a certified thermometer is recommended.
7. Troubleshooting
This section provides solutions to common issues you might encounter.
| Problem | Possible Cause | Solution |
|---|---|---|
| Incubator does not power on. | No power supply; Power cord loose; Power switch off. | Check power outlet; Ensure power cord is securely plugged in; Turn power switch to 'ON'. |
| Temperature is not reaching set point. | Door not closed properly; Damaged door seal; Overloaded chamber; Faulty thermostat. | Ensure door is latched; Inspect and replace door seal if damaged; Reduce sample load; Contact support for thermostat issues. |
| Temperature fluctuates excessively. | Frequent door opening; Poor room ventilation; Unit placed near heat source/draft. | Minimize door openings; Ensure adequate room ventilation; Relocate incubator to a stable environment. |
| Unusual noises or odors. | Internal component issue; Contamination. | Disconnect power and contact support; Clean the chamber thoroughly. |
If the problem persists after attempting the above solutions, please contact customer support.
8. Specifications
| Feature | Detail |
|---|---|
| Model | Lab 523 |
| Brand | MGM |
| Manufacturer | MG Scientific |
| Construction | Double wall fabrication |
| Inner Chamber Material | Richly anodized aluminum or highly polished stainless steel |
| Outer Body Material | Thick mild steel, white stoving enamel/powder coated paint (matte finish) |
| Door Type | Double wall door with double glass window |
| Temperature Range | Room temperature to 70°C |
| Temperature Control | Thermostat controlled |
| Power Supply | 220V/110V AC, 5 Hz, single phase |
| Internal Dimensions (H x D x W) | 12" x 12" x 12" (approx. 30.5 cm x 30.5 cm x 30.5 cm) |
| Capacity | 28 Liters |
| ASIN | B01FY01X24 |
| Date First Available | May 19, 2016 |
9. Warranty and Support
For warranty information and technical support, please refer to the documentation provided with your purchase or contact your supplier directly. Ensure you have your model number (Lab 523) and ASIN (B01FY01X24) ready when contacting support.
The manufacturer assures best quality and genuine products, suitable for demonstration or scientific purposes.
Related Documents - 523
 |
Thermo Scientific Value Lab Refrigerators, Freezers, and Combination Units - Product Specifications Detailed product specifications for Thermo Scientific Value Lab Refrigerators, Freezers, and Combination Units, including features, dimensions, capacities, and warranty information for laboratory use. |
 |
BT-523 Dongle Specification and User Manual Detailed specifications and user guide for the BT-523 Bluetooth Dongle, designed for Motorola HT-1000 radios, including pairing instructions and FCC compliance information. |
 |
DOGLinsen PD 523-TIO Dog Training Collar User Guide | Instructions & FAQ Comprehensive user guide for the DOGLinsen PD 523-TIO Dog Training Collar. Learn about safety, operation, automatic anti-bark function, pairing, maintenance, and troubleshooting. Includes specifications and warranty information. |
 |
ZLINE Range Hoods 520, 523, 527 Models: Installation and User Manual Comprehensive installation and user manual for ZLINE 520, 523, and 527 series range hoods. Covers safety instructions, product specifications, installation steps, operation, cleaning, maintenance, troubleshooting, and warranty information. |
 |
Solar Alarm User's Manual - Installation, Operation, and Technical Specifications Comprehensive user manual for the Solar Alarm system, detailing product overview, remote operation, installation guide, charging instructions, technical parameters, and FCC compliance. Learn how to set up and use your solar-powered security alarm. |
 |
Valena Life/Allure Smart Home System Installation Guide Comprehensive guide to installing and configuring the Legrand Valena Life/Allure connected home system, featuring Netatmo technology. It covers system components, installation tips, setup procedures, app usage, and a detailed product catalog. |