1. Introduction
This manual provides essential instructions for the safe and efficient operation of your Sony VPL-HW45ES Home Theater Projector. The VPL-HW45ES is designed to deliver a high-quality cinematic experience with Full HD images, utilizing SXRD panels and advanced Reality Creation upscaling technology. With 1,800 lumens of brightness and a compact design, it is suitable for various home entertainment setups. Please read this manual thoroughly before using the projector and retain it for future reference.
2. Safety Information
WARNING: To reduce the risk of fire or electric shock, do not expose this apparatus to rain or moisture.
- Power Source: Operate the projector only from the type of power source indicated on the marking label.
- Ventilation: Ensure proper ventilation. Do not block ventilation openings. Maintain adequate space around the projector for airflow.
- Heat: Do not install near any heat sources such as radiators, heat registers, stoves, or other apparatus (including amplifiers) that produce heat.
- Cleaning: Unplug this apparatus during lightning storms or when unused for long periods. Clean only with a dry cloth.
- Lamp: The lamp inside the projector operates at high temperatures and pressures. Refer to the maintenance section for safe lamp handling and replacement.
- Lens: Do not look directly into the projector lens when the lamp is on, as the intense light can damage your eyes.
3. What's in the Box
Verify that all items listed below are included in your package:
- Sony VPL-HW45ES Projector
- Remote Control
- AA Batteries (2)
- AC Power Cord
- Lens Cap
- Operating Instructions (this manual)
4. Product Overview
Familiarize yourself with the main components of your Sony VPL-HW45ES projector.

Figure 4.1: Angled view of the Sony VPL-HW45ES projector. This image displays the overall design, including the lens, ventilation grilles on the sides, and the top panel with the Sony logo.

Figure 4.2: Front view of the Sony VPL-HW45ES projector. The prominent central lens is visible, along with the front ventilation and the Sony branding.
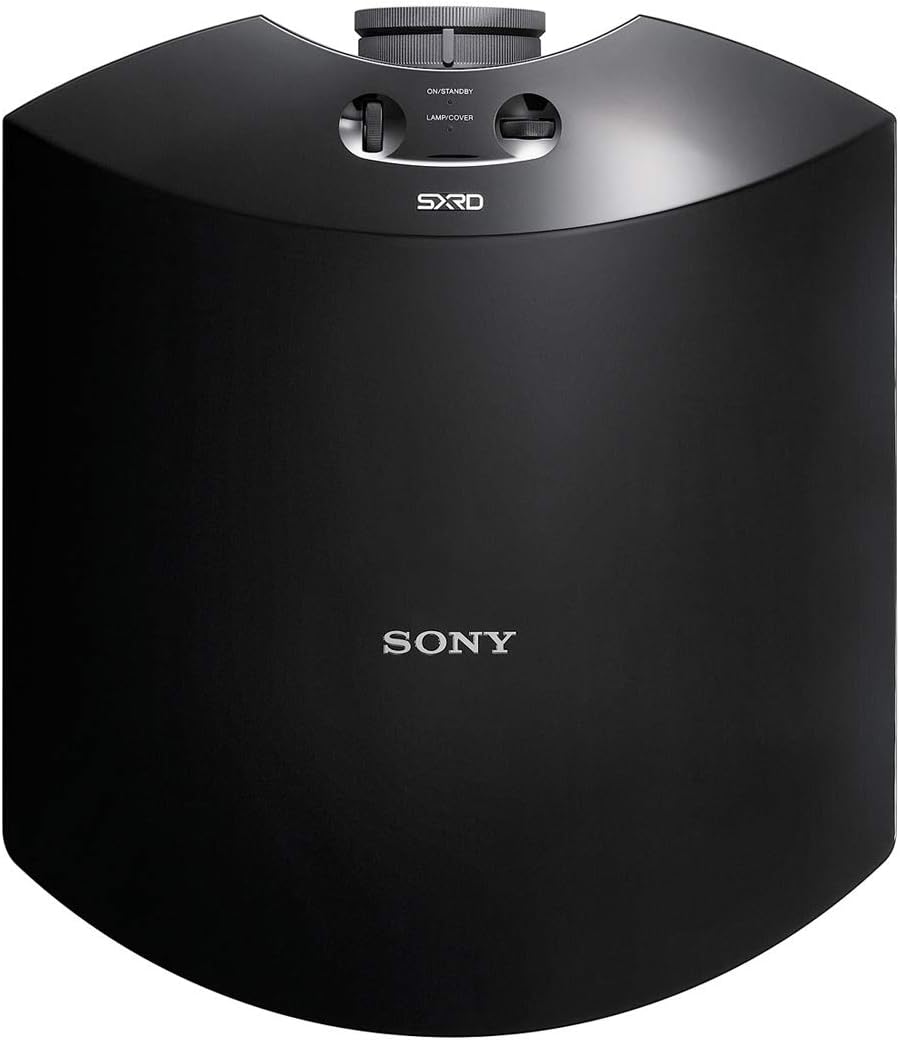
Figure 4.3: Top view of the Sony VPL-HW45ES projector. This shows the smooth, curved top surface, the 'ON/STANDBY' button, 'LAMP COVER' access, and the SXRD logo.
4.1. Front Panel
- Projection Lens: Emits the image onto the screen.
- Focus Ring: Adjusts image sharpness.
- Zoom Ring: Adjusts image size.
4.2. Top Panel
- ON/STANDBY Button: Powers the projector on or off.
- Lamp Cover: Provides access for lamp replacement.
4.3. Rear Panel

Figure 4.4: Rear view of the Sony VPL-HW45ES projector. This image highlights the various input and power ports, including AC IN, HDMI inputs, USB, REMOTE, and IR IN.
- AC IN: Connects the power cord.
- HDMI IN 1/2: Connects to HDMI-compatible devices (e.g., Blu-ray player, gaming console).
- USB: For service or firmware updates.
- REMOTE: For wired remote control connection.
- IR IN: For external IR receiver connection.
- Control Panel: Buttons for MENU, INPUT, and navigation.
4.4. Bottom Panel

Figure 4.5: Bottom view of the Sony VPL-HW45ES projector. This shows the mounting points, adjustable feet, and additional ventilation grilles.
- Adjustable Feet: For leveling the projector on a flat surface.
- Mounting Points: For ceiling or wall mount installation.
5. Setup
5.1. Projector Placement
The VPL-HW45ES offers flexible placement options due to its manual 1.6x zoom ratio and wide lens shift range. Consider the following:
- Distance from Screen: The throw distance will determine the image size. Refer to the specifications for recommended distances for various screen sizes.
- Height and Angle: Position the projector to minimize keystone correction, which can degrade image quality. Use the lens shift function to adjust the image position vertically and horizontally without tilting the projector.
- Ventilation: Ensure clear space around the projector for adequate airflow to prevent overheating.

Figure 5.1: The Sony VPL-HW45ES projector mounted in a home theater environment, projecting an image onto a large screen. This illustrates a typical installation scenario.
5.2. Connecting Devices
- Power Connection: Connect the supplied AC power cord to the AC IN port on the projector and then to a wall outlet.
- HDMI Devices: Connect your video sources (e.g., Blu-ray player, game console, streaming device) to the HDMI IN 1 or HDMI IN 2 ports using high-quality HDMI cables.
- Remote Control: Insert the two AA batteries into the remote control.
5.3. Initial Power On and Image Adjustment
- Power On: Press the ON/STANDBY button on the projector or the remote control. The power indicator will light up.
- Select Input: Press the INPUT button on the projector or remote control to select the desired input source (HDMI 1 or HDMI 2).
- Focus Adjustment: Rotate the focus ring on the lens until the image appears sharp and clear.
- Zoom Adjustment: Rotate the zoom ring on the lens to adjust the image size to fit your screen.
- Lens Shift: Use the lens shift controls (typically located near the lens) to precisely position the image vertically and horizontally on the screen without moving the projector.
6. Operating Instructions
6.1. Basic Operation
- Power On/Off: Press the ON/STANDBY button. Press it again to put the projector into standby mode.
- Input Selection: Use the INPUT button on the remote or projector to cycle through available input sources.
- Menu Navigation: Use the MENU button and navigation arrows on the remote to access and adjust projector settings.
6.2. Picture Settings
The VPL-HW45ES offers several advanced picture settings to optimize your viewing experience:
- Reality Creation: This super-resolution technology enhances subtle details, colors, and textures to produce highly detailed Full HD images. Access this setting in the picture menu to adjust its intensity.
- Brightness and Contrast: Adjust these settings to achieve optimal black levels and highlight detail. The projector features 1,800 lumens for bright images and a high contrast ratio.
- Motionflow Technology: This feature reduces motion blur, providing a smoother image, especially during fast-paced scenes. Various modes are available to suit different content types.
- Picture Modes: Select from various preset picture modes (e.g., Cinema, Game, Reference) optimized for different content.
6.3. 3D Functionality
The projector is 3D compatible and includes a built-in industry-standard RF transmitter for wider coverage and greater stability with active 3D glasses (sold separately). To enjoy 3D content:
- Ensure your 3D source device is connected and playing 3D content.
- Wear compatible active RF 3D glasses.
- The projector should automatically detect 3D content and switch to 3D mode. If not, manually enable 3D mode in the picture settings.
7. Maintenance
7.1. Lamp Replacement
The projector lamp has an estimated lifespan of up to 6,000 hours, depending on usage and settings. When the lamp reaches the end of its life, a warning indicator will appear. Follow these steps for replacement:
- Power Off and Cool Down: Turn off the projector and unplug the power cord. Allow at least one hour for the lamp to cool completely before proceeding.
- Access Lamp: Locate the lamp cover on the top panel (refer to Figure 4.3). Remove the screw(s) securing the lamp cover and carefully remove the cover.
- Remove Old Lamp: Unscrew the lamp module and carefully pull it out. Avoid touching the glass part of the lamp.
- Install New Lamp: Insert the new, genuine Sony replacement lamp module, ensuring it is seated correctly. Secure it with the screw(s).
- Replace Cover: Reattach the lamp cover and secure it with its screw(s).
- Reset Lamp Timer: After replacing the lamp, navigate to the projector's menu and reset the lamp timer to ensure accurate tracking of the new lamp's life.
7.2. Cleaning
- Exterior: Wipe the projector's exterior with a soft, dry cloth. For stubborn dirt, use a cloth lightly dampened with water and a mild detergent, then wipe dry. Avoid abrasive cleaners or solvents.
- Lens: Gently clean the lens with a soft, lint-free lens cleaning cloth. Do not use excessive force or abrasive materials, as this can scratch the lens.
- Air Filters: Regularly check and clean the air filters to maintain optimal cooling and prevent dust buildup. Refer to the projector's menu for filter cleaning reminders.
8. Troubleshooting
If you encounter issues with your projector, refer to the following common problems and solutions:
| Problem | Possible Cause | Solution |
|---|---|---|
| No image displayed | Projector not powered on; Incorrect input selected; Loose cable connection | Ensure power cord is connected and projector is on; Select correct input source; Check HDMI cable connections. |
| Image is blurry | Lens out of focus; Projector too far/close to screen | Adjust the focus ring on the lens; Adjust projector distance or use zoom function. |
| Image is distorted (trapezoid shape) | Projector not perpendicular to screen | Use lens shift to align the image; Reposition the projector to be square with the screen. |
| No sound | Projector does not have built-in speakers; Audio not routed correctly | Connect an external audio system to your source device; Ensure audio settings on source device are correct. |
| Remote control not working | Dead batteries; Obstruction between remote and projector | Replace batteries; Ensure clear line of sight to the projector's IR receiver. |
| Projector overheats and shuts down | Blocked ventilation; Dirty air filters | Ensure clear space around vents; Clean or replace air filters. |
9. Specifications
Detailed technical specifications for the Sony VPL-HW45ES Home Theater Projector:
- Model Number: VPL-HW45ES
- Display Resolution: 1920 x 1080 (Full HD)
- Brightness: 1,800 Lumens
- Display Technology: 3 SXRD Imagers
- Light Source: High-pressure mercury lamp, 215 W type
- Lamp Life: Up to 6,000 hours (in low mode)
- Zoom Ratio: Manual 1.6x
- Lens Shift: Vertical and Horizontal
- Connectivity Technology: HDMI (2 inputs)
- Special Features: Reality Creation, Motionflow, 3D Compatible (RF transmitter built-in)
- Recommended Uses: Home Theater, Movies, Gaming
- Product Dimensions (W x H x D): Approximately 23 x 11.5 x 20 inches (58.4 x 29.2 x 50.8 cm)
- Item Weight: Approximately 20 pounds (9.07 kg)
- Power Requirements: AC 100-240V, 50/60Hz
- Manufacturer: Sony
10. Warranty & Support
Sony provides a limited warranty for this product. For specific warranty terms and conditions, please refer to the warranty card included with your purchase or visit the official Sony support website for your region. Keep your proof of purchase for warranty claims.
10.1. Customer Support
For technical assistance, troubleshooting beyond this manual, or service inquiries, please contact Sony customer support. You can find contact information and additional resources on the official Sony website: