1. Introduction
The Pioneer ND-BC8-2 is a universal rear camera designed to enhance vehicle safety by providing a clear view of the area behind your vehicle. It features a natural viewing angle and high image quality, ensuring excellent visibility during both day and night driving conditions. This camera is compatible with various monitors equipped with RCA video input terminals, including Carrozzeria car navigation and car AV systems.
Key features include:
- Compatibility with RCA video input terminals for broad integration.
- High-performance 1/4-inch CMOS sensor with approximately 310,000 pixels for clear images.
- Primary color filter for natural color reproduction, even in low light.
- Effective reduction of smear noise (overexposure) in bright environments.
- Significant reduction of driver blind spots.
- Integrated power box functionality for simplified installation with a smaller relay coupler.

2. Setup and Installation
Proper installation is crucial for optimal performance of your Pioneer ND-BC8-2 rear camera. This camera is designed for surface mounting and connects via an RCA connector.
2.1. Pre-Installation Check
- Ensure your vehicle's monitor or car AV system has an RCA video input terminal.
- For 2016 Cyber Navigation systems, a camera terminal conversion connector (model "RD-C200") is required for compatibility.
- Gather necessary tools: screwdrivers, wire cutters/strippers, electrical tape, zip ties, and a drill (if mounting requires new holes).
2.2. Mounting the Camera
The camera is designed for surface mount installation. Choose a central location on the rear of your vehicle, typically above the license plate or on the bumper, that provides an unobstructed view. Secure the camera using the provided mounting hardware.
2.3. Wiring Connection
The ND-BC8-2 features an integrated power box, simplifying the wiring process. Connect the camera's RCA video output to the RCA video input on your monitor or head unit. The camera is designed to receive power and activate automatically when the vehicle is shifted into reverse gear, eliminating the need for complex manual wiring to the tail lights for reverse signal detection.
Route the wiring carefully to avoid interference with moving parts or exposure to excessive heat or moisture. Secure all cables with zip ties to prevent rattling or damage.
3. Operating Instructions
Once installed, the Pioneer ND-BC8-2 rear camera operates seamlessly with your compatible display unit.
3.1. Automatic Activation
When you shift your vehicle into reverse gear, the camera will automatically activate, and its video feed will be displayed on your connected monitor. This automatic activation ensures that you have a clear rear view precisely when needed for parking or maneuvering.
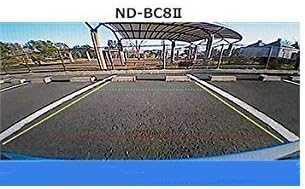
3.2. Parking Assist Lines
The camera system provides dynamic parking assist lines on the display. These lines are designed to help you gauge distance and trajectory, making parking maneuvers easier and safer. The lines may adjust based on your steering wheel input, providing real-time guidance.

3.3. Image Quality
The 1/4-inch high-performance CMOS sensor and primary color filter ensure clear and natural-colored images. Even in challenging lighting conditions, such as direct sunlight or streetlights, the camera minimizes smear noise (overexposure) to maintain a usable and clear view.
4. Maintenance
To ensure the longevity and optimal performance of your Pioneer ND-BC8-2 rear camera, follow these simple maintenance guidelines:
- Cleaning the Lens: Regularly clean the camera lens with a soft, damp cloth to remove dirt, dust, and water spots. Avoid abrasive cleaners or materials that could scratch the lens.
- Checking Connections: Periodically inspect all wiring connections to ensure they are secure and free from corrosion or damage.
- Environmental Factors: While the camera is designed for outdoor use, extreme weather conditions (e.g., heavy snow, ice, or prolonged direct sunlight) can affect performance. Clear any obstructions from the lens before driving.
5. Troubleshooting
If you encounter issues with your Pioneer ND-BC8-2 rear camera, refer to the following common troubleshooting steps:
5.1. No Image on Display
- Check Power: Ensure the vehicle is in reverse gear and the camera is receiving power.
- Verify Connections: Confirm that the RCA video cable is securely connected to both the camera and the display unit.
- Monitor Input: Make sure your display unit is set to the correct video input source for the camera.
5.2. Poor Image Quality
- Clean Lens: Clean the camera lens as described in the Maintenance section.
- Lighting Conditions: While the camera performs well in various lighting, extreme conditions can still impact clarity.
- Cable Integrity: Check the video cable for any kinks, pinches, or damage that could affect signal transmission.
5.3. Intermittent Functionality
If the camera's functionality is intermittent, check all power and video connections for looseness. Ensure that the vehicle's electrical system is stable. For issues related to software or specific compatibility, contacting Pioneer customer support is recommended for potential firmware updates or specialized assistance.
6. Specifications
| Feature | Detail |
|---|---|
| Brand | PIONEER |
| Model | ND-BC8-2 |
| Screen Size | 0.25 Inches (Sensor) |
| Compatible Devices | Monitor with RCA input |
| Installation Type | Surface Mount |
| Voltage | 12 Volts |
| Optical Sensor Technology | CMOS |
| Lens Type | Wide Angle, Fixed |
| Real Angle of View | 120 Degrees |
| Connector Type | RCA |
| Effective Still Resolution | 310,000 Pixels |
| Video Capture Resolution | 720p |
| Item Weight | 304 Grams |
7. Warranty and Support
Pioneer is committed to providing high-quality products and customer satisfaction. For any questions regarding installation, operation, or troubleshooting that are not covered in this manual, please contact Pioneer customer support. While specific warranty details may vary by region and retailer, Pioneer typically offers support for product defects and operational issues. Keep your purchase receipt as proof of purchase for warranty claims.
For further assistance, visit the official PIONEER Store on Amazon or their official website.