
Introduction
This instruction manual provides essential information for the safe operation, maintenance, and care of your BLACK+DECKER 20V MAX Cordless Drill/Driver Kit, model BDCDD120C. Please read this manual thoroughly before using the tool to ensure proper function and to prevent injury.
Important Safety Instructions
WARNING: Read all safety warnings and instructions. Failure to follow the warnings and instructions may result in electric shock, fire, and/or serious injury.
- Always wear eye protection.
- Keep work area clean and well lit.
- Do not operate power tools in explosive atmospheres, such as in the presence of flammable liquids, gases, or dust.
- Keep children and bystanders away while operating a power tool.
- Use the correct tool for your application.
- Disconnect the battery pack from the tool before making any adjustments, changing accessories, or storing power tools.
- Store idle power tools out of the reach of children.
- Maintain power tools. Check for misalignment or binding of moving parts, breakage of parts, and any other condition that may affect the power tool’s operation.
- Use power tool, accessories and tool bits etc. in accordance with these instructions, taking into account the working conditions and the work to be performed.
Proposition 65 Warning: This product contains chemicals known to the State of California to cause cancer and birth defects or other reproductive harm.
Product Components and Key Features
Your BLACK+DECKER BDCDD120C Cordless Drill/Driver Kit includes the following:
- (1) 20V MAX* Cordless Drill/Driver
- (1) 20V MAX* Lithium-Ion Battery
- (1) Battery Charger
- (1) Double Ended Bit
Key Features:
- High Performance: Delivers 115 inch-pounds of torque and up to 650 RPM for various drilling and driving tasks.
- Lightweight Design: Weighs approximately 2.5 pounds (tool only) for reduced user fatigue.
- 11-Position Clutch: Provides precision control to prevent stripping screws and over-drilling.
- Keyless Chuck: Allows for quick and easy bit changes.
- LED Work Light: Illuminates the work area for improved visibility in low-light conditions.

Image: The BLACK+DECKER 20V MAX Cordless Drill/Driver, model BDCDD120C, with its battery pack attached. The drill features an orange and black design, a keyless chuck, and an ergonomic handle.
Setup and Initial Use
Charging the Battery Pack
- Plug the charger into a standard electrical outlet.
- Insert the battery pack fully into the charger. The green charging light will blink continuously, indicating that charging is in progress.
- Charging is complete when the green light remains continuously ON. The battery pack can then be removed or left in the charger.
- Note: The charger will not charge a faulty battery pack. If the red light blinks rapidly, take the charger and battery pack to an authorized service center. If the light stays OFF or red light rapidly blinks, refer to the label near the charging light on the charger for blink patterns.
Hot/Cold Pack Delay: If the charger detects a battery pack that is too hot or too cold, it automatically starts a Hot/Cold Pack Delay, suspending charging until the battery pack reaches an appropriate temperature. This feature ensures maximum battery life. A cold battery pack may charge at a slower rate than a warm battery pack.
Electronic Protection System: Li-Ion tools are designed with an Electronic Protection System that will protect the battery pack against overloading, overheating, or deep discharge. The tool will automatically turn off and the battery pack will need to be recharged.
Installing and Removing the Battery Pack
- To install the battery pack, align the battery pack with the rails inside the tool's handle and slide it into the handle until the battery pack is firmly seated in the tool and ensures it does not disengage.
- To remove the battery pack from the tool, press the release button and firmly pull the battery pack out of the tool handle. Insert it into the charger as described in the charger section of this manual.

Image: Diagram illustrating the process of charging the battery and installing/removing it from the drill handle. Includes charger indicator light explanations.
Operating Your Drill/Driver
Inserting and Removing Drill Bits
- Ensure the battery pack is removed from the tool.
- Grasp the rear half of the chuck with one hand and rotate the front half counter-clockwise until the chuck jaws are wide enough to accept the bit.
- Insert the drill bit or screwdriver bit into the chuck.
- Grasp the rear half of the chuck and rotate the front half clockwise until the bit is securely tightened.
Clutch Settings (Torque Control)
The 11-position clutch ring allows you to select the appropriate torque setting for your application. Rotate the clutch ring to align the desired number with the indicator arrow. Lower numbers are for driving small screws or working with soft materials, while higher numbers are for driving large screws or drilling into harder materials. The drill symbol setting is for drilling applications.
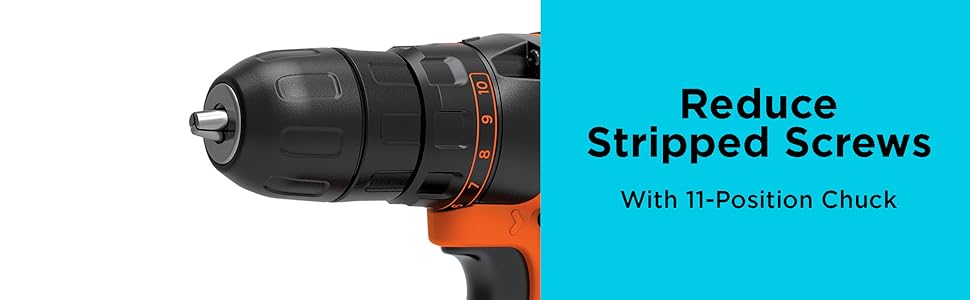
Image: Close-up view of the drill's chuck and adjustable 11-position clutch ring, designed to prevent stripped screws.
Variable Speed Trigger and Direction Control
- Variable Speed Trigger: The trigger switch controls the speed of the drill. Pressing the trigger further increases the speed.
- Forward/Reverse Button: Located above the trigger, this button allows you to select forward (clockwise) or reverse (counter-clockwise) rotation. Push the button to the left for forward and to the right for reverse. Center position locks the trigger for safety.
General Operation Tips
- Always hold the drill firmly with both hands, especially when drilling large holes or driving long screws.
- Apply steady, even pressure. Do not force the drill.
- For drilling, start with a slow speed to prevent the bit from walking, then increase speed as needed.
- When driving screws, use the clutch setting to prevent over-tightening or stripping the screw head.

Image: A person wearing safety glasses is using the BLACK+DECKER drill to create a pilot hole in a wooden fence post.
Maintenance
Regular maintenance ensures optimal performance and extends the life of your tool.
- Cleaning: Use only mild soap and a damp cloth to clean the tool. Never let any liquid get inside the tool. Never immerse any part of the tool into liquid.
- Lubrication: Your power tool is lubricated for life and requires no additional lubrication.
- Battery Care: Store battery packs in a cool, dry place. Do not store in temperatures exceeding 105°F (40°C). Do not charge battery packs when the temperature is below 40°F (4.5°C) or above 105°F (40°C).
- Accessory Changes: Always remove the battery pack before changing accessories or performing any maintenance.
Troubleshooting
| Problem | Possible Cause | Solution |
|---|---|---|
| Tool does not start. | Battery pack not installed correctly. Battery pack not charged. | Ensure battery pack is fully seated. Charge battery pack. |
| Battery pack does not charge. | Battery pack too hot or too cold. Charger not plugged in. Faulty battery pack. | Allow battery to reach room temperature. Ensure charger is plugged into a working outlet. Contact service center if faulty. |
| Drill bit slips in chuck. | Chuck not tightened sufficiently. Bit shank is dirty or damaged. | Tighten chuck firmly. Clean or replace bit. |
| Screws are stripped or over-driven. | Clutch setting is too high. | Adjust clutch to a lower setting. |
Technical Specifications
| Feature | Specification |
|---|---|
| Model Number | BDCDD120C |
| Voltage | 20V MAX* |
| No-Load Speed | 0-650 RPM |
| Maximum Torque | 115 in-lbs |
| Chuck Size | 3/8 inch (10mm) Keyless |
| Clutch Settings | 11 |
| Tool Weight (without battery) | Approximately 2.5 lbs |
| Battery Type | Lithium-Ion |
| Battery Capacity | 1.5 Ah |
| Power Source | Battery Powered |
| Product Dimensions | 10"L x 3"W x 8"H |
*Maximum initial battery voltage (measured without a workload) is 20 volts. Nominal voltage is 18 volts.
Warranty Information
This BLACK+DECKER product is covered by a 2-year limited warranty from the date of purchase. This warranty covers defects in material or workmanship. For full warranty terms and conditions, please refer to the warranty card included with your product or visit the official BLACK+DECKER website.
Customer Support
For technical assistance, service, or replacement parts, please contact BLACK+DECKER customer service. You can find contact information on the official BLACK+DECKER website or on the product packaging.
Online Resources: www.blackanddecker.com