1. Introduction
This manual provides essential instructions for the safe and efficient operation of your Hytera PD365LF Digital Portable Radio. Please read this manual thoroughly before using the product to ensure proper functionality and to prevent damage.
2. Package Contents
Upon unpacking, please verify that all items listed below are present and in good condition. If any item is missing or damaged, contact your dealer immediately.
- Hytera PD365LF Digital Portable Radio
- Lithium-Ion Battery
- Power Adapter
- Belt Clip
- Strap
- User Manual (this document)
3. Product Overview
The Hytera PD365LF is a compact and robust digital portable radio designed for reliable communication. Familiarize yourself with the radio's components.
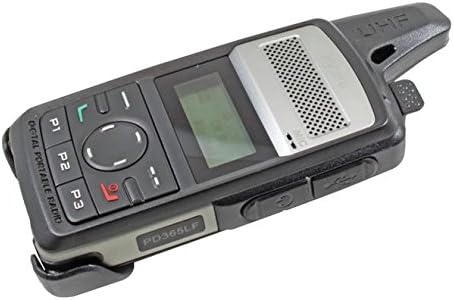
Figure 1: Hytera PD365LF Digital Portable Radio. This image displays the radio from an angled perspective, highlighting its compact form factor. Visible features include the speaker grille, LCD screen, navigation buttons (P1, P2, P3, and a central directional pad), and the UHF antenna. The model number "PD365LF" is clearly visible on the front casing.
Key Components:
- Antenna: For transmitting and receiving signals.
- Speaker: Outputs audio.
- Microphone: Inputs audio.
- LCD Display: Shows channel information, battery status, and menu options.
- Navigation Buttons (P1, P2, P3, Directional Pad): For menu navigation and quick access functions.
- Push-to-Talk (PTT) Button: Activates transmission.
- Power/Volume Knob: Turns the radio on/off and adjusts volume.
- Accessory Port: For connecting audio accessories or programming cable.
4. Setup
4.1 Battery Installation
- Ensure the radio is powered off.
- Align the battery with the battery compartment on the back of the radio.
- Gently press the battery into place until it clicks securely.
- To remove, slide the battery release latch and lift the battery out.
4.2 Charging the Battery
Before initial use, fully charge the battery. A fully discharged battery typically takes approximately 3-4 hours to charge.
- Connect the power adapter to a suitable power outlet.
- Connect the charging cable to the radio's accessory port.
- The charging indicator on the radio will illuminate (e.g., red for charging, green for fully charged).
- Once fully charged, disconnect the charger.
5. Operating Instructions
5.1 Powering On/Off
- To Power On: Rotate the Power/Volume knob clockwise until a click is heard and the display illuminates.
- To Power Off: Rotate the Power/Volume knob counter-clockwise until a click is heard and the display turns off.
5.2 Adjusting Volume
After powering on, rotate the Power/Volume knob clockwise to increase volume or counter-clockwise to decrease volume.
5.3 Channel Selection
Use the navigation buttons (e.g., up/down arrows on the directional pad) to scroll through available channels. The selected channel will be displayed on the LCD screen.
5.4 Transmitting and Receiving
- To Transmit: Press and hold the Push-to-Talk (PTT) button. Speak clearly into the microphone. Release the PTT button to stop transmitting.
- To Receive: Ensure the PTT button is not pressed. The radio will automatically receive signals on the selected channel.
5.5 Programmable Buttons (P1, P2, P3)
The P1, P2, and P3 buttons can be programmed for various functions (e.g., zone switch, scan, emergency call) by your dealer or through programming software. Refer to your dealer for specific configurations.
6. Maintenance
6.1 General Care
- Keep the radio dry. Avoid exposure to rain, moisture, or liquids.
- Do not expose the radio to extreme temperatures.
- Handle the radio with care. Avoid dropping or subjecting it to strong impacts.
6.2 Cleaning
Clean the radio's surface with a soft, damp cloth. Do not use harsh chemicals, cleaning solvents, or strong detergents, as these may damage the casing or internal components.
7. Troubleshooting
| Problem | Possible Cause | Solution |
|---|---|---|
| Radio does not power on. | Battery is discharged or improperly installed. | Charge the battery or re-install it correctly. |
| Cannot transmit or receive. | Incorrect channel selected; out of range; antenna not properly attached. | Verify channel; move closer to other radios; ensure antenna is secure. |
| Poor audio quality. | Low battery; obstruction between radios; volume too low/high. | Charge battery; clear obstructions; adjust volume. |
If the problem persists after attempting these solutions, please contact your authorized Hytera dealer for assistance.
8. Specifications
The following are general specifications for the Hytera PD365LF. Specific performance may vary based on environmental conditions and configuration.
- Model: PD365LF
- Brand: Hytera
- Dimensions: Approximately 19 x 13.2 x 6.8 cm (Packaging)
- Weight: Approximately 439.99 grams (Packaging)
- Battery Type: Lithium-Ion (1 required, included)
- Number of Channels: 32
- Water Resistance: Water-resistant
9. Warranty and Support
Your Hytera PD365LF radio is covered by a limited warranty. For detailed warranty terms and conditions, please refer to the warranty card included with your product or contact your authorized Hytera dealer. For technical support, service, or spare parts, please contact your point of purchase or visit the official Hytera website.
Note: Unauthorized repairs or modifications will void the product warranty.