Product Overview
The Harmony Audio HA-JVC16A is a replacement wire harness cable designed for seamless integration of an aftermarket stereo radio receiver, such as the JVC KS-FX240, into your vehicle's existing wiring system. This harness simplifies installation by providing a direct OEM fit connection, eliminating the need for cutting or splicing factory wires.
Key features include:
- Simply plug and play installation
- Clearly marked Color Coded wires for easy identification
- 18 gauge excellent wire for reliable conductivity
- Direct OEM fit Connection ensures compatibility
- 16 Pin harness for standard connections
Product Components
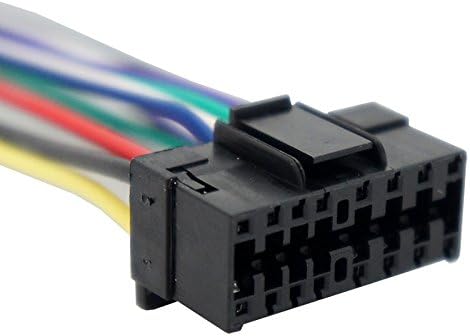
Image: Close-up view of the 16-pin connector end of the Harmony Audio HA-JVC16A wire harness. This connector is designed to plug directly into the aftermarket stereo unit.

Image: The Harmony Audio HA-JVC16A wire harness displayed in its retail packaging. The packaging includes a clear diagram indicating the color-coded wiring scheme, which is essential for correct installation.
Setup and Installation
Before You Begin
- Ensure your vehicle's battery is disconnected before beginning any electrical work to prevent short circuits or damage.
- Verify that the Harmony Audio HA-JVC16A harness is compatible with your specific aftermarket stereo model (e.g., JVC KS-FX240) and your vehicle's factory wiring.
- Gather necessary tools, which may include wire strippers, crimpers, electrical tape, and a multimeter.
Installation Steps
- Identify Factory Wiring: Carefully remove your vehicle's existing stereo unit to access the factory wiring harness.
- Match Wires: Refer to the wiring diagram provided with your aftermarket stereo and the color-coded wires on the Harmony Audio HA-JVC16A harness (as shown on the product packaging). Match each wire from the HA-JVC16A harness to the corresponding wire on your aftermarket stereo's harness. Common wire functions include:
- Yellow: Constant 12V (Memory/Battery)
- Red: Switched 12V (Accessory)
- Black: Ground
- Blue: Power Antenna / Remote Turn-On
- Orange: Illumination
- White/White-Black: Front Left Speaker (+/-)
- Gray/Gray-Black: Front Right Speaker (+/-)
- Green/Green-Black: Rear Left Speaker (+/-)
- Purple/Purple-Black: Rear Right Speaker (+/-)
- Secure Connections: Use appropriate connectors (crimp caps, solder, or heat shrink connectors) to securely join the matched wires. Ensure all connections are insulated to prevent short circuits.
- Connect Harness to Stereo: Plug the 16-pin connector of the Harmony Audio HA-JVC16A harness directly into the corresponding port on your aftermarket stereo unit.
- Connect to Vehicle: Plug the other end of the Harmony Audio HA-JVC16A harness into your vehicle's factory wiring harness. This connection should be a direct plug-and-play fit.
- Test Functionality: Before fully reassembling your dashboard, reconnect your vehicle's battery and test the stereo's functionality (power, sound from all speakers, radio, etc.).
- Final Assembly: Once confirmed working, carefully reassemble your dashboard and secure the stereo unit.
Operating Instructions
The Harmony Audio HA-JVC16A wire harness is a passive component designed to facilitate the electrical connection between your vehicle and an aftermarket stereo. It does not have operational controls itself. Once installed, the operation of your audio system will be entirely controlled by your aftermarket stereo unit and its associated features.
Refer to the instruction manual provided with your aftermarket stereo (e.g., JVC KS-FX240) for detailed operating instructions, including power on/off, volume control, source selection, tuning, and audio settings.
Maintenance
The Harmony Audio HA-JVC16A wire harness requires minimal maintenance. To ensure long-term performance:
- Keep Dry: Ensure the harness and its connections remain dry and free from moisture, which can cause corrosion or electrical issues.
- Check Connections: Periodically, if accessible, inspect the connections to ensure they remain secure and free from corrosion or damage. Avoid pulling on the wires.
- Avoid Stress: Do not bend or crimp the wires excessively during or after installation, as this can damage the internal conductors.
Troubleshooting
If you encounter issues after installing the Harmony Audio HA-JVC16A wire harness, consider the following troubleshooting steps:
| Problem | Possible Cause | Solution |
|---|---|---|
| Stereo does not power on. | Incorrect wiring for constant (yellow) or switched (red) power. Blown fuse in vehicle or stereo. | Verify yellow and red wire connections. Check vehicle's fuse box and the fuse on the stereo unit. Ensure ground wire (black) is securely connected. |
| No sound from speakers. | Incorrect speaker wire connections. Amplifier remote wire not connected (if applicable). Stereo's fader/balance settings. | Double-check all speaker wire connections (color-coded pairs). Ensure the blue remote wire is connected if your stereo requires it for an external amplifier. Adjust stereo's fader/balance. |
| Stereo loses memory/settings. | Constant 12V (yellow) wire not connected or losing power. | Ensure the yellow wire has a constant 12V supply even when the ignition is off. Check its connection. |
| Radio reception is poor. | Antenna wire not connected or power antenna wire (blue) not receiving power. | Verify the vehicle's antenna is securely plugged into the stereo. If your vehicle has a power antenna, ensure the blue wire from the harness is connected to the stereo's power antenna output. |
If these steps do not resolve the issue, consult a professional car audio installer or contact Harmony Audio customer support.
Specifications
| Attribute | Detail |
|---|---|
| Model Number | HA-JVC16A |
| Compatibility | JVC KS-FX240 and other compatible aftermarket stereo radio receivers |
| Wire Gauge | 18 gauge |
| Connector Type | 16 Pin |
| Connection Type | Direct OEM fit Plug and Play |
| Item Weight | 0.8 ounces (approx. 22.68 g) |
| Product Dimensions | 7 x 2 x 1 inches (approx. 17.78 x 5.08 x 2.54 cm) |
| Manufacturer | Harmony Audio |
Warranty and Support
Specific warranty details for the Harmony Audio HA-JVC16A wire harness are not provided in this manual. For information regarding warranty coverage, returns, or technical support, please refer to the documentation included with your purchase or contact Harmony Audio directly through their official website or customer service channels.
When contacting support, please have your product model number (HA-JVC16A) and purchase details readily available.