1. Introduction
Thank you for choosing the YATO YT-83060 Battery Charger and Jump Starter. This device is designed for charging 12V and 24V lead-acid batteries and for jump-starting vehicles with discharged batteries. Please read this manual carefully before operation to ensure safe and efficient use of the product.
2. Important Safety Instructions
WARNING: Read all safety warnings and instructions. Failure to follow the warnings and instructions may result in electric shock, fire, and/or serious injury.
- Always wear eye protection and protective clothing when working with batteries.
- Ensure adequate ventilation when charging batteries to prevent accumulation of explosive gases.
- Never smoke or allow sparks or flames in the vicinity of the battery or charger.
- Connect and disconnect DC output clamps only after setting the charger switch to the "OFF" position and unplugging the AC cord from the electrical outlet.
- Do not expose the charger to rain or wet conditions.
- Do not operate the charger if it has received a sharp blow, been dropped, or otherwise damaged.
- Keep out of reach of children.
- Ensure the vehicle's ignition is off before connecting the charger.
3. Product Overview
The YATO YT-83060 is a robust battery charger and jump starter designed for versatility and performance. Familiarize yourself with its components before use.
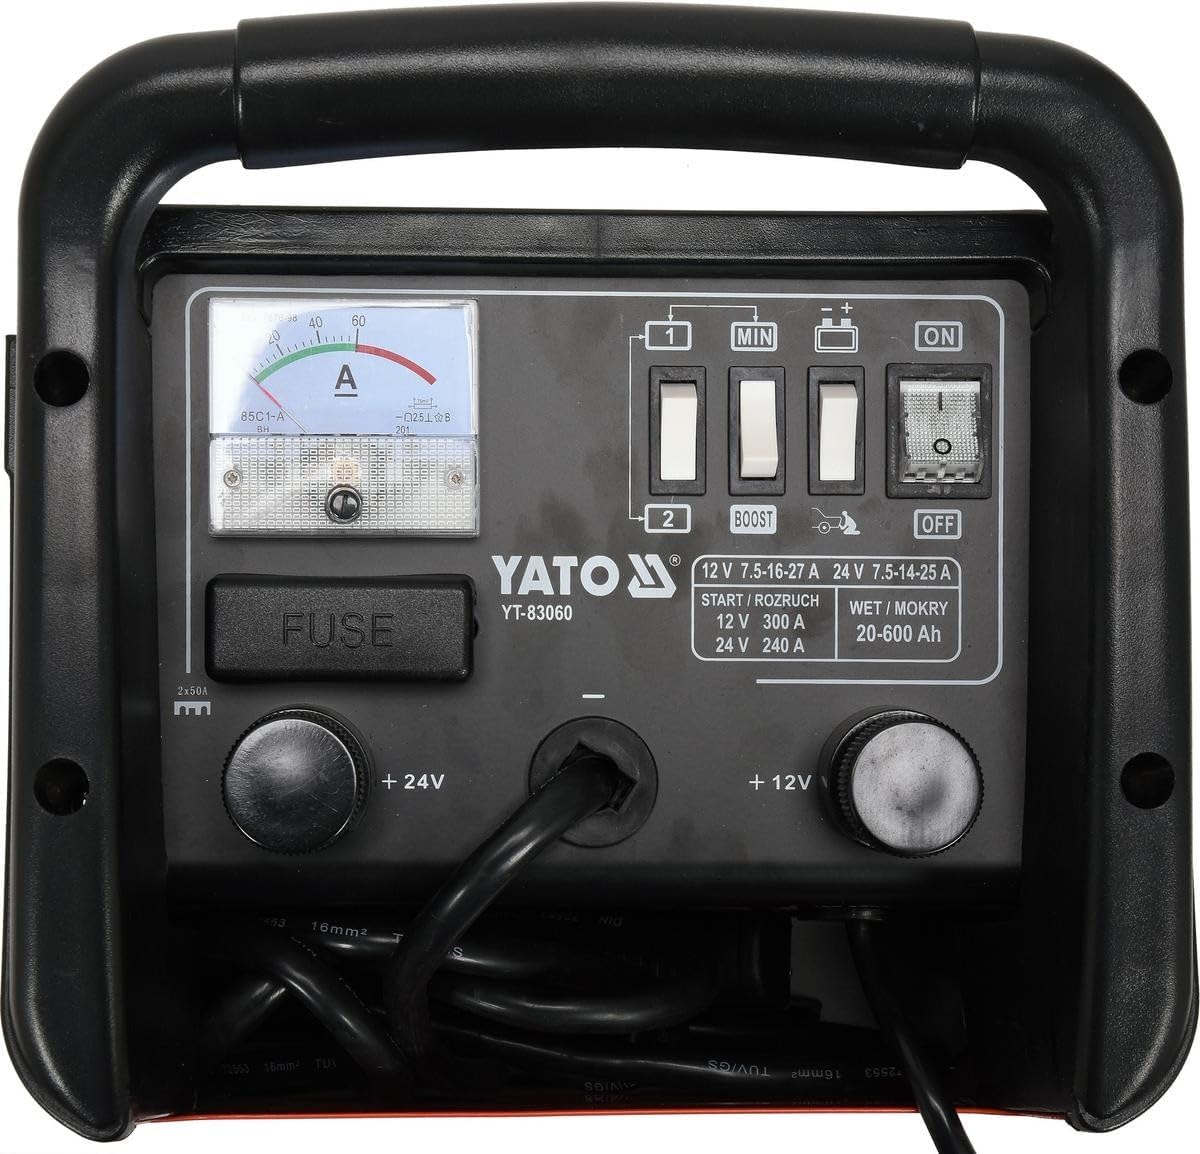
Image 3.1: Front panel of the YATO YT-83060 Battery Charger and Jump Starter. This image displays the control panel with an analog ammeter, voltage selection switches (12V/24V), operation mode switches (BOOST/OFF), power switch (ON/OFF), and the fuse compartment. The positive (+12V, +24V) and negative terminals are also visible, along with the power cord connection.
Key Components:
- Ammeter: Displays the charging current.
- Voltage Selector Switch: Allows selection between 12V and 24V operation.
- Mode Selector Switch: Selects between normal charging and BOOST (jump start) functions.
- Power Switch: Turns the unit ON or OFF.
- Fuse Compartment: Houses the protective fuses.
- Positive (+) and Negative (-) Terminals: For connecting to the battery.
- Power Cord: For connecting to the AC mains supply.
4. Setup
4.1 Unpacking and Initial Inspection
- Carefully remove the charger from its packaging.
- Inspect the unit for any signs of damage during transit. Do not operate if damaged.
- Ensure all components, including the power cord and battery clamps, are present and in good condition.
4.2 Connecting to the Battery
Before connecting, ensure the charger's power switch is in the "OFF" position and it is unplugged from the mains supply.
- Identify the positive (+) and negative (-) terminals on the battery. The positive terminal is usually marked with a plus sign (+) and is larger than the negative terminal.
- Connect the RED positive (+) clamp from the charger to the positive (+) terminal of the battery.
- Connect the BLACK negative (-) clamp from the charger to the negative (-) terminal of the battery. For vehicles, if connecting to the chassis, connect to a heavy, unpainted metal part of the vehicle frame, away from the battery and fuel line.
- Ensure connections are secure and free from corrosion.
5. Operating Instructions
5.1 Charging a Battery
- Ensure the charger is disconnected from the mains supply and the power switch is "OFF".
- Connect the charger to the battery as described in Section 4.2.
- Select the correct voltage (12V or 24V) using the Voltage Selector Switch on the charger, matching your battery's voltage.
- Set the Mode Selector Switch to the normal charging position (usually indicated as "OFF" for BOOST, or a specific charging symbol).
- Plug the charger's power cord into a grounded 230V AC electrical outlet.
- Turn the Power Switch to "ON". The ammeter will show the charging current.
- Monitor the ammeter. As the battery charges, the current will gradually decrease.
- Once the ammeter reads near zero or a very low stable current, the battery is fully charged.
- To disconnect, first turn the Power Switch to "OFF", then unplug from the mains, and finally disconnect the battery clamps (negative first, then positive).
5.2 Jump Starting a Vehicle
CAUTION: Do not attempt to jump start a frozen battery. Always ensure the vehicle's ignition is off before connecting.
- Ensure the charger is disconnected from the mains supply and the power switch is "OFF".
- Connect the charger to the vehicle's battery as described in Section 4.2.
- Select the correct voltage (12V or 24V) using the Voltage Selector Switch, matching the vehicle's battery voltage.
- Set the Mode Selector Switch to "BOOST" or the jump start position.
- Plug the charger's power cord into a grounded 230V AC electrical outlet.
- Turn the Power Switch to "ON".
- Wait approximately 60-120 seconds for the battery to receive a preliminary charge.
- Attempt to start the vehicle. If it does not start within 5 seconds, wait at least 3 minutes before trying again to prevent overheating.
- Once the vehicle starts, immediately turn the Power Switch to "OFF", unplug from the mains, and then disconnect the battery clamps (negative first, then positive).
6. Maintenance
6.1 Cleaning
- Always disconnect the charger from the power supply before cleaning.
- Wipe the exterior of the charger with a soft, damp cloth. Do not use harsh chemicals or abrasive cleaners.
- Keep the ventilation openings clear of dust and debris.
- Clean battery clamps after each use to remove any battery acid or corrosion.
6.2 Fuse Replacement
If the charger stops working, check the fuse located in the fuse compartment (refer to Image 3.1). Always replace with a fuse of the same type and rating (e.g., 2x50A as indicated on the unit).
6.3 Storage
Store the charger in a dry, cool, and well-ventilated area when not in use. Keep it away from direct sunlight, moisture, and corrosive materials. Coil the cables neatly to prevent damage.
7. Troubleshooting
| Problem | Possible Cause | Solution |
|---|---|---|
| Charger does not turn ON. | No power from outlet; Power switch OFF; Blown fuse. | Check outlet with another appliance; Ensure Power switch is ON; Replace fuse (see Section 6.2). |
| Ammeter shows no current during charging. | Poor connection to battery; Battery fully charged; Incorrect voltage selected; Severely discharged battery. | Check clamp connections; This is normal if battery is full; Verify 12V/24V selection; Allow more time for very flat batteries. |
| Vehicle does not jump start. | Poor connection; Incorrect voltage; Battery too deeply discharged; Vehicle issue. | Check clamp connections; Verify 12V/24V selection; Allow more pre-charge time; Consult vehicle mechanic if issue persists. |
| Charger gets hot. | Normal during heavy use; Blocked ventilation. | Ensure adequate ventilation; This is normal for high current operation. If excessively hot, disconnect and allow to cool. |
8. Technical Specifications

Image 8.1: Pictorial representation of key specifications for the YATO YT-83060. This image shows icons and text indicating 12V 27A charge / 300A start, 24V 25A charge / 240A start, 20-600Ah battery capacity, 230V 50Hz input, and suitability for WET (MOKRY) batteries.
| Feature | Specification |
|---|---|
| Model Number | YT-83060 |
| Input Voltage | 230V AC, 50Hz |
| Output Voltage | 12V / 24V DC |
| Nominal Power | 1250 W |
| Charging Current (12V) | 27 A |
| Charging Current (24V) | 25 A |
| Jump Start Current (12V) | 300 A |
| Jump Start Current (24V) | 240 A |
| Battery Capacity Range | 20 - 600 Ah |
| Weight | 15.13 kg |
| Applicable Battery Types | Lead-acid (WET) |
9. Warranty and Support
Specific warranty information for the YATO YT-83060 is not provided in this manual. Please refer to the warranty card included with your product or contact your retailer for details regarding warranty coverage and terms.
For technical support or service inquiries, please contact your authorized YATO dealer or the point of purchase.


