1. Introduction
Thank you for choosing the YATO YT-2381 Pressure Regulator with Manometer. This device is designed to precisely control and maintain the output pressure of compressed air systems. Please read this manual carefully before installation and operation to ensure safe and efficient use of the product. Keep this manual for future reference.
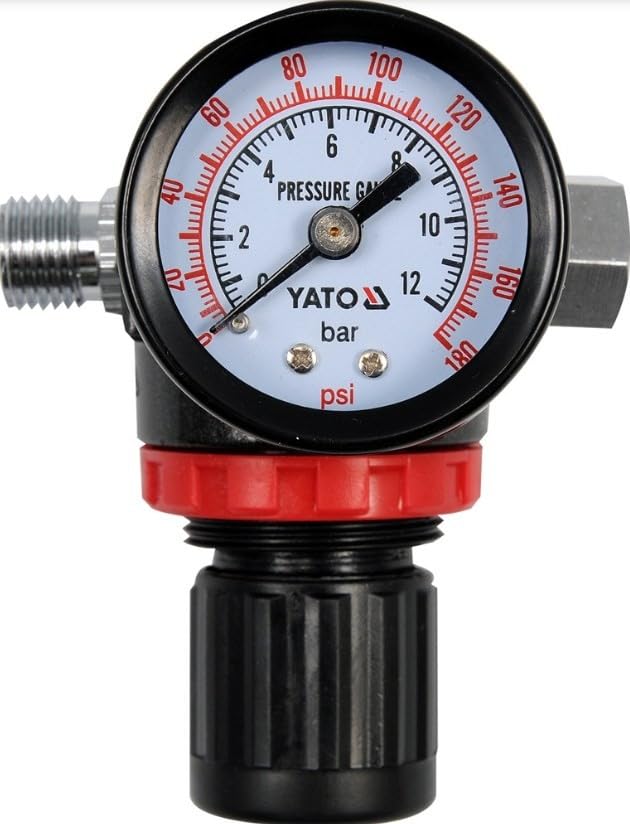
Image 1.1: YATO YT-2381 Pressure Regulator with Manometer. This image shows the overall appearance of the pressure regulator, including the main body and the attached manometer for pressure readings.
2. Safety Instructions
Always observe the following safety precautions to prevent injury and damage to the equipment:
- Ensure the compressed air system is depressurized before installing or removing the regulator.
- Wear appropriate personal protective equipment (PPE), such as safety glasses, when working with compressed air.
- Do not exceed the maximum operating pressure specified for the regulator.
- Inspect the regulator and all connections for damage or leaks before each use.
- Use only clean, dry compressed air. Contaminants can damage the regulator.
- Do not modify the regulator in any way. Use only original replacement parts if repairs are necessary.
- Keep children and unauthorized personnel away from the work area.
3. Package Contents
Verify that all items are present and undamaged upon unpacking:
- YATO YT-2381 Pressure Regulator
- Manometer (pre-installed or separate)
- User Manual (this document)
4. Product Overview
The YATO YT-2381 is a robust pressure regulator designed for industrial and workshop applications. It features a durable construction and an integrated manometer for precise pressure monitoring.
Key Components:
- Inlet Port: Connects to the compressed air source.
- Outlet Port: Connects to the air tool or system requiring regulated pressure.
- Adjustment Knob: Used to set the desired output pressure.
- Manometer: Displays the current output pressure.
5. Setup and Installation
Follow these steps for proper installation of your pressure regulator:
- Depressurize System: Ensure the compressed air system is completely depressurized and shut off before beginning installation.
- Identify Ports: Locate the inlet and outlet ports on the regulator. The inlet port typically has an arrow indicating the direction of airflow.
- Connect Inlet: Connect the compressed air supply line to the regulator's inlet port. Use appropriate thread sealant (e.g., PTFE tape) on all threaded connections to ensure an airtight seal.
- Connect Outlet: Connect your air tool or system to the regulator's outlet port. Again, use thread sealant.
- Mounting (Optional): If desired, the regulator can be mounted to a wall or workbench using suitable brackets (not included) and fasteners. Ensure it is securely fastened.
- Manometer Installation (if separate): If the manometer is not pre-installed, carefully screw it into the designated port on the regulator. Do not overtighten.
- Check Connections: Double-check all connections for tightness and proper sealing.
6. Operating Instructions
Once installed, operate the regulator as follows:
- Open Air Supply: Slowly open the main air supply valve to the system.
- Adjust Pressure: Turn the adjustment knob on the regulator clockwise to increase the output pressure, and counter-clockwise to decrease it. Observe the manometer to set the desired pressure.
- Lock Setting (if applicable): Some regulators have a locking mechanism (e.g., push-down knob) to secure the pressure setting. Engage this if available.
- Monitor Pressure: Regularly check the manometer during operation to ensure the pressure remains stable.
- Shut Down: When finished, first close the air supply to the regulator, then depressurize the system by operating the air tool or opening a bleed valve until the manometer reads zero.
7. Maintenance
Regular maintenance ensures the longevity and optimal performance of your regulator:
- Daily: Check for visible leaks around connections and the regulator body.
- Weekly/Monthly: Inspect the manometer for accuracy. If it appears faulty, replace it.
- Periodically: If the air supply is not filtered, internal components may become contaminated. Disassemble the regulator (refer to a qualified technician if unsure) and clean internal parts with a suitable solvent. Replace any worn seals or O-rings.
- Storage: Store the regulator in a clean, dry environment when not in use.
8. Troubleshooting
| Problem | Possible Cause | Solution |
|---|---|---|
| No pressure at outlet | Air supply off; regulator adjustment knob fully counter-clockwise; clogged inlet filter. | Open air supply; turn adjustment knob clockwise; inspect and clean/replace filter. |
| Pressure fluctuates | Inconsistent air supply; internal regulator issue; faulty manometer. | Check compressor stability; inspect regulator internals (professional service recommended); replace manometer. |
| Air leaks | Loose connections; damaged seals/O-rings; cracked housing. | Tighten connections; replace seals/O-rings; replace regulator if housing is damaged. |
| Manometer reads incorrectly | Faulty manometer; incorrect installation. | Replace manometer; ensure manometer is screwed in correctly and not overtightened. |
9. Specifications
Technical data for the YATO YT-2381 Pressure Regulator:
- Model: YT-2381
- Brand: Yato
- Connection Size: 1/4 inch (6.3 mm)
- Maximum Operating Pressure: 1.2 MPa (approximately 12 bar / 174 PSI)
- Manufacturer: Yato
- Country of Origin: China
Image 9.1: Key specifications of the YATO YT-2381 regulator. This image visually confirms the maximum pressure of 1.2 MPa and the 1/4 inch (6.3mm) connection size.
10. Warranty and Support
YATO products are manufactured to high-quality standards. For warranty information, please refer to the warranty card included with your purchase or contact your local YATO distributor. For technical support or service, please contact the retailer where you purchased the product or visit the official YATO website for contact details.
Please retain your proof of purchase for warranty claims.


