
1. Introduction
The Skar Audio SKv2-3500.1D is a competition-grade monoblock Class D subwoofer amplifier engineered for exceptional performance and power output. As a flagship model in the SKv2 series, it incorporates high-quality internal components and advanced engineering to deliver superior audio amplification. This amplifier is rated at 3,500 watts RMS power and can achieve a maximum output of over 4,700 watts. It features an advanced heatsink design for optimal cooling, 4-way protection circuitry for reliable operation, and a comprehensive user control panel for precise audio tuning. The control panel includes variable adjustments for gain level, subsonic filter, bass boost, low-pass filter, and phase control. The SKv2-3500.1D also supports strapping multiple amplifiers together and includes RCA inputs and outputs for daisy-chaining. Its massive 1/0-gauge power and ground input terminals ensure maximum current flow for high power delivery. A remote subwoofer level control (bass knob) is included for convenient bass adjustment from the vehicle's front.
2. Safety Information
- Professional Installation Recommended: Due to the high power output and complex wiring requirements, professional installation by a qualified car audio technician is strongly recommended.
- Power Supply: Ensure your vehicle's electrical system can support the amplifier's power demands. Upgraded alternators and batteries may be necessary for optimal performance and to prevent damage to the vehicle's electrical system.
- Wiring: Use appropriate gauge wiring (1/0-gauge for power and ground) to prevent overheating and ensure stable power delivery. Always use an inline fuse on the main power wire, located as close to the battery as possible.
- Ventilation: Mount the amplifier in a location that allows for adequate airflow to prevent overheating. Do not cover the amplifier or restrict its ventilation.
- Speaker Impedance: Ensure the connected speakers or subwoofers have an impedance rating compatible with the amplifier's stable operating range (1 Ohm stable). Connecting an incompatible load can cause damage to the amplifier.
- Water and Moisture: Keep the amplifier away from water and excessive moisture. Exposure to liquids can cause electrical shorts and damage.
- Secure Mounting: Securely mount the amplifier to prevent it from becoming a projectile in the event of sudden stops or collisions.
3. What's in the Box
Upon opening the package, you should find the following items:
- Skar Audio SKv2-3500.1D Class D Monoblock Amplifier
- Remote Subwoofer Level Control (Bass Knob)
- Mounting Hardware (screws, etc.)
- User Manual (this document)
4. Product Features
- Competition Grade SPL Class D Monoblock MOSFET Car Power Amplifier
- Peak Power at 1 Ohm: 4,700 Watts
- RMS Power at 1 Ohm: 3,500 Watts
- Stable at 1 Ohm
- Frequency Response: 15Hz - 270Hz
- 4-Way Protection Circuitry (Thermal, Overload, Short Circuit, DC Offset)
- 1/0 Gauge Power And Ground Input Terminals for Maximum Current Flow
- User Adjustable Low Pass Filter (Variable): 35Hz - 250Hz
- Remote Subwoofer Level Control Included
- Heavy Duty Advanced Heatsink Design for Maximum Cooling and Efficiency
- On-board Bass Boost Control (0-9dB)
- RCA Inputs and Outputs for Daisy-Chaining Multiple Amplifiers
5. Controls and Connections
5.1. Front Panel Controls
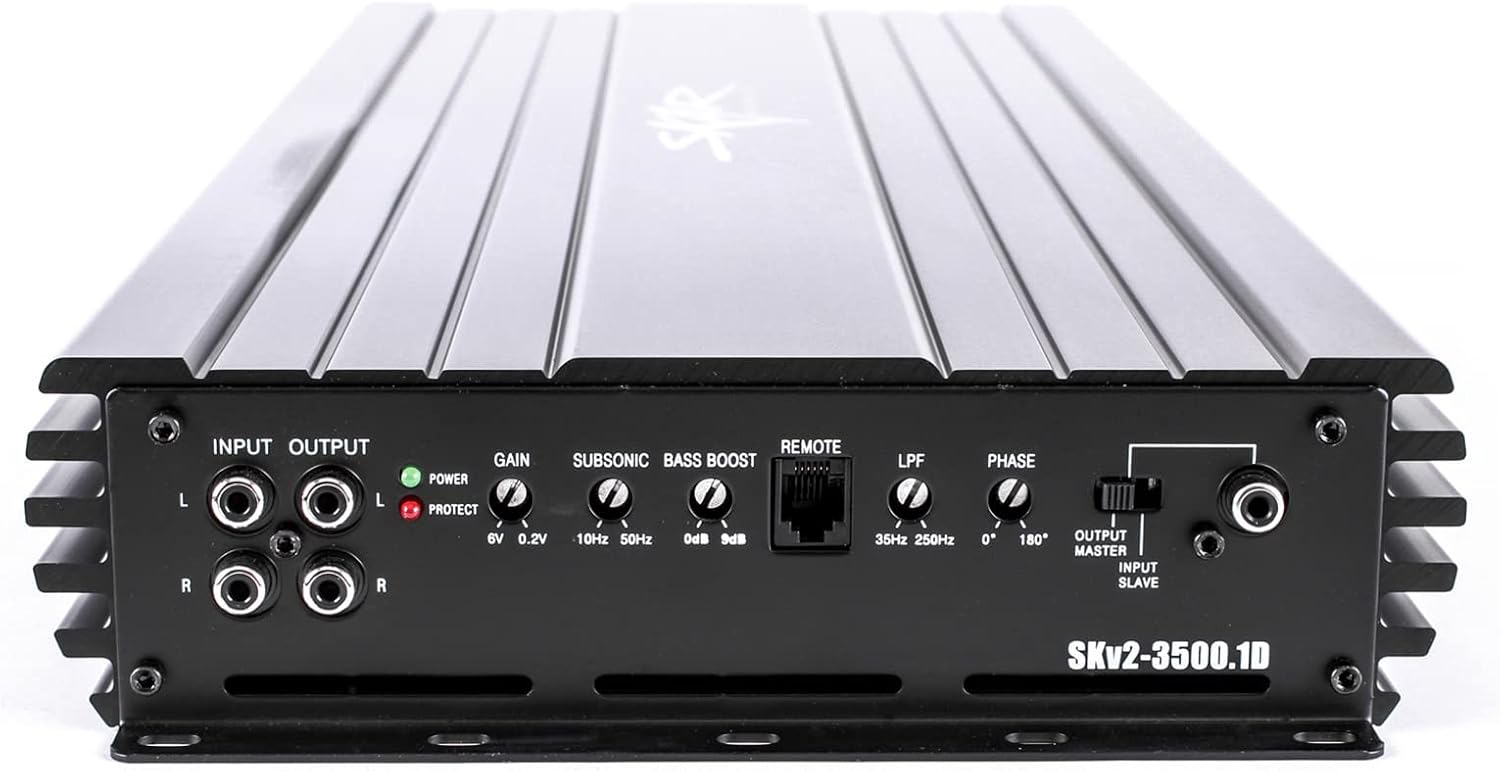
This image displays the front panel of the Skar Audio SKv2-3500.1D amplifier, featuring the input and output RCA connections, power and protect indicator LEDs, and various adjustment knobs. From left to right, these include: Gain control (6V-0.2V), Subsonic filter (10Hz-50Hz), Bass Boost (0dB-9dB), Remote port, Low-Pass Filter (35Hz-250Hz), and Phase control (0°-180°). Also visible are the Output Master/Input Slave switch for strapping multiple amplifiers.
- Input/Output RCA: Used for connecting the audio signal from your head unit and for daisy-chaining to other amplifiers.
- Power/Protect LEDs: The Power LED illuminates green when the amplifier is operating correctly. The Protect LED illuminates red when the amplifier enters protection mode due to a fault.
- Gain: Adjusts the input sensitivity of the amplifier to match the output voltage of your head unit.
- Subsonic Filter: Filters out extremely low frequencies that are inaudible and can cause damage to subwoofers.
- Bass Boost: Provides an adjustable boost to bass frequencies. Use sparingly to avoid distortion.
- Remote: Port for connecting the included remote subwoofer level control.
- Low-Pass Filter (LPF): Filters out high frequencies, allowing only low frequencies to pass to the subwoofer.
- Phase: Adjusts the phase of the subwoofer output (0° or 180°) to optimize sound integration with other speakers.
- Output Master/Input Slave: Switch for configuring the amplifier in a master/slave setup when strapping two SKv2-3500.1D units together.
5.2. Rear Panel Terminals

This image shows the rear panel of the Skar Audio SKv2-3500.1D amplifier, which houses the power, ground, remote turn-on, and speaker output terminals. The large terminals for Power (+12V) and Ground (GND) are designed for 1/0-gauge wiring, while the smaller REM terminal is for the remote turn-on wire. The Speaker output terminals are clearly marked with positive and negative connections.
- GND (Ground): Connects to the vehicle's chassis ground. Requires 1/0-gauge wire.
- REM (Remote): Connects to the remote turn-on output of your head unit.
- +12V (Power): Connects directly to the vehicle's positive battery terminal. Requires 1/0-gauge wire and an inline fuse.
- Speaker Terminals: Connects to your subwoofer(s). Ensure correct polarity and impedance.
5.3. Remote Subwoofer Level Control

This image displays the remote subwoofer level control (bass knob) included with the Skar Audio SKv2-3500.1D amplifier. It features a rotary knob for adjusting bass output, a power indicator light, and a clipping indicator light. This allows for convenient, real-time bass adjustments from the driver's seat.
- Bass Control Knob: Adjusts the output level of the subwoofer.
- Power Indicator: Illuminates when the remote is active.
- Clipping Indicator: Illuminates when the amplifier output is clipping, indicating potential distortion and risk of damage to speakers. Reduce the bass control or amplifier gain if this light is consistently on.
6. Setup and Installation
Proper installation is crucial for the performance and longevity of your amplifier. Consult a professional if you are unsure about any steps.
6.1. Mounting the Amplifier
- Choose a secure, dry location with adequate ventilation. Avoid mounting on carpet or in enclosed spaces without airflow.
- Ensure the mounting surface is strong enough to support the amplifier's weight.
- Use the provided mounting hardware to secure the amplifier firmly.
6.2. Wiring Connections
- Power Wire (+12V): Run a 1/0-gauge power wire from the vehicle's positive battery terminal to the amplifier's +12V terminal. Install an inline fuse holder (with appropriate fuse rating) within 18 inches (45 cm) of the battery.
- Ground Wire (GND): Run a 1/0-gauge ground wire from the amplifier's GND terminal to a clean, bare metal point on the vehicle's chassis. Ensure a solid, low-resistance connection. The ground wire should be as short as possible, ideally less than 3 feet (1 meter).
- Remote Turn-On Wire (REM): Connect a smaller gauge wire (e.g., 18-gauge) from the head unit's remote output to the amplifier's REM terminal. This wire turns the amplifier on and off with the head unit.
- RCA Input Cables: Connect RCA cables from your head unit's subwoofer output to the amplifier's RCA input jacks.
- Speaker Output Wires: Connect your subwoofer(s) to the amplifier's speaker terminals. Pay close attention to polarity (+ to + and - to -) and ensure the total impedance of the connected subwoofers is 1 Ohm or higher.
- Remote Bass Knob: Connect the remote bass knob to the 'REMOTE' port on the amplifier's front panel using the provided cable.
6.3. Strapping Multiple Amplifiers
The SKv2-3500.1D amplifier supports strapping two identical units together for increased power output. Refer to the detailed wiring diagrams in the full installation guide (if provided separately) for specific instructions on configuring the master/slave switch and wiring connections for strapped operation. Ensure both amplifiers are set correctly (one as 'Output Master', the other as 'Input Slave').
7. Operating the Amplifier
Once installed, adjust the amplifier settings for optimal sound performance.
- Gain Adjustment: Start with the gain control at its minimum (0.2V). Play a familiar track with strong bass at about 75% of your head unit's maximum volume. Slowly increase the amplifier's gain until you hear distortion, then back off slightly. The clipping indicator on the remote bass knob can assist in this process.
- Low-Pass Filter (LPF): Set the LPF to filter out frequencies above your desired subwoofer range, typically between 60Hz and 100Hz, depending on your main speakers and personal preference.
- Subsonic Filter: Adjust the subsonic filter to protect your subwoofers from playing frequencies below their resonant frequency, usually set between 20Hz and 30Hz.
- Bass Boost: Use the bass boost sparingly. Excessive bass boost can lead to distortion and potential damage to your subwoofers. Start at 0dB and increase only if needed, listening carefully for distortion.
- Phase Control: Experiment with the 0° and 180° phase settings to find the one that provides the most impactful and coherent bass response with your other speakers.
- Remote Bass Knob: Use the remote bass knob for convenient, on-the-fly adjustments to the subwoofer level. Monitor the clipping indicator to prevent distortion.
8. Maintenance
- Cleaning: Periodically clean the amplifier's exterior with a soft, dry cloth. Avoid using harsh chemicals or abrasive cleaners. Ensure ventilation fins are free from dust and debris.
- Connection Checks: Regularly inspect all wiring connections (power, ground, remote, RCA, speaker) to ensure they are secure and free from corrosion. Loose connections can lead to poor performance or damage.
- Ventilation: Ensure the amplifier's mounting location remains clear of obstructions to maintain proper airflow and prevent overheating.
9. Troubleshooting
| Problem | Possible Cause | Solution |
|---|---|---|
| Amplifier does not turn on (No Power LED) | No power to +12V terminal; No ground connection; No remote turn-on signal; Blown fuse. | Check +12V power wire and inline fuse; Verify ground connection; Check remote turn-on wire from head unit; Replace fuse if blown (use correct rating). |
| Amplifier goes into protection mode (Protect LED on) | Overheating; Speaker short circuit; Speaker impedance too low; DC offset; Low voltage. | Ensure adequate ventilation; Check speaker wiring for shorts; Verify speaker impedance is 1 Ohm or higher; Check vehicle's charging system and battery voltage; Allow amplifier to cool down. |
| No sound output | No input signal (RCA); Speaker wires disconnected or incorrect polarity; Amplifier gain too low; Head unit settings. | Check RCA cable connections; Verify speaker wiring and polarity; Increase amplifier gain; Check head unit's volume and subwoofer output settings. |
| Distorted sound | Gain set too high; Speaker impedance mismatch; Clipping; Poor quality input signal. | Reduce amplifier gain; Verify speaker impedance; Monitor clipping indicator on remote bass knob; Check RCA cables for damage or interference. |
| Weak bass output | Gain too low; LPF set too high; Subsonic filter set too high; Incorrect phase setting; Subwoofer box issues. | Increase amplifier gain; Adjust LPF to a lower frequency; Adjust subsonic filter to a lower frequency; Experiment with phase switch (0°/180°); Ensure subwoofer enclosure is appropriate. |
10. Specifications
| Specification | Value |
|---|---|
| Model | SKv2-3500.1D |
| RMS Power @ 1 Ohm | 3500 Watts |
| Maximum Output Power | 4700 Watts |
| Number of Channels | 1 (Monoblock) |
| Stable Impedance | 1 Ohm |
| Frequency Response | 15Hz - 270Hz |
| Low Pass Filter (LPF) | 35Hz - 250Hz (Variable) |
| Subsonic Filter | 10Hz - 50Hz (Variable) |
| Bass Boost | 0-9dB |
| Phase Control | 0° - 180° |
| Input Terminals | 1/0 Gauge Power and Ground |
| Voltage | 14.4 Volts (Nominal) |
| Item Dimensions (L x W x H) | 21.26 x 9.15 x 2.45 inches |
| Material Type | Metal or Plastic |
| Specification Met | RoHS |
11. Warranty and Support
11.1. Warranty Information
The Skar Audio SKv2-3500.1D Monoblock Amplifier comes with a 2-year limited warranty from the date of purchase. This warranty covers manufacturing defects and malfunctions under normal use. It does not cover damage caused by improper installation, abuse, accident, neglect, unauthorized repair, or modification. Please retain your proof of purchase for warranty claims.
11.2. Customer Support
For technical assistance, troubleshooting, or warranty inquiries, please contact Skar Audio customer support. Refer to the official Skar Audio website for the most current contact information, including phone numbers, email addresses, and support hours. When contacting support, please have your product model number (SKv2-3500.1D) and proof of purchase readily available.


