1. Introduction
This manual provides essential information for the safe and effective use, installation, and maintenance of your Technical Precision Replacement for EPSON EH-TW450 LAMP & HOUSING Projector TV Lamp Bulb. Please read this manual thoroughly before installation and retain it for future reference.
This product is a high-quality replacement lamp unit designed to restore optimal brightness and performance to compatible projectors. It is not manufactured by EPSON but is engineered to meet or exceed the original specifications.
2. Safety Information
- Power Off: Always ensure the projector is completely powered off and unplugged from the electrical outlet before attempting any installation or maintenance.
- Cool Down: Allow the projector and the old lamp to cool down for at least 60 minutes before handling. Hot lamps can cause severe burns.
- Handle with Care: Projector lamps contain high-pressure mercury vapor. Handle the lamp unit carefully to avoid breakage. Do not touch the glass bulb directly with bare hands, as oils can reduce lamp life. Use gloves if possible.
- Eye Protection: Avoid looking directly at the lamp when it is operating, as intense light can damage your eyes.
- Disposal: Dispose of old lamps according to local regulations, as they contain mercury. Do not dispose of in regular household waste.
- Ventilation: Ensure the projector's ventilation system is clear and unobstructed to prevent overheating, which can shorten lamp life.
3. Product Overview
The Technical Precision Replacement Lamp & Housing unit is a complete module designed for easy installation. It includes the lamp bulb securely mounted within a housing, ensuring proper alignment and electrical connection within your projector.
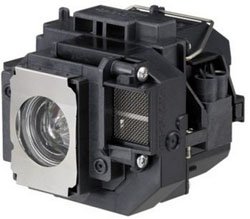
Figure 1: Technical Precision Replacement Projector Lamp and Housing. An image showing the Technical Precision replacement projector lamp and housing unit. The unit is black with a silver metallic lamp housing on one side, featuring a clear bulb visible inside. Various connectors and a mesh vent are also visible on the housing.
Key Features:
- High-efficiency lamp for bright and clear projection.
- Integrated housing for simplified installation and precise fit.
- Designed for compatibility with EPSON EH-TW450 projectors.
4. Setup and Installation
Follow these general steps for replacing your projector lamp. Always refer to your specific projector's user manual for detailed instructions, as procedures may vary.
- Prepare the Projector:
- Turn off the projector and unplug the power cord.
- Allow the projector to cool down completely (at least 60 minutes).
- Locate the Lamp Cover:
- Identify the lamp cover on your projector. It is usually secured by one or more screws.
- Use a screwdriver to loosen and remove the screws, then carefully remove the lamp cover.
- Remove the Old Lamp:
- Locate the old lamp unit. It will typically have a handle or a set of screws holding it in place.
- Loosen any screws securing the lamp unit.
- Gently pull the handle or lift the lamp unit straight out of the projector. Avoid tilting or forcing it.
- Install the New Lamp:
- Carefully insert the new Technical Precision lamp unit into the projector slot. Ensure it slides in smoothly and is seated firmly.
- Tighten the screws to secure the new lamp unit in place.
- Replace the lamp cover and secure it with its screws.
- Reset Lamp Timer:
- Plug the projector back in and turn it on.
- Navigate to the projector's menu settings and reset the lamp usage timer. This is crucial for accurate lamp life monitoring. Refer to your projector's manual for specific steps.
5. Operating Considerations
While the lamp itself does not have operational controls, its performance is directly tied to the projector's operation. Observe the following for optimal lamp life and performance:
- Proper Shutdown: Always allow the projector to complete its cool-down cycle before unplugging it. Abrupt power cuts can damage the lamp.
- Ventilation: Ensure the projector is placed in a well-ventilated area, free from obstructions that could block airflow. Overheating is a primary cause of premature lamp failure.
- Eco Mode: Utilize the projector's "Eco Mode" or "Low Power Mode" if available. This reduces lamp brightness and extends its lifespan.
- Avoid Frequent On/Off Cycles: Turning the projector on and off frequently can stress the lamp. If you need to pause viewing for a short period, it's often better to leave the projector on.
6. Maintenance
Regular maintenance helps ensure the longevity of your projector and its lamp.
- Clean Air Filter: Periodically clean or replace the projector's air filter as recommended by the projector manufacturer. A clogged filter restricts airflow, leading to overheating and reduced lamp life.
- Dust Removal: Keep the projector free from dust. Use a soft, dry cloth to wipe the exterior. Avoid using abrasive cleaners or solvents.
- Monitor Lamp Life: Pay attention to your projector's lamp hour counter. Replace the lamp when it reaches its recommended lifespan or when brightness significantly diminishes.
- Storage: If storing a spare lamp, keep it in its original packaging in a cool, dry place away from direct sunlight and extreme temperatures.
7. Troubleshooting
If you encounter issues after installing your new lamp, consider the following:
- Lamp Not Turning On:
- Ensure the projector is properly plugged into a working power outlet.
- Verify the lamp unit is fully seated and secured in its slot.
- Check that the lamp cover is correctly installed and its screws are tightened. Many projectors have a safety switch that prevents operation if the cover is open.
- If the issue persists, the lamp might be faulty. Contact Technical Precision support.
- Dim Image or Poor Picture Quality:
- Confirm the lamp timer was reset after installation.
- Check projector settings for brightness or picture mode.
- Ensure the projector lens is clean.
- Verify the air filter is clean and not obstructing airflow.
- Lamp Warning Light On:
- This usually indicates the lamp is nearing the end of its life or has failed. If this is a new lamp, ensure the lamp timer was reset.
- If the warning persists after resetting the timer, the lamp may be defective.
- Overheating:
- Ensure adequate ventilation around the projector.
- Clean the projector's air filter.
8. Specifications
| Brand | Technical Precision |
| Model Name | EH-TW450 LAMP & HOUSING |
| Part Number | EH-TW450 LAMP & HOUSING |
| Wattage | 1 watts (Note: This wattage might refer to a control circuit or standby, actual lamp wattage for projection is typically higher and specific to the projector model.) |
| Bulb Base | E26 |
| Material | Glass |
| Included Components | Replacement Part (Lamp & Housing) |
| Special Feature | High Efficiency |
Note: Specifications are subject to change without notice. For the most accurate and up-to-date information, please refer to the product packaging or contact Technical Precision directly.
9. Warranty and Support
This Technical Precision replacement lamp is backed by the manufacturer's policy. For specific warranty details, including coverage period and terms, please refer to the documentation provided with your purchase or contact Technical Precision customer support directly.
Customer Support:
For technical assistance, troubleshooting, or warranty claims, please contact Technical Precision through their official channels. You can often find contact information on their website or through the retailer where the product was purchased.
As this product is a replacement part and not manufactured by EPSON, any support or warranty claims should be directed to Technical Precision.
For more information, you may visit the Technical Precision Store on Amazon.


