1. Introduction
This manual provides detailed instructions for the safe and correct installation, operation, and maintenance of your Hama TV Wall Mount Model 00118100. Please read all instructions carefully before beginning installation and retain this manual for future reference.

Figure 1.1: Overview of the Hama TV Wall Mount Model 00118100. This image displays the black, single-arm wall mount with its VESA-compatible mounting plate and articulated arm.
2. Safety Instructions
- Read Instructions: Ensure you read and understand all instructions before installation. Incorrect installation can lead to serious injury or damage.
- Weight Capacity: Do not exceed the maximum weight capacity of 20 kg (44 lbs).
- Screen Size: This mount is designed for screens between 19 and 48 inches (48-122 cm).
- VESA Compatibility: Verify your TV's VESA mounting pattern is compatible (75x75 mm to 200x200 mm).
- Wall Structure: Ensure the mounting surface (wall) can safely support the combined weight of the mount and your TV. Consult a professional if unsure.
- Tools: Use appropriate tools for installation.
- Children: Keep children away from the installation area.
- Periodic Check: Periodically check that the mount is secure and all fasteners are tight.
3. Package Contents
Verify that all components are present before beginning installation:
- 1x Hama FULLMOTION TV Wall Bracket
- Mounting hardware (screws, washers, spacers)
- Fischer plugs (wall anchors)
- Mounting instructions (this manual)

Figure 3.1: Included mounting hardware. This image shows a variety of screws, washers, spacers, and wall plugs (Fischer plugs) provided for installation.
4. Specifications
| Feature | Specification |
|---|---|
| Screen Size Compatibility | 19 - 48 inches (48 - 122 cm) |
| Maximum Weight Capacity | 20 kg (44 lbs) |
| VESA Mounting Standards | 75x75, 100x100, 200x100, 200x200 mm (up to 220x230 mm) |
| Tilt Angle | +5° / -12° continuous tilt |
| Swivel Range | 180° (on 2 hinges) |
| Distance to Wall (Min-Max) | 5.6 cm - 22.2 cm (2.2 in - 8.7 in) |
| Material | Steel |
| Color | Black |
| Model Number | 00118100 |

Figure 4.1: Key specifications at a glance. Icons indicate compatibility for 19-48 inch screens, VESA up to 200x200mm, maximum weight of 20kg, and ease of installation.

Figure 4.2: Dimensional drawing of the Hama TV Wall Mount. This diagram illustrates the height (22 cm), width (23 cm), and adjustable depth (5.6 cm to 22.2 cm) of the mount.
5. Setup and Installation
Follow these steps carefully to install your Hama TV Wall Mount.
5.1. Pre-Installation Checks
- Verify VESA Pattern: Measure the horizontal and vertical distance between the mounting holes on the back of your TV. This mount supports VESA patterns from 75x75 mm up to 200x200 mm (and up to 220x230 mm).
- Check Wall Type: Determine if your wall is solid concrete, brick, wood stud, or drywall. Different wall types require different mounting hardware and techniques.
- Locate Studs (for wood walls): Use a stud finder to locate the center of wood studs.
- Mark Mounting Position: Hold the wall plate against the wall at the desired height and use a pencil to mark the drilling holes. Ensure it is level.

Figure 5.1: Measuring VESA mounting points. This diagram shows how to measure the horizontal and vertical distances between the mounting holes on the back of a television to determine its VESA standard.
5.2. Mounting the Wall Plate
- Drill Holes: Drill pilot holes at the marked locations. The drill bit size will depend on the wall plugs (Fischer plugs) provided.
- Insert Wall Plugs: Insert the Fischer plugs into the drilled holes. Tap gently with a hammer if necessary until flush with the wall surface.
- Attach Wall Plate: Secure the wall plate to the wall using the provided screws. Ensure it is firmly attached and level.
5.3. Attaching the TV Bracket to the TV
- Select Screws and Spacers: Choose the correct diameter and length of screws from the provided hardware that fit your TV's mounting holes. Use spacers if the TV back is uneven or if screws are too long.
- Attach TV Bracket: Secure the TV mounting plate to the back of your TV using the selected screws and washers. Do not overtighten.
5.4. Hanging the TV on the Wall Mount
- Lift and Hook: With assistance, carefully lift the TV and hook the TV bracket onto the arm of the wall mount.
- Secure: Ensure the TV is securely seated on the mount. Tighten any safety screws or mechanisms if present to prevent accidental dislodging.
5.5. Cable Management
The mount includes a cable manager to organize and relieve strain on your cables.
- Route your TV cables through the integrated cable manager on the arm of the mount.
- Ensure cables have enough slack for full range of motion without being stretched or pinched.

Figure 5.2: Integrated cable management. This image highlights the cable routing clip located on the underside of the mount's arm, designed to keep cables tidy and secure.
6. Operating Instructions
The Hama TV Wall Mount offers flexible viewing options:
6.1. Adjusting Tilt
- The mount allows for a continuous tilt adjustment from +5° (upwards) to -12° (downwards).
- Loosen the tilt adjustment knob or bolt (if present) slightly, adjust the screen to the desired angle, and then re-tighten to secure.
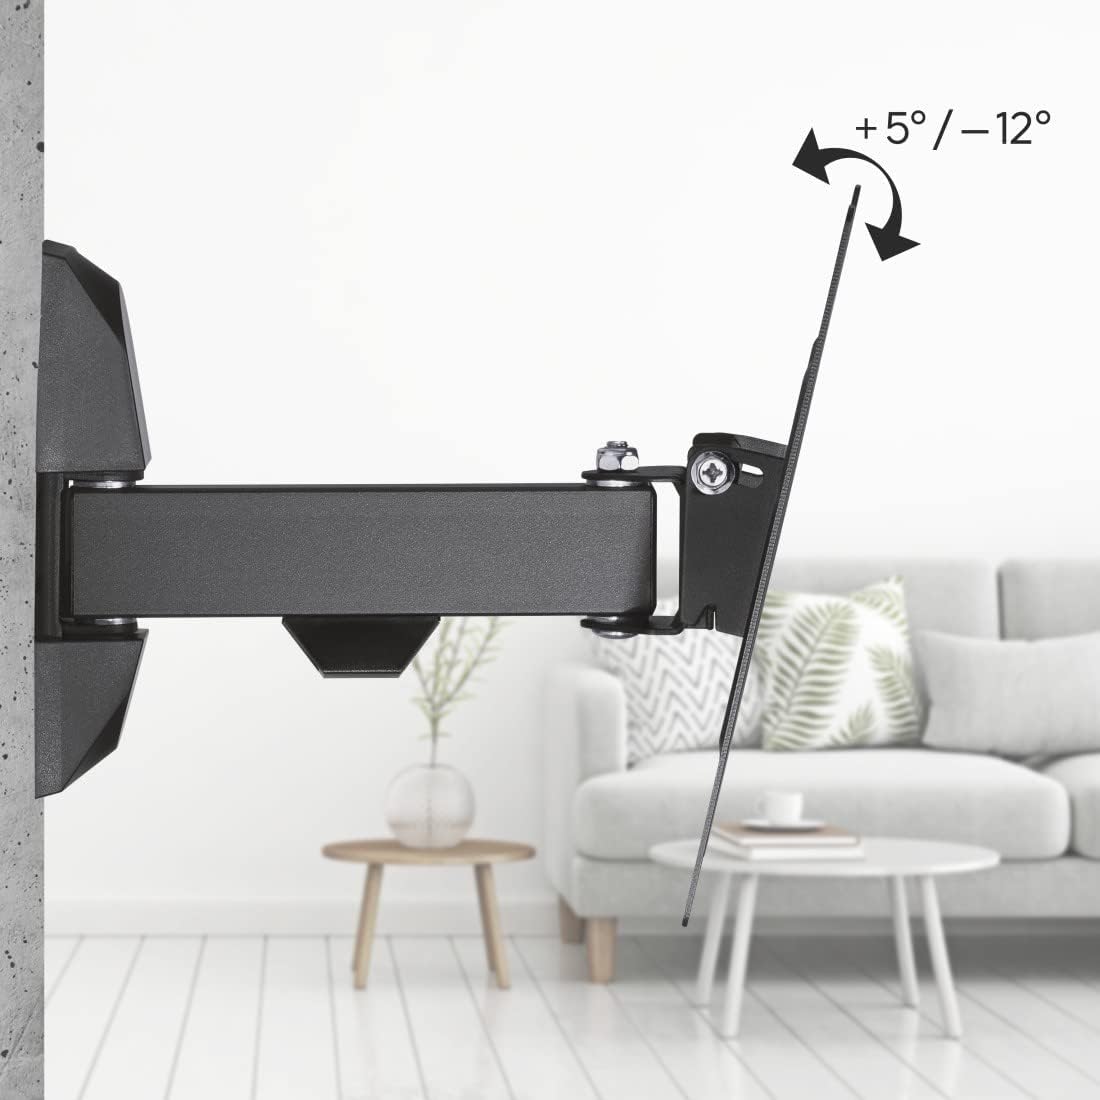
Figure 6.1: Tilt adjustment range. This diagram illustrates the ability to tilt the screen from +5 degrees to -12 degrees for optimal viewing.
6.2. Adjusting Swivel
- The articulated arm allows for a 180° swivel range, enabling you to position your TV for optimal viewing from various angles in the room.
- Gently push or pull the TV to the desired swivel position. The mount is designed for smooth movement.

Figure 6.2: Swivel functionality. This image shows the mount's arm extending and swiveling, indicating its full motion capability.

Figure 6.3: 180-degree swivel range. This diagram visually represents the extensive horizontal rotation possible with the mount.
6.3. Adjusting Distance from Wall
- The mount allows the TV to be positioned between 5.6 cm (minimum) and 22.2 cm (maximum) from the wall.
- Extend or retract the arm to achieve the desired distance.
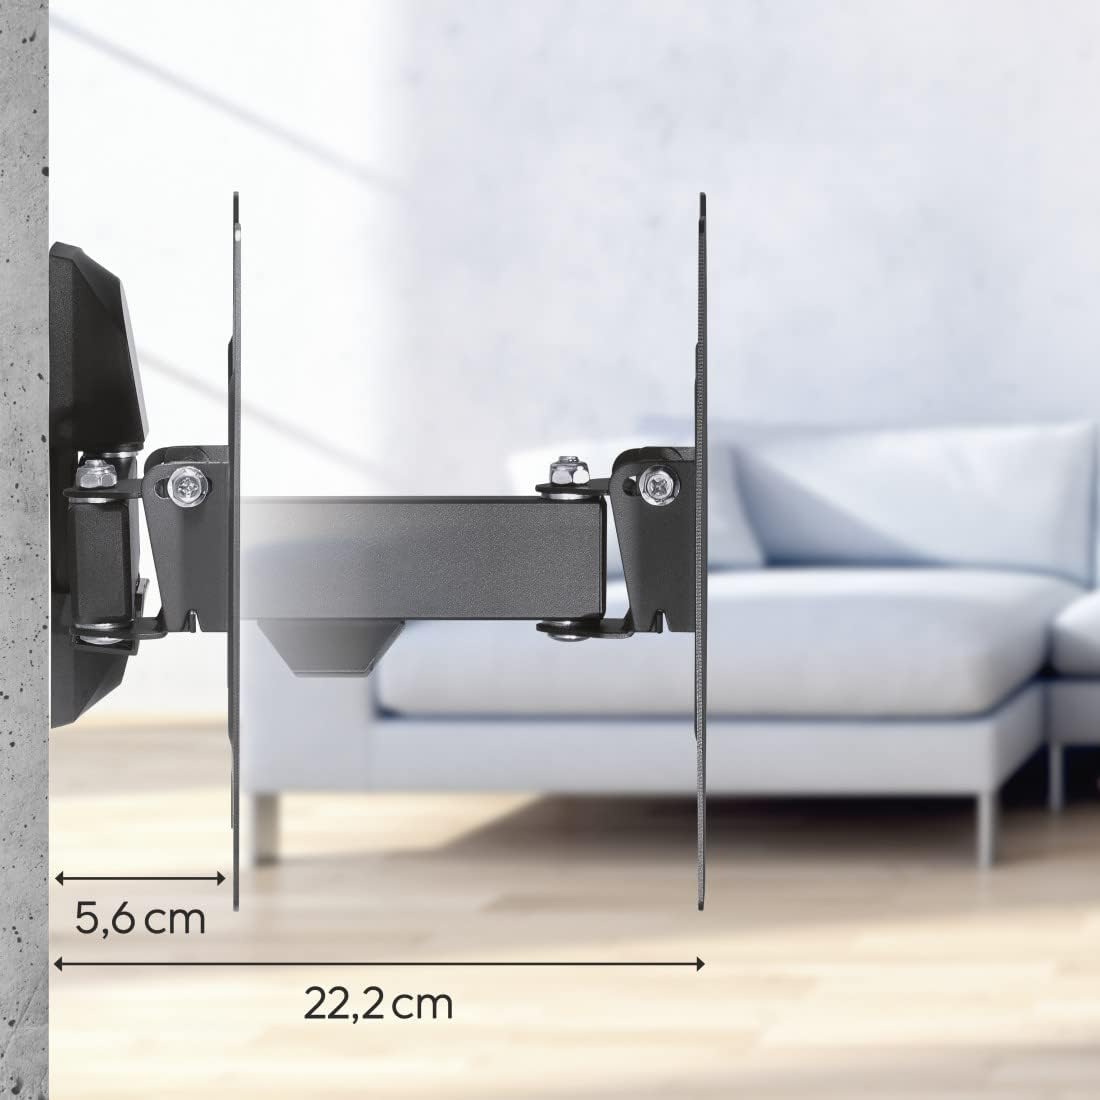
Figure 6.4: Minimum and maximum wall distance. This image shows the mount's ability to extend from 5.6 cm to 22.2 cm from the wall.
7. Maintenance
- Cleaning: Clean the mount with a soft, dry cloth. Do not use abrasive cleaners or solvents.
- Periodic Inspection: Regularly check all screws and connections to ensure they remain tight and secure. Re-tighten if necessary.
- Lubrication: The moving parts are designed for maintenance-free operation. Do not apply lubricants unless specifically instructed by Hama support.
8. Troubleshooting
- TV is not level: Check the wall plate installation. Ensure it was mounted level. Minor adjustments can sometimes be made by slightly loosening and re-tightening the TV mounting screws.
- Mount feels loose: Immediately remove the TV. Re-check all wall mounting screws and TV attachment screws. Ensure the wall structure is sound. If issues persist, consult a professional.
- Difficulty adjusting tilt/swivel: Ensure no cables are snagged. Check for any overtightened bolts that might restrict movement.
- Missing parts: Refer to the 'Package Contents' section. If parts are missing, contact Hama customer support.
9. Warranty and Support
Hama products are designed for quality and reliability. For warranty information, please refer to the warranty card included with your product or visit the official Hama website. For technical support or inquiries, please contact Hama customer service through their official channels.
Manufacturer: Hama
Model Number: 00118100
Date First Available: July 13, 2016