1. Introduction
This manual provides detailed instructions for the installation, operation, and maintenance of your Evertech 32 Channel H.265 Hybrid DVR Recorder. This device is designed for comprehensive security surveillance, supporting various camera types and offering advanced recording and remote access features.
1.1 Product Overview
The Evertech 32 Channel Hybrid DVR is a versatile digital video recorder capable of managing up to 32 security cameras. It supports multiple video formats, including HD-TVI, CVI, AHD, and Analog, making it suitable for a wide range of surveillance applications in homes, offices, businesses, and restaurants.

Image 1.1: Evertech 32 Channel Hybrid DVR Recorder with included 4TB hard drive and remote viewing capability on a smartphone.

Image 1.2: The Evertech 32 Channel HD 1080 Digital Video Recorder in a typical home environment.
1.2 Compatibility
This DVR is compatible with HD-TVI, CVI, AHD, and Analog cameras. It supports resolutions up to 1080P and up to 2.4MP security cameras. Please note that this device is NOT compatible with SDI, 3MP, 4MP, or 5MP security cameras. Ensure your cameras are compatible before connecting.

Image 1.3: DVR compatibility details, indicating support for AHD, TVI, CVI, and Analog cameras up to 2.4MP, and incompatibility with SDI, 3MP, 4MP, and 5MP cameras.

Image 1.4: Visual representation of supported camera types: AHD, TVI, CVI, and CVBS (Analog).
1.3 Package Contents
Verify that all items are present in the package:
- Evertech 32 Channel CCTV Surveillance Recorder
- 4TB Pre-Installed Hard Drive
- 12V DC Power Supply Adapter
- USB Mouse
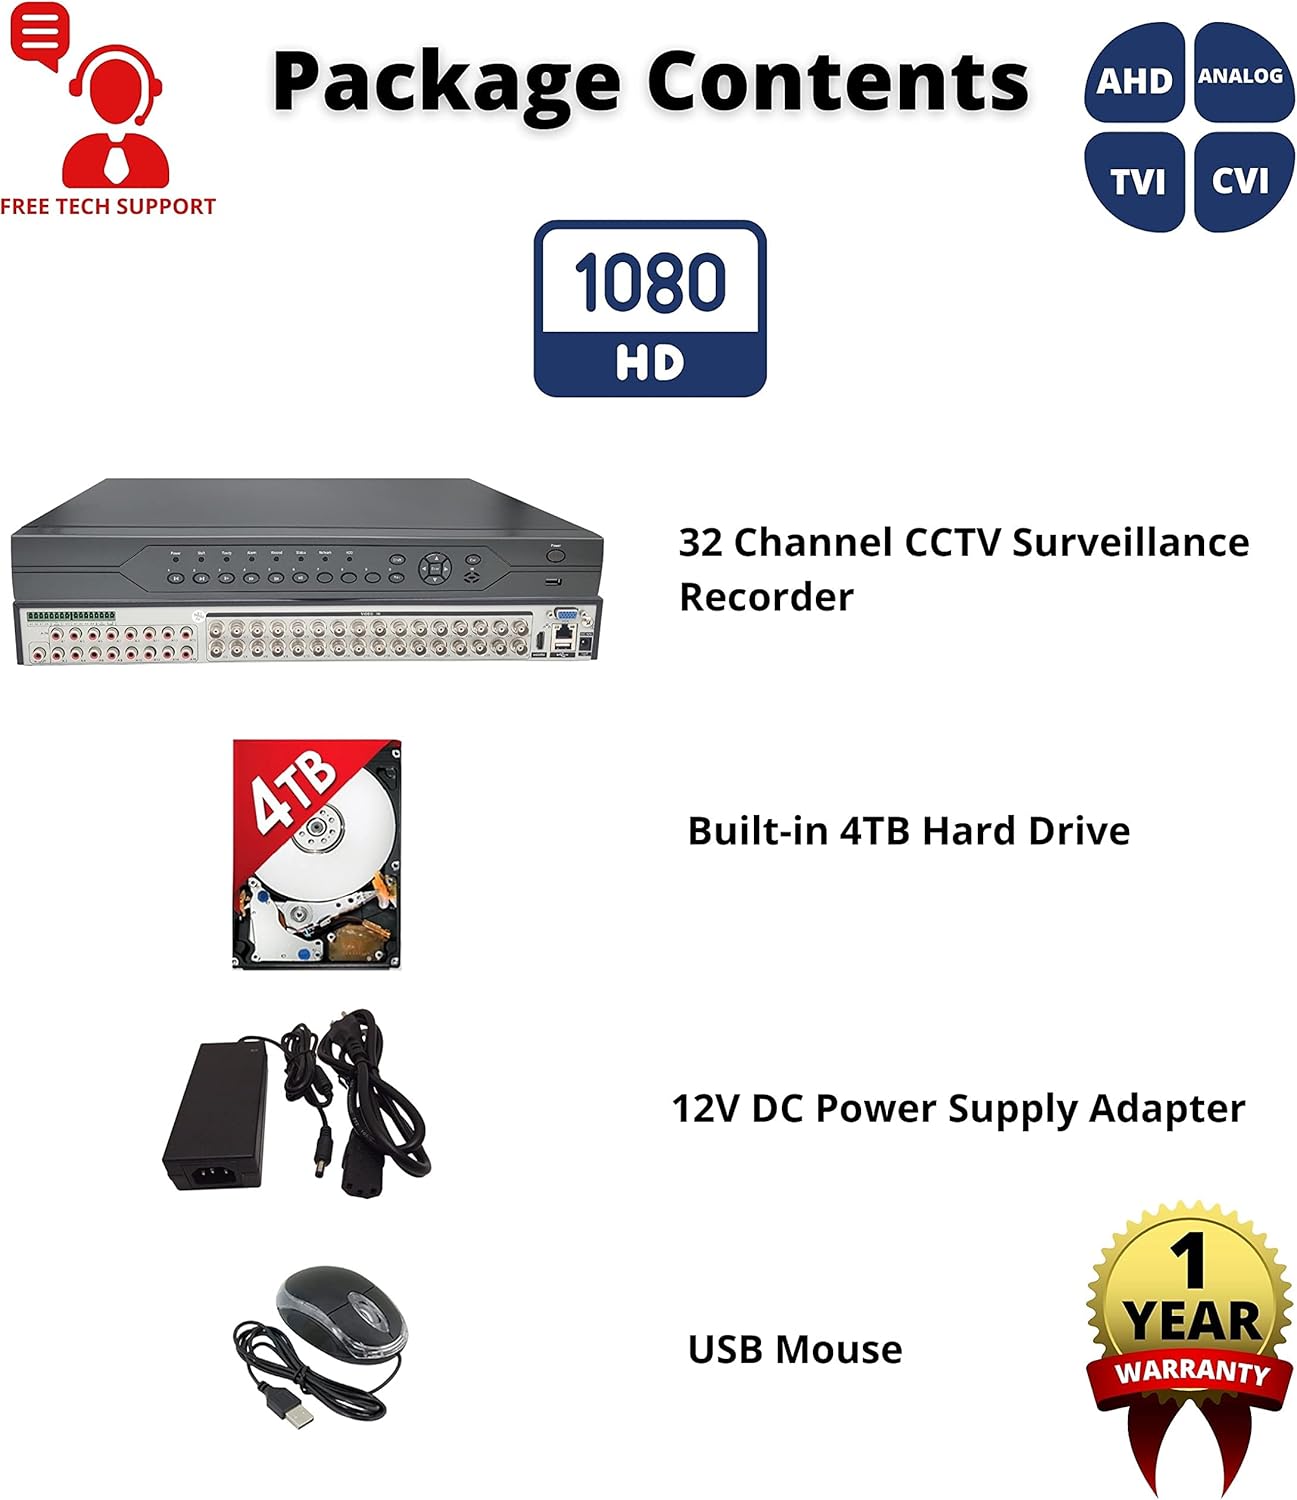
Image 1.5: Contents of the product package, showing the DVR unit, 4TB hard drive, power adapter, and USB mouse.

Image 1.6: Diagram of the package contents, highlighting the main components.
2. Setup
2.1 Physical Connections
Before powering on the DVR, connect all necessary peripherals and cameras.
- Connect Cameras: Attach your HD-TVI, CVI, AHD, or Analog cameras to the BNC video input ports on the rear panel.
- Connect Monitor: Connect a monitor to the DVR using either the HDMI or VGA output port.
- Connect USB Mouse: Plug the included USB mouse into one of the USB ports for navigation.
- Network Connection (Optional): For remote access, connect an Ethernet cable from the DVR's LAN port to your router/modem.
- Audio Input/Output (Optional): Connect microphones to audio input ports and speakers to audio output ports if audio recording/playback is desired.
- Power Connection: Connect the 12V DC power supply adapter to the DVR and then to a power outlet.
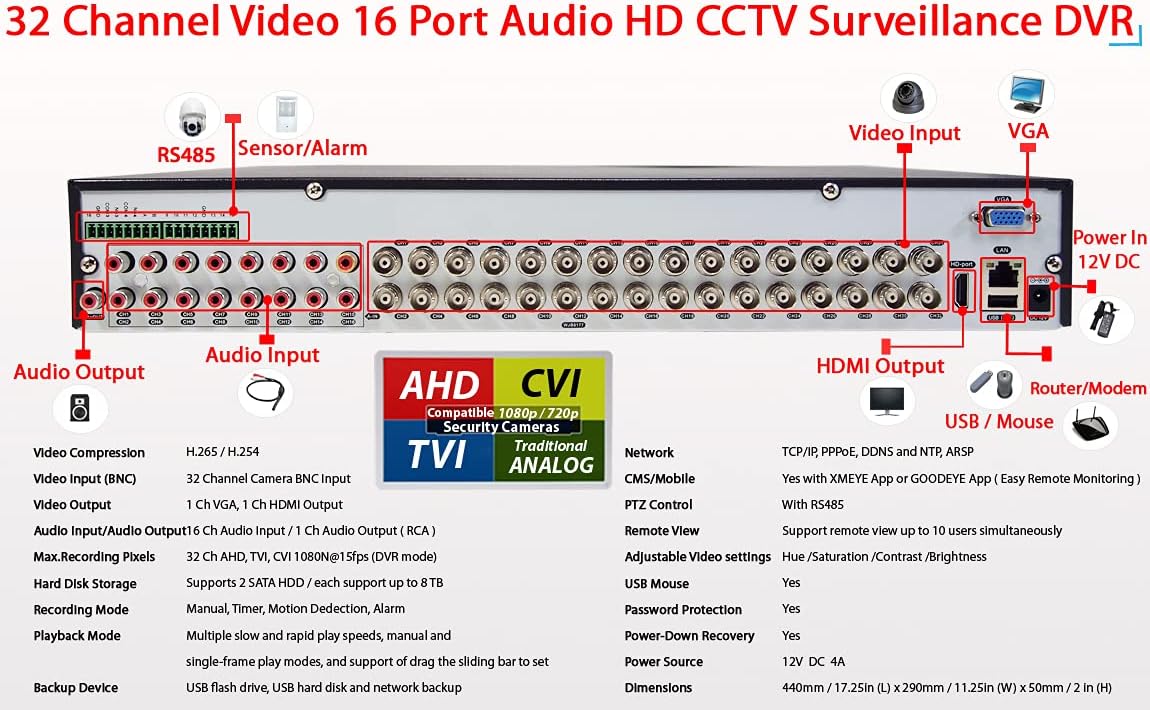
Image 2.1: Detailed view of the DVR's rear panel, illustrating all available connection ports for cameras, audio, video output, network, and power.

Image 2.2: Comprehensive diagram for DVR connections, detailing inputs for cameras, audio, and outputs for monitor, along with USB and network ports.

Image 2.3: Front and rear panel overview of the DVR, showing control interface and connectivity options.
2.2 Initial Configuration
Upon first power-up, the DVR will guide you through an initial setup wizard. Follow the on-screen prompts to set the date, time, network settings, and create an administrator password. It is crucial to set a strong password for security.
3. Operating Instructions
3.1 Recording Modes
The DVR supports several recording modes:
- Continuous Recording: Records 24/7 without interruption.
- Manual Recording: Initiated and stopped manually by the user.
- Motion Detection Recording: Records only when motion is detected by the cameras.
- Schedule Recording: Records according to a pre-defined schedule.
You can configure these modes through the DVR's on-screen menu, typically found under "Record Settings" or "Schedule."
3.2 Remote Access
The DVR allows remote viewing and playback on smartphones, tablets, and PCs. To set up remote access:
- Ensure the DVR is connected to your network via an Ethernet cable.
- Download the designated smartphone application (e.g., Xmeye App or GOODEYE App) from your device's app store.
- Open the app and scan the QR code displayed on the DVR's monitor (usually found in the network settings or P2P menu) to add your device.
- Follow the app's instructions to complete the setup.

Image 3.1: Remote viewing capability on various devices including smartphones, tablets, and personal computers.

Image 3.2: Live video surveillance viewable on desktop, smartphone, and tablet devices.
3.3 Motion Detection & Email Alerts
Configure motion detection zones and sensitivity through the DVR's menu. When motion is detected, the DVR can trigger recording and send an email alert to a specified address. This feature helps in monitoring specific areas and receiving timely notifications.
3.4 Playback
To review recorded footage, access the playback function from the main menu. You can search by date, time, and event type (e.g., motion detection). The DVR supports multichannel playback and offers features like slow and rapid play speeds, and a sliding bar for precise navigation.

Image 3.3: DVR playback interface with a timeline for reviewing recorded events.
4. Maintenance
4.1 Hard Drive Management
The DVR comes with a 4TB hard drive pre-installed, enabling 24/7 recording. The device supports up to 2 SATA HDDs, with each supporting up to 8TB, for a total of 16TB internal storage. The system has a capacity for up to 28TB total hard drive storage, including potential external storage. To increase recording days before overwriting, you may upgrade or add additional compatible hard drives. Refer to the specifications for supported hard drive types and capacities.

Image 4.1: DVR unit with a 4TB hard drive, illustrating storage capacity.

Image 4.2: DVR unit with an 8TB hard drive option.

Image 4.3: DVR unit with a 10TB hard drive option.

Image 4.4: DVR unit with a 12TB hard drive option.

Image 4.5: DVR unit with a 16TB hard drive option.
4.2 USB Backup
You can transfer recorded video files to external USB storage devices (e.g., USB flash drive, USB hard disk) via the USB port for backup purposes. Access the backup function through the DVR's menu.
5. Troubleshooting
This section addresses common issues you might encounter with your Evertech DVR.
- No Signal on Monitor:
- Ensure the monitor is powered on and correctly connected to the DVR via HDMI or VGA.
- Verify the DVR is powered on and the power adapter is securely connected.
- Check the monitor's input source setting to ensure it matches the connection type (HDMI/VGA).
- Remote Access App Shows "Offline":
- Confirm the DVR is connected to your router/modem with an Ethernet cable and the network indicator light on the DVR is active.
- Check your internet connection.
- Verify network settings on the DVR are correctly configured (DHCP enabled or static IP set).
- Ensure the P2P service is enabled on the DVR.
- Cameras Not Displaying Video:
- Confirm cameras are powered on and properly connected to the DVR's BNC input ports.
- Verify camera compatibility (HD-TVI, CVI, AHD, Analog; not SDI, 3MP, 4MP, 5MP).
- Check camera cables for damage or loose connections.
- DVR Unresponsive / Power Issues:
- Unplug the power adapter, wait 10 seconds, and plug it back in.
- Ensure the power outlet is functional.
- If the issue persists, contact technical support.
6. Specifications
Detailed technical specifications for the Evertech 32 Channel H.265 Hybrid DVR Recorder (Model RM).
| Feature | Detail |
|---|---|
| Model Number | RM |
| Video Compression | H.265 / H.264 |
| Video Input | 32 Channel BNC Input |
| Video Output | 1 Ch VGA, 1 Ch HDMI Output |
| Audio Input/Output | 16 Ch Audio Input / 1 Ch Audio Output (RCA) |
| Max. Recording Pixels | 32 Ch AHD, TVI, CVI 1080N@15fps (DVR mode) |
| Hard Disk Storage | Supports 2 SATA HDD, up to 8TB each (Total 16TB internal, up to 28TB with external) |
| Recording Mode | Continuous / Manual / Motion / Schedule |
| Playback Mode | Multiple slow and rapid play speeds, manual and single-frame play modes |
| Backup Device | USB flash drive, USB hard disk, network backup |
| Network | TCP/IP, PPPoE, DDNS, NTP, ARSP |
| CMS/Mobile | Yes with Xmeye App or GOODEYE App (Easy Remote Monitoring) |
| PTZ Control | With RS485 |
| Remote View | Supports remote view up to 10 users simultaneously |
| Adjustable Video Settings | Hue / Saturation / Contrast / Brightness |
| USB Mouse | Yes |
| Password Protection | Yes |
| Power-Down Recovery | Yes |
| Power Source | 12V DC, 4A |
| Dimensions (L x W x H) | 17.25in (44cm) x 11.25in (29cm) x 2in (5cm) |
| Item Weight | 9.43 pounds |
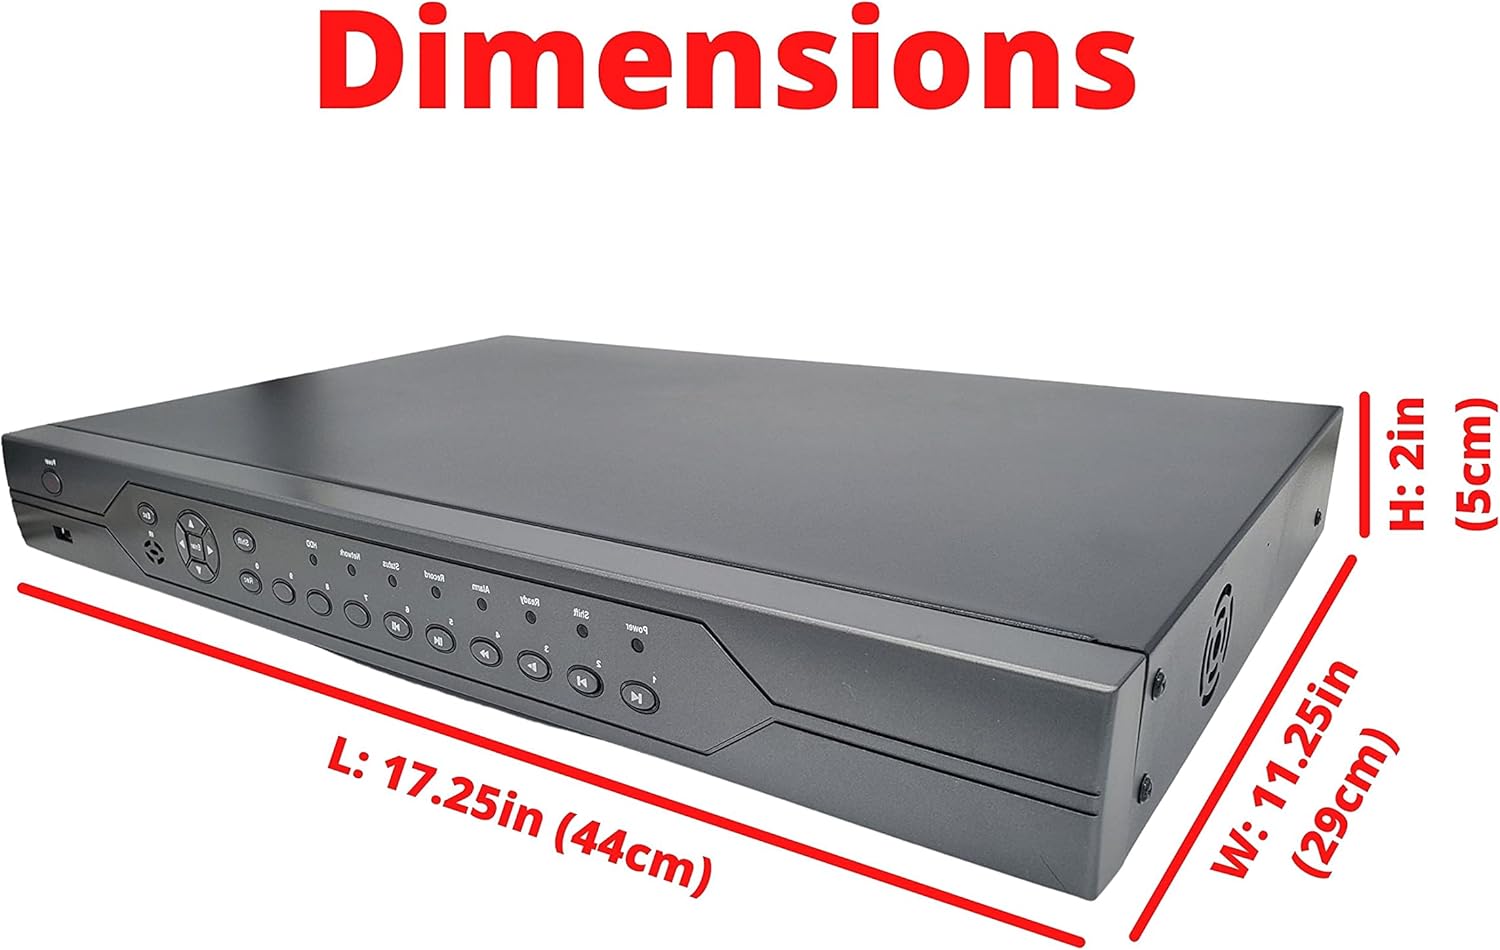
Image 6.1: Physical dimensions of the DVR unit.
7. Warranty and Support
All Evertech products come with a one-year warranty against manufacturing defects. For technical assistance, setup guidance, or troubleshooting, please contact Evertech Technical Support. They can provide detailed assistance for setup, including remote viewing configuration.
For support, please refer to the contact information provided with your product or visit the official Evertech website.


