Introduction
This manual provides detailed instructions for the installation, operation, and maintenance of your SmartZone 10-inch Round Professional-Grade HVAC Zoning Damper. This damper is designed for HVAC zoning systems, featuring commercial-quality construction and a high-torque Belimo motor for reliable power-open and power-close functionality. It is manufactured in the USA with a focus on durability and efficiency.
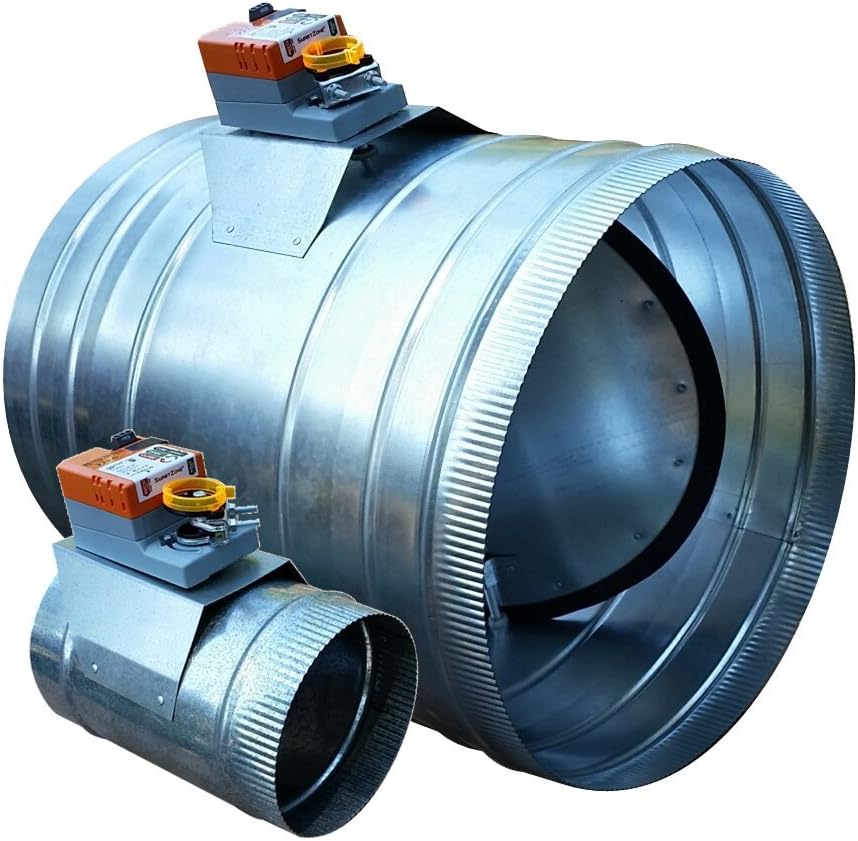
Image: The SmartZone 10-inch Round HVAC Zoning Damper, showcasing its robust galvanized steel construction and integrated motor actuator.
Key features include a full-seal gasket blade for ultra-low leakage, ribs for easy flexible duct attachment, and a crimped end for secure solid duct connections. The motor operates on 24 VAC and includes a push-button clutch for manual adjustment when no power is supplied.
Setup and Installation
Safety Precautions
- Always disconnect power to the HVAC system before installation or maintenance.
- Wear appropriate personal protective equipment (PPE), such as gloves and eye protection.
- Ensure all wiring complies with local electrical codes and standards.
Tools Required
- Screwdriver set
- Wire strippers
- Drill (if creating new duct openings)
- Duct sealant or tape
- Measuring tape
Installation Steps
- Select Damper Size: Ensure the damper size matches your ductwork. This model is a 10-inch round damper.
- Ductwork Preparation: Identify the location for damper installation. The damper features a crimped end for easy attachment to solid ductwork and ribs for secure connection with flexible ducting. Ensure a snug fit to prevent air leakage.
- Mounting the Damper: Insert the damper into the ductwork. Secure it using appropriate fasteners (e.g., sheet metal screws) and seal all connections with duct sealant or tape to ensure an airtight system.
- Wiring: The SmartZone damper uses a 3-wire, 24 VAC connection for power-open and power-close operation. Connect the wires from your zoning control panel to the damper motor terminals labeled COM (Common), OPEN, and CLOSE. Refer to your zoning system's manual for specific wiring diagrams.
- Initial Adjustment: The damper motor allows for minimum-open and maximum-close settings. These can be adjusted to fine-tune airflow. The motor has a run time of 60 seconds for a 90-degree rotation.

Image: A graphic illustrating various round damper sizes, including 6, 7, 8, 9, 10, and 12 inches, for proper selection.

Image: Side view of the SmartZone damper with the Belimo motor actuator securely mounted on the damper body.

Image: Close-up of the Belimo motor actuator, showing the COM -24V, OPEN, and CLOSE wiring terminals and labels.
Operation
The SmartZone damper operates automatically in conjunction with your HVAC zoning control system. When a zone calls for heating or cooling, the control panel sends a 24 VAC signal to the damper motor, causing it to open or close as required to direct airflow.
Manual Override: In situations where power is not available or for system testing, the damper can be manually adjusted. Locate the push-button clutch on the motor actuator. Press and hold the button to disengage the motor gears, allowing you to manually rotate the damper blade to the desired open or closed position. Release the button to re-engage the gears.
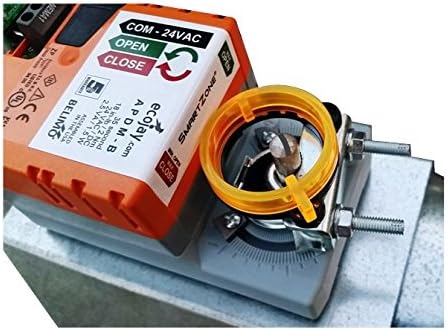
Image: Close-up of the Belimo motor actuator, highlighting the yellow push-button clutch for manual damper adjustment.
Maintenance
The SmartZone damper is designed for long-term, reliable operation with minimal maintenance. However, periodic inspection can help ensure optimal performance:
- Annual Inspection: Annually, inspect the damper for any signs of wear or damage. Check the duct connections for air leaks and re-seal if necessary.
- Blade Seal Check: Verify that the full-seal gasket blade is intact and providing a tight seal when the damper is closed.
- Motor Functionality: Observe the damper's operation during a zoning cycle to ensure the motor opens and closes the blade smoothly and completely.
- Cleaning: If dust or debris accumulates on the damper blade or motor, gently clean it with a soft, dry cloth. Avoid using harsh chemicals.
Troubleshooting
If you encounter issues with your SmartZone damper, consider the following troubleshooting steps:
- Damper Not Responding:
- Check the power supply to the HVAC system and zoning control panel.
- Verify that the wiring connections to the damper motor (COM, OPEN, CLOSE) are secure and correct.
- Ensure the zoning control panel is sending the correct signals to the damper.
- Damper Not Fully Opening/Closing:
- Inspect the damper blade for any obstructions that might prevent full movement.
- Check the motor's minimum-open and maximum-close settings for proper adjustment.
- Manually operate the damper using the push-button clutch to check for mechanical binding.
- Unusual Noise from Damper:
- Ensure the damper is securely mounted and not vibrating against ductwork.
- Check for any loose components on the motor or damper blade.
Specifications

Image: Close-up view of the damper's full-seal gasket blade, designed for ultra-low air leakage.

Image: Internal view of the damper, showing the robust blade and shaft mechanism.
| Feature | Detail |
|---|---|
| Model Number | DSUP |
| Size | 10-inch Round |
| Voltage | 24 VAC |
| Power Consumption | 2.5 VA |
| Run Time (90 degrees) | 60 Seconds |
| Torque | 45 in-lbs minimum |
| Blade Seal | Full-seal gasket (metal and poly) for ultra-low leakage |
| Duct Attachment | Crimped end for solid duct, ribs for flex duct |
| Motor Type | High-torque Belimo motor, Power Open & Close (3 Wire) |
| Construction | Heavy-duty, professional-grade, made in the USA |
| Item Weight | 5.14 pounds |
| Product Dimensions | 10 x 10 x 12 inches |
Warranty Information
The SmartZone 10-inch Round Professional-Grade HVAC Zoning Damper comes with a 5-year replacement warranty. This warranty covers defects in materials and workmanship under normal use and service. Please retain your proof of purchase for warranty claims.
Customer Support
For further assistance, technical support, or warranty inquiries, please contact your authorized SmartZone dealer or the manufacturer directly. When contacting support, please have your product model number (DSUP) and purchase date available.
It is recommended that installation and complex troubleshooting be performed by a qualified HVAC professional.