
Sony RMIP10
Sony RM-IP10 IP Remote Control Unit
Instruction Manual
1. Introduction
This manual provides detailed instructions for the setup, operation, and maintenance of the Sony RM-IP10 IP Remote Control Unit. Please read this manual thoroughly before using the unit to ensure proper and safe operation. Keep this manual for future reference.
The Sony RM-IP10 is designed to provide versatile and precise control over compatible Sony BRC series cameras via an IP network, offering enhanced flexibility for professional video production environments.
2. Safety Information
Always observe the following safety precautions to prevent electric shock, fire, or damage to the unit.
- Power Source: Use only the specified power adapter and ensure the power supply voltage matches the unit's requirements.
- Ventilation: Do not block ventilation openings. Ensure adequate airflow around the unit to prevent overheating.
- Liquid and Moisture: Do not expose the unit to rain, moisture, or spills. If liquid enters the unit, disconnect power immediately and contact qualified service personnel.
- Placement: Place the unit on a stable, level surface. Avoid placing it in direct sunlight, near heat sources, or in excessively dusty or humid environments.
- Servicing: Do not attempt to service the unit yourself. Refer all servicing to qualified service personnel.
3. Package Contents
Verify that all items listed below are included in your package. If any items are missing or damaged, contact your dealer immediately.
- Sony RM-IP10 IP Remote Control Unit
- AC Power Adapter
- Operating Instructions (this manual)
4. Product Overview
Familiarize yourself with the various components and controls of the RM-IP10 unit.

Figure 4.1: Frontal view of the Sony RM-IP10 IP Remote Control Unit, highlighting the ergonomic joystick and button layout for camera control.
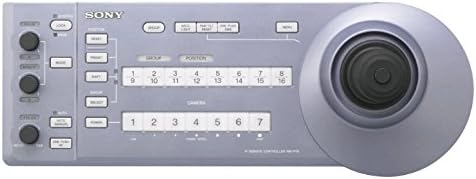
Figure 4.2: Detailed view of the control panel buttons and indicators on the RM-IP10, including camera selection and function buttons.
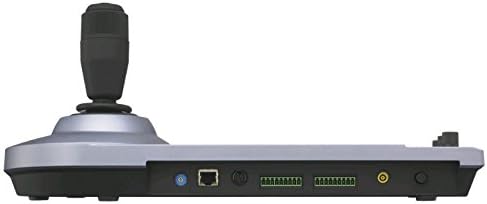
Figure 4.3: Rear panel of the RM-IP10, illustrating the connectivity options for network and external devices.
Key Components:
- Joystick: For precise pan, tilt, and zoom control of connected cameras.
- Camera Select Buttons: Allows selection of up to 5 compatible BRC cameras.
- Function Buttons: Dedicated buttons for various camera functions and settings.
- Rotary Knobs: For fine-tuning parameters such as focus, iris, and gain.
- Network Port (RJ-45): For IP connectivity to cameras and network infrastructure.
- Power Input: For connecting the AC power adapter.
5. Setup
5.1 Connecting the Power
- Connect the supplied AC power adapter to the DC IN port on the rear of the RM-IP10 unit.
- Plug the AC power adapter into a standard electrical outlet.
- The unit will power on automatically or can be turned on using the power button (if present).
5.2 Network Connection
The RM-IP10 connects to compatible cameras via an IP network.
- Connect an Ethernet cable from the NETWORK port on the RM-IP10 to your network switch or router.
- Ensure that your compatible Sony BRC cameras are also connected to the same network.
- Configure IP addresses for the RM-IP10 and the cameras to be on the same subnet. Refer to the camera's instruction manual for IP configuration details.
- The RM-IP10 supports automatic IP address assignment (DHCP) or manual static IP configuration.
5.3 Initial Camera Registration
Before controlling cameras, they must be registered with the RM-IP10.
- Press the MENU button on the RM-IP10.
- Navigate to the "Camera Setup" or "Camera Registration" menu option using the navigation buttons.
- Select "Add Camera" and enter the IP address of the camera you wish to control.
- Assign a camera number (1-5) to the registered camera.
- Repeat for all cameras you intend to control with the unit (up to 5 cameras).
6. Operating Instructions
6.1 Basic Camera Control
- Select Camera: Press one of the CAMERA SELECT buttons (1-5) to choose the camera you wish to control. The corresponding LED will illuminate.
- Pan/Tilt: Use the joystick to control the horizontal (pan) and vertical (tilt) movement of the selected camera.
- Zoom: Rotate the joystick's top ring or use dedicated zoom buttons (if available) to zoom in (T) or out (W).
- Focus: Use the FOCUS rotary knob to adjust the camera's focus.
- Iris: Use the IRIS rotary knob to adjust the camera's aperture.
6.2 Advanced Functions
- Preset Recall: If your cameras support presets, use the PRESET buttons to store and recall specific camera positions and settings.
- White Balance: Access the white balance settings through the menu or dedicated buttons to adjust color temperature.
- Exposure Control: Adjust gain, shutter speed, and other exposure parameters using the relevant controls or menu options.
- OSD (On-Screen Display): Toggle the camera's on-screen display for direct feedback on settings.
7. Maintenance
7.1 Cleaning the Unit
- Before cleaning, disconnect the power adapter from the unit.
- Use a soft, dry cloth to wipe the exterior of the unit.
- For stubborn dirt, dampen the cloth slightly with a mild, non-abrasive cleaner. Do not use strong solvents or abrasive cleaners.
- Avoid spraying liquids directly onto the unit.
7.2 Firmware Updates
Periodically check the Sony support website for firmware updates for the RM-IP10. Firmware updates can provide new features, performance improvements, and bug fixes.
- Visit the official Sony Professional support website.
- Search for "RM-IP10" and navigate to the downloads section.
- Follow the instructions provided with the firmware update package carefully. Typically, this involves connecting the unit to a computer via USB or network and using a specific utility.
8. Troubleshooting
This section addresses common issues you might encounter with the RM-IP10. If the problem persists, contact Sony customer support.
| Problem | Possible Cause | Solution |
|---|---|---|
| Unit does not power on. | Power adapter not connected or faulty. Power outlet not active. | Ensure power adapter is securely connected. Try a different power outlet. Check the power adapter for damage. |
| Cannot control cameras. | Network connection issue. Incorrect IP settings. Camera not registered. | Verify Ethernet cable connection. Ensure RM-IP10 and cameras are on the same network/subnet. Confirm cameras are correctly registered in the RM-IP10's settings. Check camera's power and network status. |
| Joystick or buttons unresponsive. | Unit malfunction. Firmware issue. | Restart the RM-IP10 unit. Check for and apply any available firmware updates. If problem persists, contact support. |
| Limited range of control. | Network interference or congestion. | Ensure a stable network environment. Reduce network traffic if possible. Consider using a dedicated network for camera control. |
9. Specifications
Technical specifications for the Sony RM-IP10 IP Remote Control Unit.
| Feature | Description |
|---|---|
| Model Number | RM-IP10 |
| Product Type | IP Remote Control Unit |
| Connectivity Technology | IP Network (Ethernet) |
| Compatible Devices | Sony BRC-H900, Sony BRC-Z700, Sony BRC-Z330 (and other compatible BRC cameras) |
| Max Supported Devices | Up to 5 cameras |
| Control Interface | Joystick (Pan/Tilt/Zoom), 12 Buttons, Rotary Knobs |
| Special Features | Ergonomic design, Wireless (network connectivity) |
| Product Dimensions (L x W x H) | 19.2 x 9.5 x 10.5 inches (approx.) |
| Item Weight | 2.1 pounds (approx.) |
| Manufacturer | Sony |
10. Warranty and Support
10.1 Limited Warranty
Sony warrants this product against defects in material or workmanship for a period specified by your regional warranty terms, typically one (1) year from the original date of purchase. This warranty does not cover damage caused by accident, misuse, abuse, improper installation or operation, or unauthorized repair or modification.
For full warranty details, please refer to the warranty card included with your product or visit the official Sony support website for your region.
10.2 Customer Support
If you encounter any issues not covered in the troubleshooting section or require further assistance, please contact Sony customer support:
- Online Support: Visit www.sony.com/electronics/support for FAQs, drivers, software, and service information.
- Telephone Support: Refer to the contact information provided on the Sony support website for your specific region.
- When contacting support, please have your product model number (RM-IP10) and serial number ready.
Ask a question about this manual
Ask about setup, troubleshooting, compatibility, parts, safety, or missing instructions. Manuals+ will review the question and use this page’s manual context to help answer it.