1. Introduction
This manual provides detailed instructions for the installation, operation, and maintenance of your JOOAN Wireless Security NVR (Network Video Recorder) system, model JA-8108. This 10-channel NVR supports up to 10 HD3MP (2304x1296) wireless cameras and features H.265+ video compression for efficient storage. It includes audio and video recording capabilities and is designed for seamless integration with compatible JOOAN WiFi cameras. Please read this manual thoroughly before using the product to ensure proper setup and optimal performance.
2. Safety Information
- Ensure the NVR is placed in a well-ventilated area, away from direct sunlight, heat sources, and moisture.
- Use only the power adapter supplied with the NVR. Using an incorrect adapter may damage the device and void the warranty.
- Do not open the NVR casing. Refer all servicing to qualified personnel.
- Protect cables from being walked on or pinched, particularly at plugs, convenience receptacles, and the point where they exit from the apparatus.
- Disconnect the NVR from the power supply during lightning storms or when unused for long periods.
- This NVR is designed to work exclusively with JOOAN Wireless Camera models JA-734CRK or JA-734CRI. Compatibility with other camera models is not guaranteed.
3. Package Contents
Please check the package contents upon unboxing. If any items are missing or damaged, contact customer support immediately.
- JOOAN Wireless Security NVR (Model JA-8108)
- Power Adapter for NVR
- USB Mouse
- User Manual (this document)
- Ethernet Cable (for network connection)
- Screws for Hard Drive Installation (Hard Drive not included)
4. Product Overview
4.1 NVR Unit
The JOOAN JA-8108 NVR is the central unit for your wireless security system. It processes and stores video footage from connected cameras.

Figure 4.1: Front view of the JOOAN Wireless Security NVR. This image shows the compact, white NVR unit with two prominent antennas and a black front panel featuring the JOOAN logo.
4.2 NVR Dimensions
The NVR unit has compact dimensions for easy placement.

Figure 4.2: Dimensions of the JOOAN Wireless Security NVR. The image illustrates the NVR's measurements: approximately 10.08 inches (length), 9.13 inches (width), and 1.77 inches (height).
4.3 Rear Panel and Ports
The rear panel of the NVR features various ports for connectivity to monitors, audio devices, and network.

Figure 4.3: Rear panel of the JOOAN Wireless Security NVR with labeled ports. From left to right, the ports include Audio Out, VGA, HD-OUT (HDMI), WAN (Ethernet), USB, and DC12V power input. There is also a power switch.
5. Setup
5.1 Hardware Installation
- Hard Drive Installation (Optional): The NVR does not include a hard drive. To enable recording, install a 3.5" SATA hard drive (up to 6TB, 1TB/2TB recommended). Power off the NVR before installation. Remove the top cover, connect the SATA data and power cables to the hard drive, secure the drive with screws, and replace the cover.
- Connect Monitor: Connect a monitor to the NVR using either the VGA or HD-OUT (HDMI) port.
- Connect Mouse: Plug the included USB mouse into the USB port on the NVR's rear panel.
- Connect Power: Connect the NVR power adapter to the DC12V input and plug it into a power outlet. Turn on the NVR using the power switch.
- Network Connection: For remote viewing and updates, connect the NVR to your router using the provided Ethernet cable via the WAN port.
- Camera Pairing: This NVR is designed for JOOAN Wireless Camera models JA-734CRK or JA-734CRI. Power on your compatible JOOAN wireless cameras. The NVR and cameras are designed for automatic pairing (one-key auto-pair). If cameras do not connect automatically, refer to the troubleshooting section or contact support for specific pairing instructions.

Figure 5.1: Simplified plug and play installation diagram. This image shows a JOOAN camera and the NVR unit, both connected to power outlets, and the NVR connected to a router via an Ethernet cable, illustrating the wireless connection between the camera and NVR.

Figure 5.2: Detailed connection diagram for the NVR system. This diagram illustrates connections for cameras (wireless), NVR power, router, and NVR outputs to audio, VGA monitor, HDMI monitor, and remote viewing via phone app.
5.2 Initial Configuration
Upon first boot, the NVR may guide you through an initial setup wizard. Follow the on-screen prompts to set language, date/time, network settings, and hard drive formatting (if a new HDD is installed). Ensure the hard drive is formatted by the NVR for proper recording functionality.
6. Operating the NVR System
6.1 Live View
Once cameras are paired, you can view live feeds on the connected monitor. Use the USB mouse to navigate the NVR interface. Double-clicking a camera channel typically brings it to full-screen view.
6.2 Recording
The NVR supports continuous, scheduled, and motion-triggered recording. The H.265+ compression technology significantly reduces file size while maintaining video quality, allowing for extended recording periods on the same hard drive capacity.

Figure 6.1: Comparison of H.264, H.265, and H.265+ video compression. This image demonstrates how H.265+ offers superior compression, resulting in smaller file sizes (e.g., 0.44Mbps for H.265+ vs. 1.2Mbps for H.264) and reduced storage occupation for 3MP recording.
The wireless solution allows for flexible camera placement, with cascade connection supporting distances up to 500m, further optimizing storage and cost.

Figure 6.2: Indoor/Outdoor Wireless Solution diagram. This image shows the NVR unit and multiple wireless cameras positioned around a house, indicating the system's capability for wide-area coverage and cascade connection for extended range.
6.3 Playback
Access the playback menu from the NVR interface to review recorded footage. You can search by date, time, and event type (e.g., motion detection). The NVR supports simultaneous playback of multiple channels.
6.4 Remote Access (Eseecloud APP)
To view your security system remotely on your smartphone or PC, download the "Eseecloud" application. Ensure your NVR is connected to the internet via the WAN port. Use the "fast network" option on the NVR and scan the provided SN code within the Eseecloud app to add your device. This allows for live viewing, playback, and system management from anywhere with an internet connection.
Figure 6.3: Eseecloud mobile application interface for remote viewing. This image displays a smartphone screen showing a live video feed from a security camera, demonstrating the remote access capability.
6.5 Alerts and Notifications
The system supports customized alerts, including sound alarms, APP push notifications, and NVR buzzer alerts. Configure these settings within the NVR menu or the Eseecloud app to receive timely notifications for detected events.
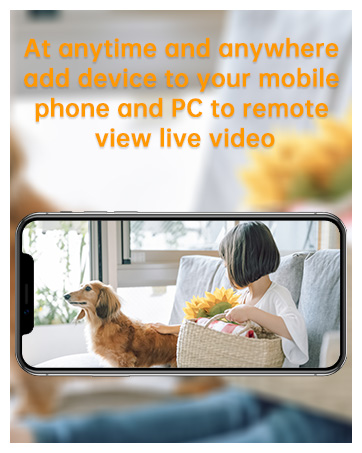
Figure 6.4: Eseecloud mobile application showing alert options. This image illustrates the various notification methods available, including sound alarms, app push notifications, and NVR buzzer alerts, for enhanced security monitoring.
7. Maintenance
- Hard Drive Management: Regularly check the hard drive status in the NVR settings. If the hard drive becomes full, the NVR will typically overwrite the oldest footage. Consider backing up important footage periodically.
- Firmware Updates: Check the JOOAN official website or contact customer support for available firmware updates. Keeping your NVR firmware updated ensures optimal performance and security.
- Cleaning: Gently clean the exterior of the NVR with a soft, dry cloth. Do not use liquid cleaners or aerosols. Ensure ventilation openings are free from dust and obstructions.
- System Restart: Periodically restarting the NVR (e.g., once a month) can help maintain system stability.
8. Troubleshooting
| Problem | Possible Cause | Solution |
|---|---|---|
| No video output on monitor. | Loose cable connection; incorrect input selected on monitor; NVR not powered on. | Check HDMI/VGA cable connections. Ensure monitor input matches (HDMI/VGA). Verify NVR power adapter is connected and power switch is ON. |
| Cameras not pairing/displaying. | Cameras not powered; cameras out of range; incompatible camera model; pairing issue. | Ensure cameras are powered on. Move cameras closer to NVR. Confirm cameras are JOOAN JA-734CRK or JA-734CRI. If auto-pairing fails, contact support for manual pairing steps. |
| No remote access via Eseecloud app. | NVR not connected to internet; incorrect network settings; app not configured correctly. | Verify NVR is connected to router via Ethernet. Check network settings on NVR. Ensure correct SN code is entered in Eseecloud app. Check router firewall settings. |
| No recording or hard drive error. | No hard drive installed; hard drive not formatted; hard drive faulty. | Install a compatible 3.5" SATA hard drive. Format the hard drive via NVR settings. If issues persist, the hard drive may be faulty and require replacement. |
For further assistance, please refer to the Warranty & Support section.
9. Specifications
| Feature | Detail |
|---|---|
| Model Number | JA-8108 |
| Video Compression | H.265+ |
| IP Video Input | 10 Channels Wireless |
| Max Recording Resolution | Up to 3MP (2304x1296) |
| Video Output | HDMI, VGA (Up to 3MP) |
| Max Playback Resolution | Up to 3MP |
| Hard Drive Support | 1 SATA interface, Max 6TB (3.5" HDD, not included) |
| Network Interface | RJ45 x 1 (10/100M) |
| Wireless Antenna | 2 Ports |
| USB Interface | USB2.0 x 1 |
| Operating Power | DC12V |
| Power Consumption | 6W (without HDD) |
| Working Temperature | 14°F ~ 131°F (-10°C ~ 55°C) |
| Dimensions (WxHxD) | 10.08 x 9.13 x 1.77 inches (approx. 25.6 x 23.2 x 4.5 cm) |
10. Warranty & Support
JOOAN provides customer support for its products. For technical assistance, warranty claims, or any inquiries regarding your NVR system, please use the following contact information:
- Customer Service Email: wendy@qacctv.com
- Technician Email: technicalreply@qacctv.com
- Skype: market@qacctv.com
- Service Online Hours: 5 PM ~ 2 AM (PST)
Please have your model number (JA-8108) and purchase details ready when contacting support for faster service.


