1. Introduction
This manual provides essential information for the proper installation, operation, and maintenance of your Xtune PRO-JH-JGC08-AM-BK Projector Headlights. These headlights are designed as a direct replacement for the factory halogen headlights on 2008-2010 Jeep Grand Cherokee models, offering an OEM-style projector design for enhanced illumination.
Important Note: These headlights are specifically designed for Jeep Grand Cherokee models equipped with halogen headlights only from 2008 to 2010. They are not compatible with models originally equipped with HID (High-Intensity Discharge) headlights.

Figure 1: Xtune PRO-JH-JGC08-AM-BK Projector Headlights (Pair)
2. Safety Information
- Always disconnect the vehicle's battery before performing any electrical work to prevent electrical shock or damage to the vehicle's electrical system.
- Wear appropriate personal protective equipment, including safety glasses and gloves, during installation.
- Ensure all connections are secure and properly insulated to prevent short circuits.
- Do not modify the product. Any modifications may void the warranty and compromise safety.
- If you are unsure about any part of the installation process, consult a qualified automotive technician.
- Proposition 65 Warning: This product may contain chemicals known to the State of California to cause cancer and birth defects or other reproductive harm.
3. Package Contents
Verify that all components are present and undamaged before beginning installation.
- Xtune PRO-JH-JGC08-AM-BK Projector Headlight Assembly (1 Pair)
4. Specifications
| Feature | Specification |
|---|---|
| Brand | Xtune |
| Model Number | PRO-JH-JGC08-AM-BK |
| Vehicle Service Type | Jeep Grand Cherokee (2008-2010 Halogen Models) |
| Special Feature | Waterproof |
| Lens Color | Clear |
| Assembly Required | No |
| Automotive Fit Type | Vehicle Specific Fit |
| OEM Part Number | CH2519129 |
| UPC | 887769036118 |
| Item Weight | 18.21 pounds (per pair) |
5. Setup (Installation)
This section provides general guidance for installing the projector headlights. For detailed vehicle-specific instructions on removing existing components, please consult your vehicle's service manual or a qualified technician.
- Preparation: Park the vehicle on a level surface, engage the parking brake, and turn off the engine. Disconnect the negative terminal of the vehicle's battery.
- Access Existing Headlights: Depending on your vehicle model, this may involve removing the front grille, bumper cover, or other trim pieces to access the headlight mounting bolts.
- Remove Old Headlights: Disconnect the electrical connectors from the back of the existing headlight assembly. Unbolt and carefully remove the old headlight units.
- Inspect New Headlights: Before installation, visually inspect the new Xtune projector headlights for any shipping damage.
- Connect Wiring: Connect the electrical harness of the new Xtune headlight assembly to the vehicle's existing wiring. Ensure all connections are secure and match the factory configuration.

Figure 2: Rear view of the headlight assembly with wiring connections.

Figure 3: Detailed view of the multi-pin electrical connector.
- Mount New Headlights: Carefully position the new headlight assemblies into the vehicle's headlight housing. Secure them using the factory mounting bolts. Do not overtighten.
- Reassemble Vehicle: Reinstall any removed grille, bumper, or trim pieces.
- Reconnect Battery: Reconnect the negative terminal of the vehicle's battery.
- Aiming Adjustment: After installation, it is crucial to properly aim your headlights to ensure optimal visibility and to avoid blinding oncoming traffic. Locate the vertical adjustment screw on the back of the headlight assembly.
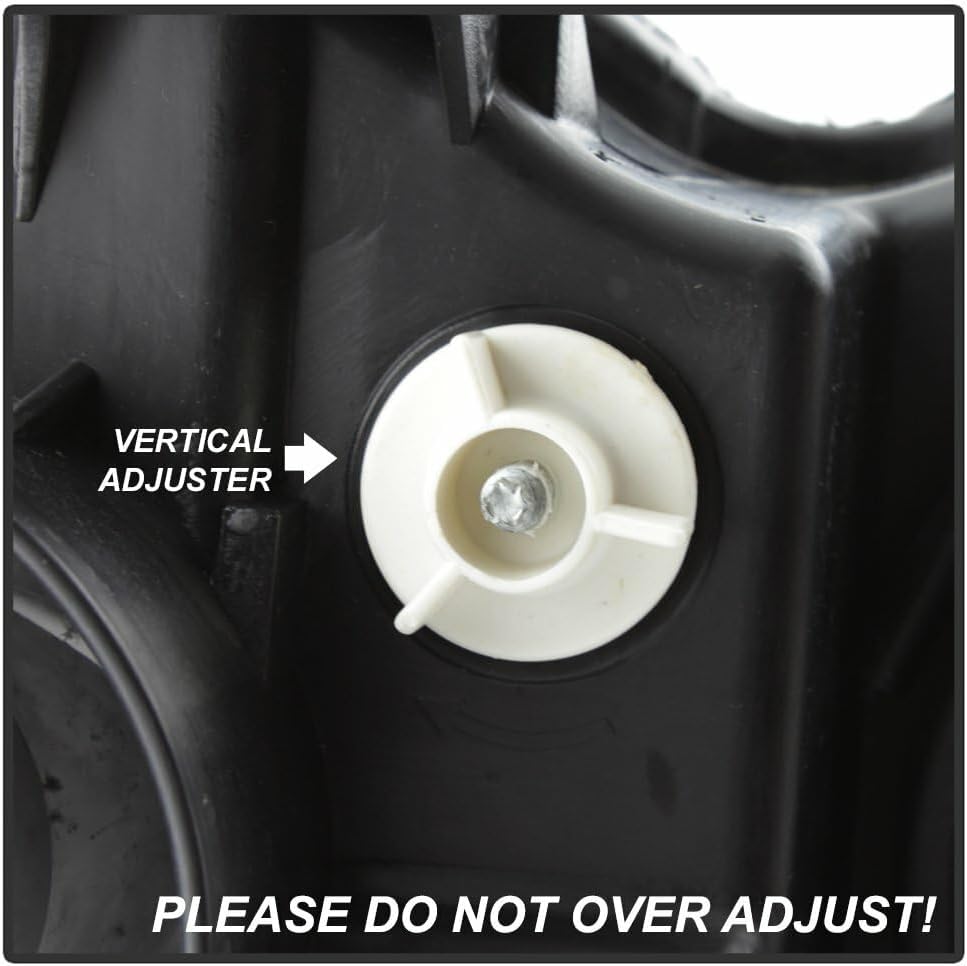
Figure 4: Vertical headlight adjuster. Do not over adjust.
Use a Phillips head screwdriver to turn the vertical adjuster. Refer to local regulations or a professional for proper headlight aiming procedures. Do not over adjust the screw, as this can damage the internal mechanism.
6. Operating Instructions
The Xtune projector headlights operate in conjunction with your vehicle's existing headlight controls. No special operating procedures are required beyond standard vehicle operation.
- Turn your vehicle's headlight switch to the "ON" or "AUTO" position to activate the headlights.
- Use your vehicle's high beam/low beam switch as usual. The projector lens design provides a focused beam pattern for improved light distribution.
7. Maintenance
- Cleaning: Clean the headlight lenses regularly with a soft cloth and mild automotive soap or glass cleaner. Avoid abrasive cleaners or harsh chemicals that could damage the lens surface.
- Inspection: Periodically inspect the headlight assemblies for any signs of damage, cracks, or moisture intrusion. Ensure all wiring connections remain secure.
- Bulb Replacement: If a bulb requires replacement, consult your vehicle's service manual for the correct bulb type and replacement procedure. Exercise caution to avoid touching the glass of new bulbs with bare hands, as oils can reduce bulb life.
8. Troubleshooting
| Problem | Possible Cause | Solution |
|---|---|---|
| Headlight not illuminating | Blown fuse, loose connection, faulty bulb, wiring issue. | Check vehicle's fuse box for blown headlight fuses. Verify all electrical connections are secure. Test or replace the bulb. Inspect wiring for damage. |
| Dim or flickering light | Poor electrical connection, low voltage, failing bulb. | Ensure connections are tight and clean. Check vehicle's charging system. Replace bulb if necessary. |
| Moisture inside lens | Condensation (normal in some conditions), seal compromise. | Minor condensation often dissipates. If excessive or persistent, inspect seals for damage. Ensure all caps are securely in place. |
| Improper beam pattern | Incorrect aiming. | Adjust headlight aiming using the vertical adjuster screw (refer to Section 5). |
If troubleshooting steps do not resolve the issue, contact Xtune customer support or a qualified automotive technician.
9. Warranty and Support
Xtune products are manufactured to high-quality standards. For specific warranty terms and conditions, please refer to the documentation provided with your purchase or contact your retailer. Keep your proof of purchase for warranty claims.
For technical assistance or further inquiries, please contact Xtune customer support through their official website or the retailer from whom the product was purchased.


