1. Product Overview
The Hikvision DS-7B08HQHI-K1 Turbo HD DVR is a robust digital video recorder designed for advanced surveillance systems. It supports various signal inputs including HDTVI, HDCVI, AHD, and CVBS, and is compatible with H.265+/H.265/H.264+/H.264 IP cameras. This DVR offers high-resolution recording up to 3MP and HDMI output up to 4K resolution, ensuring clear and detailed video monitoring. It is built for long-distance transmission over UTP and coaxial cables and supports up to 6TB HDD storage for extensive recording capabilities.
Key Features:
- H.265+/H.265/H.264+/H.264 encoding for main stream and H.265/H.264 for sub-stream of analog cameras.
- Self-adaptive HDTVI/HDCVI/AHD/CVBS signal input.
- Connectable to H.265+/H.265/H.264+/H.264 IP cameras.
- Supports up to 3MP resolution for recording.
- HDMI output at up to 4K (3840 × 2160) resolution.
- Long distance transmission over UTP and coaxial cable.
- 4/8-channel synchronous playback.
- Playback resolution: 3MP/1080p/720p/VGA/WD1/4CIF/CIF.
- Supports up to 6TB HDD (HDD not included).
- Features RJ45, 2 USB ports, and includes mouse support.
- Free Cloud P2P in-built for mobile viewing (Android and Windows Phone).

Figure 1: Front view of the Hikvision DS-7B08HQHI-K1 Turbo HD DVR, showing the sleek design and front panel indicators.
2. Setup Guide
2.1 Unboxing and Initial Inspection
Carefully unpack all components from the box. Verify that all items listed in the packing list are present and undamaged. The package typically includes the DVR unit, power adapter, USB mouse, and a remote control.
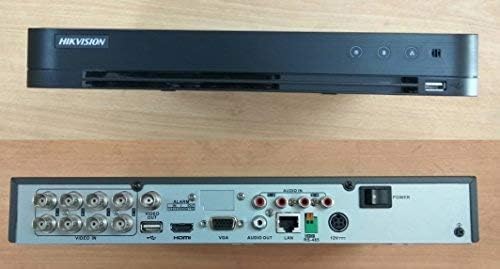
Figure 2: The Hikvision DVR unit displayed with its standard accessories, including the remote control, power adapter, and USB mouse.
2.2 Hard Disk Drive (HDD) Installation
The DVR supports up to a 6TB HDD, which is not included. Follow these steps to install an HDD:
- Unscrew and remove the top cover of the DVR.
- Connect the SATA power and data cables from the DVR to the HDD.
- Secure the HDD to the DVR chassis using the provided screws.
- Replace the top cover and secure it with screws.
2.3 Connecting Peripherals
Refer to the back panel diagram for port identification:
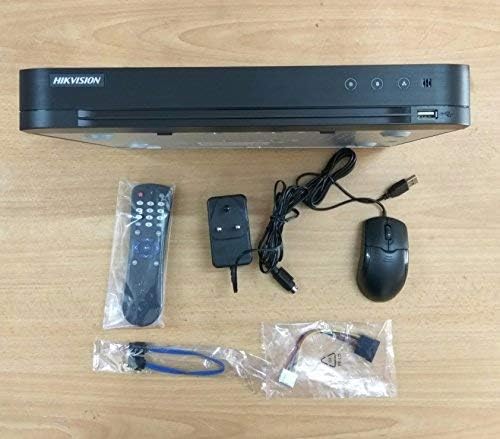
Figure 3: Rear view of the Hikvision DVR, illustrating the various input/output ports for video, audio, network, and power connections.
- Video Input: Connect your HDTVI/HDCVI/AHD/CVBS cameras to the "VIDEO IN" BNC ports.
- Video Output: Connect a monitor to the HDMI or VGA port.
- Audio Input/Output: Connect audio devices to the "AUDIO IN" and "AUDIO OUT" RCA ports.
- Network: Connect an Ethernet cable from the "LAN" port to your router or network switch.
- USB: Connect the USB mouse to one of the USB ports. Additional USB ports can be used for backup devices.
- Power: Connect the provided power adapter to the "12V" power input.
2.4 Powering On and Initial Configuration
After all connections are made, plug the power adapter into an electrical outlet. The DVR will power on automatically. Follow the on-screen prompts to complete the initial setup, including setting up an administrator password, date/time, and network settings. Ensure the HDD is formatted through the DVR's menu for proper recording.
3. Operating Instructions
3.1 Live View
Once powered on, the DVR will display the live view from connected cameras on the connected monitor. You can switch between single-camera view and multi-camera grid view using the controls.
3.2 Recording
The DVR is configured to record continuously by default once an HDD is installed and formatted. You can adjust recording schedules, motion detection settings, and other recording parameters through the DVR's main menu (typically accessible by right-clicking with the mouse).
3.3 Playback
To review recorded footage:
- Access the "Playback" menu from the main interface.
- Select the desired date and time range.
- Choose the camera(s) you wish to view.
- Use the playback controls (play, pause, fast forward, rewind) to navigate through the footage.
3.4 Remote Access (Cloud P2P / Mobile View)
The DVR supports remote viewing via Hik-Connect (or similar P2P service) on Android and Windows Phone devices. To set up remote access:
- Ensure the DVR is connected to the internet via the LAN port.
- Enable the Cloud P2P service in the DVR's network settings.
- Download the Hik-Connect app on your mobile device.
- Register an account and add your DVR by scanning the QR code or entering the serial number.
- You can now view live footage and playback recordings remotely.
4. Maintenance
Regular maintenance ensures the longevity and optimal performance of your DVR system.
- Cleaning: Periodically clean the exterior of the DVR with a soft, dry cloth. Ensure ventilation openings are free from dust and obstructions. Do not use liquid cleaners directly on the unit.
- Firmware Updates: Check the Hikvision official website for the latest firmware updates. Keeping your DVR's firmware up-to-date can improve performance, add new features, and enhance security. Follow the provided instructions carefully when performing updates.
- Data Backup: Regularly back up important footage to an external USB drive or network storage. This is crucial for preserving critical video evidence.
- HDD Health Check: Monitor the health of your installed HDD through the DVR's system information menu. Replace the HDD if any errors or warnings are indicated.
5. Troubleshooting
This section addresses common issues you might encounter with your DVR.
| Problem | Possible Cause | Solution |
|---|---|---|
| No power to DVR | Power adapter disconnected; faulty power outlet; DVR power switch off. | Check power adapter connection; try a different outlet; ensure power switch is on. |
| No video display on monitor | Monitor cable loose/faulty; incorrect video output setting; camera not connected/powered. | Check HDMI/VGA cable; ensure monitor is on correct input; verify camera connections and power. |
| No recording | HDD not installed/formatted; recording schedule not set; HDD full. | Install and format HDD; check recording schedule; delete old footage or replace HDD. |
| Cannot access DVR remotely | Network cable disconnected; P2P service disabled; incorrect network settings. | Check LAN cable; enable P2P in DVR settings; verify network configuration (IP address, gateway, DNS). |
If the problem persists after attempting these solutions, please contact Hikvision technical support or refer to the comprehensive user manual available on the Hikvision website.
6. Specifications
| Feature | Detail |
|---|---|
| Model Number | DS-7B08HQHI-K1 (Note: Product specifications may also refer to DS-7208HQHI-F1 due to product upgrades and enhancements, but core resolution and functions remain consistent.) |
| Video Input | Self-adaptive HDTVI/HDCVI/AHD/CVBS signal input |
| IP Camera Input | Connectable to H.265+/H.265/H.264+/H.264 IP cameras |
| Recording Resolution | Up to 3MP |
| HDMI Output | Up to 4K (3840 × 2160) resolution |
| Playback Channels | 4/8-channel synchronous playback |
| HDD Support | Up to 6TB (HDD not included) |
| USB Ports | 2 |
| Network Interface | RJ45 Ethernet port |
| Dimensions | 31.5 x 24.2 x 4.5 cm |
| Weight | 1.98 kg (1980 Grams) |
| Connectivity Technology | HDMI, USB, VGA |
| Compatible Devices | Camera, Smartphone |
7. Warranty and Support
7.1 Warranty Information
The Hikvision DS-7B08HQHI-K1 Turbo HD DVR comes with a 2-year warranty. Please note that the warranty does not cover the adapter, mouse, remote, physical damage, or burning. For specific warranty claims, retain your proof of purchase.
7.2 Technical Support
For technical assistance, troubleshooting beyond this manual, or warranty inquiries, please contact Hikvision customer support. You can find contact information and additional resources, including updated manuals and software, on the official Hikvision website:
When contacting support, please have your product model number (DS-7B08HQHI-K1 or DS-7208HQHI-F1) and serial number ready.