1. Introduction and Product Overview
This manual provides detailed instructions for the safe installation, operation, and maintenance of your Westinghouse Bendan Ceiling Fan. Please read all instructions carefully before beginning installation.
The Westinghouse Bendan Ceiling Fan is designed for indoor use, featuring a modern style with white blades and a metal finish. It includes a remote control for convenient operation and an integrated light fixture.

Figure 1.1: Westinghouse Bendan Ceiling Fan (Model 7214040) with white blades.
2. Safety Information
WARNING: To reduce the risk of fire, electric shock, or personal injury, always follow these basic precautions:
- Read all instructions before installing the fan.
- Installation must be performed by a qualified electrician in accordance with all local and national electrical codes.
- Ensure the installation site is suitable for the fan's weight (approximately 7.6 kg). The mounting structure must be capable of supporting the fan.
- Disconnect power at the main circuit breaker before installation or servicing.
- Do not operate the fan with damaged blades or housing.
- Keep hands, clothing, and other objects clear of the fan blades when in operation.
- This product is designed for indoor use only.
Important Note on Bulbs: This product includes a halogen R7s 80W bulb. For information on recycling and cleaning broken bulbs, refer to relevant local guidelines.
3. What's in the Box
Carefully unpack all components and ensure all parts are present before beginning assembly. Refer to the diagram below for identification of parts.
- Ceiling Fan Motor Housing
- 5 White Blades
- Light Kit with Glass Shade
- Remote Control Unit
- Mounting Bracket and Hardware (screws, washers, anchors)
- Downrod
- Receiver for Remote Control
- (1) Halogen R7s 80W Bulb
- Electrical Cable
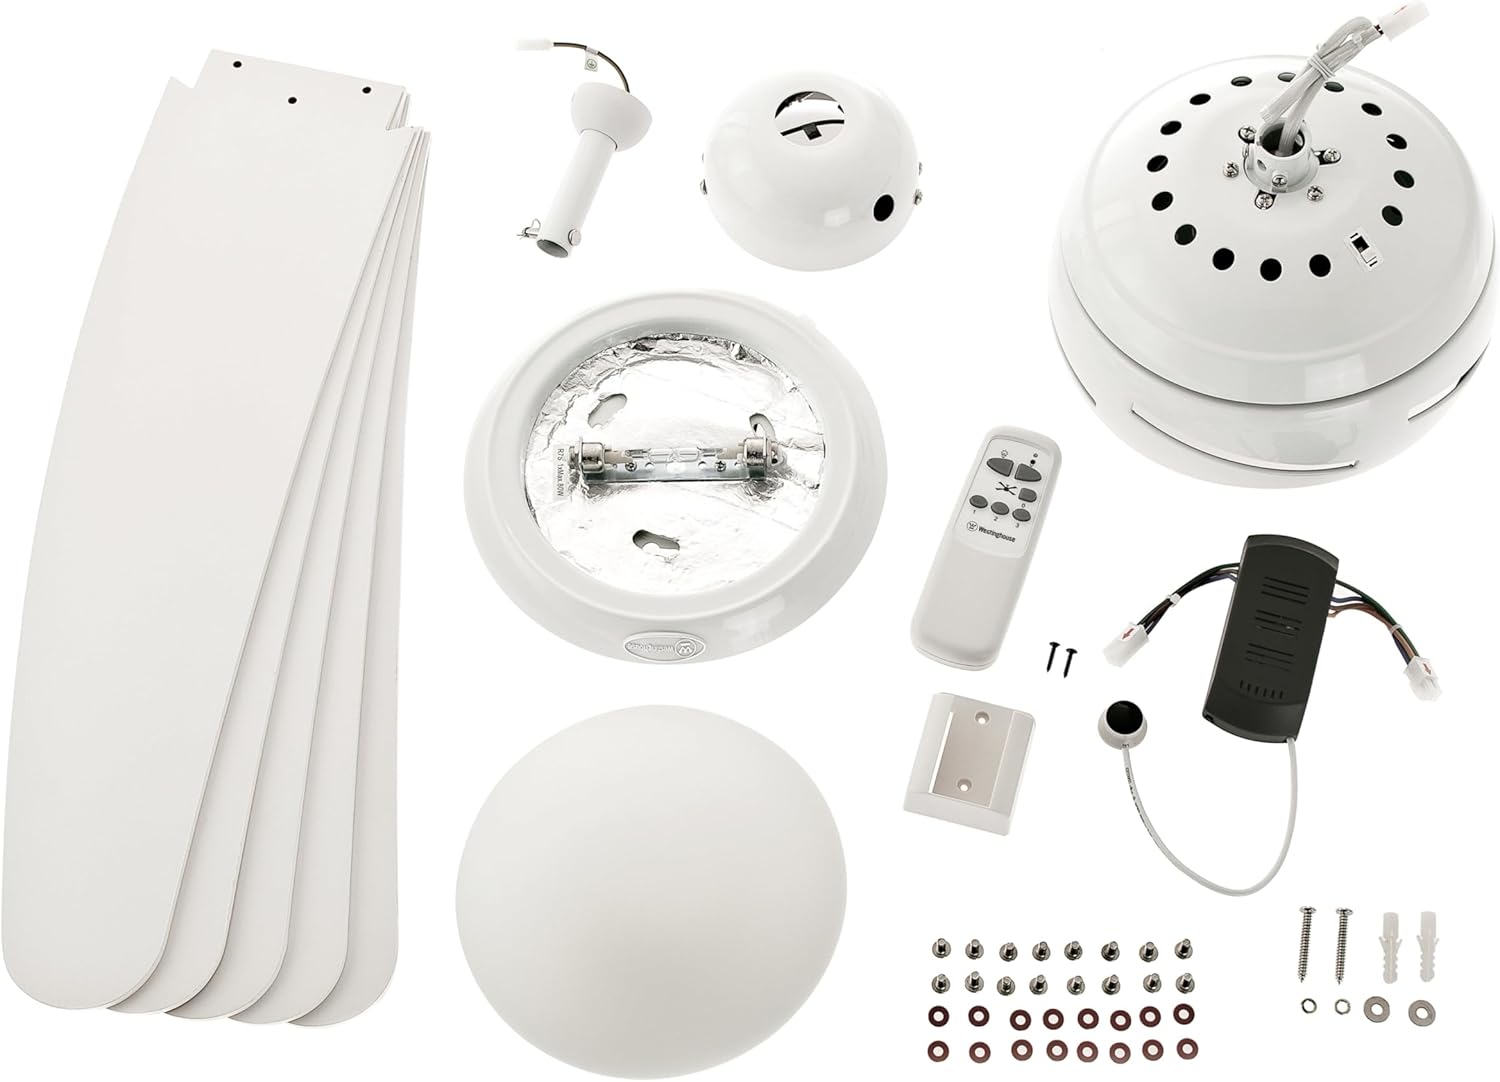
Figure 3.1: Included components of the ceiling fan kit.
4. Setup and Installation
Professional Installation Recommended: Due to the electrical nature and weight of the ceiling fan, professional installation by a certified electrician is highly recommended to ensure safety and proper functionality.
4.1 Mounting the Fan
- Prepare the Mounting Location: Ensure the ceiling junction box is securely mounted and capable of supporting the fan's weight. Turn off power at the circuit breaker.
- Install Mounting Bracket: Attach the mounting bracket to the ceiling junction box using the provided hardware. Ensure it is firmly secured.
- Assemble Downrod and Motor: Connect the downrod to the fan motor housing. Carefully lift the fan assembly and hang it from the mounting bracket.
4.2 Electrical Connection
- Connect Wiring: Follow the wiring diagram provided in the separate installation guide (not included in this manual) to connect the fan's electrical wires to the household wiring. This typically involves connecting live, neutral, and ground wires.
- Install Remote Receiver: The remote control receiver must be wired between the fan and the household electrical supply. Ensure it is placed securely within the canopy.
- Secure Canopy: Once wiring is complete and secure, attach the canopy to cover the wiring and mounting bracket.
4.3 Attaching Blades and Light Kit
- Attach Blades: Secure each of the five white blades to the blade holders, and then attach the blade holders to the motor housing using the provided screws.
- Install Light Bulb: Insert the included R7s 80W halogen bulb into the light fixture.
- Attach Light Shade: Secure the glass light shade to the light kit assembly.
4.4 Remote Control Setup
Insert the required AA batteries (not included) into the remote control unit. The remote control is pre-paired with the fan's receiver. If issues arise, refer to the troubleshooting section.

Figure 4.1: Remote control unit.
5. Operating Instructions
Your Westinghouse Bendan Ceiling Fan is operated via the included remote control. Ensure power is supplied to the fan at the wall switch.
5.1 Fan Operation
- Power On/Off: Press the fan icon button on the remote to turn the fan on or off.
- Speed Control: Use the '1', '2', and '3' buttons to select the desired fan speed.
- 1: Low speed, gentle airflow.
- 2: Medium speed, moderate airflow.
- 3: High speed, maximum airflow.
- Summer/Winter Mode (Reversible Motor): Locate the slide switch on the fan motor housing (usually near the top of the motor).
- Summer Mode (Counter-clockwise rotation): Pushes air downwards, creating a cooling breeze.
- Winter Mode (Clockwise rotation): Draws cool air up, circulating warm air trapped near the ceiling.
Note: Change the direction of rotation only when the fan is completely stopped.
5.2 Light Operation
- Light On/Off: Press the light bulb icon button on the remote to turn the light on or off.
- Brightness Control: Use the up/down arrow buttons next to the light icon to adjust brightness (if dimmable, though this model's bulb is not dimmable).

Figure 5.1: Example of the ceiling fan in an indoor setting.
6. Maintenance
Regular maintenance ensures optimal performance and longevity of your ceiling fan.
6.1 Cleaning
- General Cleaning: Dust the fan blades and motor housing regularly with a soft, lint-free cloth. Do not use abrasive cleaners or solvents, as they may damage the finish.
- Light Shade Cleaning: The glass light shade can be removed and washed with mild soap and water. Ensure it is completely dry before reattaching.
- Important: Always turn off power to the fan at the circuit breaker before cleaning.
6.2 Bulb Replacement
- Power Off: Turn off power to the fan at the circuit breaker and allow the bulb to cool completely.
- Remove Shade: Carefully remove the light shade.
- Replace Bulb: Gently remove the old R7s 80W halogen bulb and insert a new one of the same type and wattage.
- Reattach Shade: Securely reattach the light shade.
7. Troubleshooting
If you experience issues with your ceiling fan, consult the following common problems and solutions:
| Problem | Possible Cause | Solution |
|---|---|---|
| Fan does not start. | No power supply; loose wiring; remote control issues. | Check circuit breaker and wall switch. Ensure all electrical connections are secure (consult electrician). Replace remote batteries. Re-pair remote if necessary (refer to specific remote instructions). |
| Light does not work. | Bulb faulty; loose wiring; remote control issues. | Check bulb and replace if necessary. Verify light kit wiring. Check remote batteries. |
| Fan wobbles. | Loose blades; unbalanced blades; loose mounting. | Ensure all blade screws are tightened. Check for bent blades. Verify mounting bracket is securely fastened to the ceiling. |
| Excessive noise. | Loose screws; motor issues; blades hitting an obstruction. | Check all screws on the fan and mounting. Ensure no wires or objects are touching the fan blades or motor housing. If noise persists, contact support. |
8. Specifications
| Feature | Detail |
|---|---|
| Brand | Westinghouse |
| Model Number | 7214040 |
| Dimensions (L x W x H) | 132 x 132 x 36 cm |
| Weight | 7.6 kg |
| Material | Metal (housing), White Blades |
| Number of Blades | 5 |
| Voltage | 230 Volts |
| Max Electrical Power (Light) | 80 Watts |
| Bulb Type | Halogen R7s (1 included) |
| Control Type | Remote Control |
| Speed Levels | 3 |
| Reversible Motor | Yes (Summer/Winter mode) |
| Batteries Required (Remote) | AA (not included) |
| Intended Use | Indoor |

Figure 8.1: Energy Label. For more details, visit the EPREL database.
9. Warranty Information
Westinghouse products are manufactured to high-quality standards. For specific warranty terms and conditions, please refer to the warranty card included with your product or visit the official Westinghouse website. Keep your proof of purchase for any warranty claims.
10. Customer Support
If you have any questions, require technical assistance, or need to order replacement parts, please contact Westinghouse customer support. Contact information can typically be found on the Westinghouse website or on the product packaging.
For more information about Westinghouse products, visit: Westinghouse Brand Store on Amazon.