1. Important Safeguards
When using electrical appliances, basic safety precautions should always be followed to reduce the risk of fire, electric shock, and injury to persons, including the following:
- Read all instructions before operating the kettle.
- Do not touch hot surfaces. Use handles or knobs.
- To protect against fire, electric shock, and injury to persons, do not immerse cord, plugs, or the kettle base in water or other liquid.
- Close supervision is necessary when any appliance is used by or near children.
- Unplug from outlet when not in use and before cleaning. Allow to cool before putting on or taking off parts, and before cleaning the appliance.
- Do not operate any appliance with a damaged cord or plug, or after the appliance malfunctions or has been damaged in any manner. Contact customer service for examination, repair, or adjustment.
- The use of accessory attachments not recommended by the appliance manufacturer may result in fire, electric shock, or injury to persons.
- Do not use outdoors.
- Do not let cord hang over edge of table or counter, or touch hot surfaces.
- Do not place on or near a hot gas or electric burner, or in a heated oven.
- Always attach plug to appliance first, then plug cord into the wall outlet. To disconnect, turn any control to "off", then remove plug from wall outlet.
- Do not use appliance for other than intended use.
- This appliance operates on 120 Volts. Ensure your power supply matches this requirement to prevent damage or malfunction.
- Do not overfill the kettle. Fill only to the maximum fill line to prevent boiling water from overflowing.
2. Product Overview
The Brewista SmartPour Variable Digital Kettle is designed for precise temperature control, ideal for brewing coffee and tea. It features a gooseneck spout for controlled pouring and a digital display for accurate temperature readings.

Figure 2.1: Front view of the Brewista SmartPour Variable Digital Kettle. This image shows the stainless steel kettle body, the gooseneck spout, the handle, and the digital control base.
2.1 Components
- Kettle Body: Stainless steel construction with a 1.2-liter capacity.
- Gooseneck Spout: Designed for precise pouring control.
- Lid: Removable lid with a handle.
- Handle: Ergonomically designed for comfortable grip.
- Power Base: Contains the heating element and digital controls.
- Digital Display: Shows current and target temperatures, and timer settings.
- Control Buttons: Power, Temperature Up/Down, Set Temperature, Keep Warm, Auto-Start.
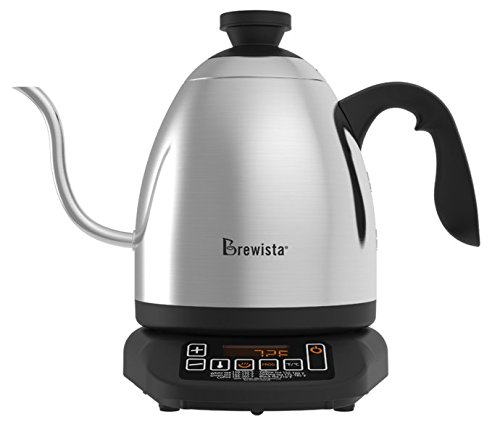
Figure 2.2: Close-up of the control panel on the Brewista SmartPour Kettle base. This image highlights the digital display and various control buttons for temperature adjustment and function selection.
3. Setup
3.1 Initial Cleaning
- Remove all packaging materials and labels from the kettle and base.
- Wipe the exterior of the kettle and base with a damp cloth.
- Wash the interior of the kettle and the lid with warm, soapy water. Rinse thoroughly.
- Fill the kettle with water to the maximum fill line and boil. Discard this water. Repeat this process two to three times to ensure the kettle is clean and free of manufacturing residues.
3.2 Placement
- Place the power base on a dry, flat, stable, and heat-resistant surface.
- Ensure the power cord is not dangling or in contact with hot surfaces.
- Plug the power cord into a grounded 120V AC electrical outlet.
4. Operating Instructions
4.1 Filling the Kettle
- Remove the kettle from its power base.
- Remove the lid and fill the kettle with fresh, cold water. Do not fill below the minimum or above the maximum fill lines. The capacity is 1.2 liters.
- Replace the lid securely.
- Place the kettle back onto the power base.
4.2 Powering On and Setting Temperature
- Press the POWER button to turn on the kettle. The digital display will illuminate.
- To select a preset temperature, press the SET TEMP button repeatedly to cycle through common brewing temperatures (e.g., 175°F, 195°F, 205°F, 212°F).
- To set a custom temperature, use the + and - buttons to adjust the desired temperature in 1-degree increments.
- The kettle will automatically begin heating to the selected temperature. The display will show the current water temperature as it heats.
4.3 Switching Temperature Units (°F/°C)
To switch between Fahrenheit (°F) and Celsius (°C), press and hold the + and - buttons simultaneously for a few seconds until the unit changes on the display.
4.4 Keep Warm Function
- After setting your desired temperature, press the KEEP WARM button.
- The kettle will heat to the set temperature and then maintain that temperature for up to one hour.
- To deactivate the Keep Warm function, press the KEEP WARM button again or turn off the kettle.
4.5 Auto-Start Timer
The auto-start timer allows you to program the kettle to begin heating at a specific time.
- Ensure the kettle is filled with water and placed on the base.
- Set your desired target temperature using the SET TEMP or +/- buttons.
- Press and hold the AUTO-START button. The display will show the current time.
- Use the + and - buttons to set the desired start time.
- Press the AUTO-START button again to confirm. The kettle will now display the current time and a small timer icon, indicating the auto-start is active.
- The kettle will begin heating at the programmed time.
Note: The auto-start timer can typically be set for up to 24 hours in advance.
5. Maintenance and Cleaning
Regular cleaning and maintenance will extend the life of your kettle.
5.1 Daily Cleaning
- Unplug the kettle from the power outlet and allow it to cool completely before cleaning.
- Wipe the exterior of the kettle and the power base with a soft, damp cloth. Do not use abrasive cleaners or scouring pads.
- The kettle body and lid can be hand washed with warm, soapy water. Rinse thoroughly and dry completely before returning to the base.
- Do not immerse the power base, cord, or plug in water or any other liquid.
5.2 Descaling
Mineral deposits (limescale) can build up inside the kettle over time, affecting performance. Descale your kettle regularly, depending on water hardness and frequency of use.
- Fill the kettle with a solution of equal parts white vinegar and water, or use a commercial descaling solution according to its instructions. Ensure the solution covers the mineral deposits.
- Allow the solution to soak for at least 30 minutes, or longer for heavy buildup. For stubborn deposits, you may heat the solution to just below boiling (do not boil vinegar).
- Empty the kettle and rinse thoroughly several times with fresh water.
- Boil a full kettle of fresh water and discard it to remove any residual descaling agent.
6. Troubleshooting
| Problem | Possible Cause | Solution |
|---|---|---|
| Kettle does not turn on. | Not plugged in; power outlet not working; kettle not properly seated on base. | Ensure the power cord is securely plugged into a working 120V outlet. Check if the kettle is correctly placed on the power base. |
| Water is not heating. | Kettle not powered on; temperature not set; insufficient water. | Press the POWER button. Set a desired temperature. Ensure water level is between MIN and MAX lines. |
| Temperature display is inaccurate. | Mineral buildup on temperature sensor; internal sensor malfunction. | Descale the kettle thoroughly. If the problem persists, contact customer support. |
| Kettle leaks or rusts. | Overfilling; manufacturing defect; hard water corrosion. | Do not overfill past the MAX line. Regular descaling can prevent corrosion from hard water. If a defect is suspected, contact customer support. |
| Kettle is slow to heat. | Mineral buildup; low voltage. | Descale the kettle. Ensure the kettle is connected to a stable 120V power supply. |
| Auto-start timer does not activate. | Timer not set correctly; power interruption. | Review the auto-start timer setting process. Ensure continuous power supply. |
For issues not listed here, or if solutions do not resolve the problem, please contact Brewista customer support.
7. Specifications
| Model Number | BKV12S02 |
| Brand | Brewista |
| Capacity | 1.2 Liters |
| Material | Stainless Steel |
| Voltage | 120 Volts |
| Special Features | Concealed Heating, Indicator Light, Variable Temperature Control, Gooseneck Spout, Keep Warm Function, Auto-Start Timer |
| Product Care | Hand wash, Wipe clean |
| Item Weight | 3 Pounds (approx. 1.36 kg) |
| Dimensions (LxWxH) | 27.3 x 21.1 x 30.4 Centimeters |
| UPC | 735343350429, 645240812855 |
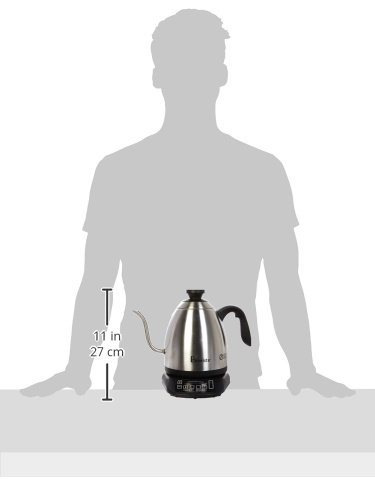
Figure 7.1: Image illustrating the approximate size of the Brewista SmartPour Kettle in relation to a person, showing its compact countertop footprint.
8. Warranty and Support
For warranty information, product registration, or technical support, please refer to the official Brewista website or contact their customer service department. Keep your purchase receipt as proof of purchase for warranty claims.
You may also find additional resources and product information by scanning the QR code provided on the product packaging or by visiting the link below: