Introduction
This manual provides comprehensive instructions for the installation, operation, and maintenance of your Cascada Classic Design 31-Inch LED Recessed Ceiling-Mount Shower System. Please read this manual thoroughly before installation and use to ensure proper function and longevity of your product.
The shower system features a premium stainless steel construction, a multi-function showerhead offering rainfall, waterfall, and rain curtain modes, and an integrated 5-knob thermostatic valve for precise temperature and function control. It also includes a handheld spray and a waterfall bathtub spout.
Safety Information
- Ensure all plumbing and electrical connections are performed by qualified professionals in accordance with local codes.
- Turn off the main water supply and electrical power before beginning any installation or maintenance.
- Verify water pressure is within the recommended range (40 PSI maximum).
- Do not use abrasive cleaners or harsh chemicals on the polished chrome finish.
- Keep the LED remote controller dry and away from water.
Package Contents
Verify that all components are present before beginning installation.

Image: Overview of included components: 23"x31" LED Shower Head, Controller, Installation accessories, Shower Holder, Spout, Plug, 1.5m Shower Flexible hose, Hand Shower, Screws, and 5-Knob Valve with Rough-in Kit.
- Recessed Ceiling-Mount Shower Head (31-inch)
- 5-Knob Thermostatic Valve with Rough-in Kit
- Handheld Shower with 60" Hose
- Shower Holder
- Waterfall Bathtub Spout
- LED Remote Controller
- Power Adapter/Plug for LED lights
- Installation Accessories (screws, flexible hoses)
Installation Instructions
Professional installation is recommended for this recessed ceiling-mount shower system. Ensure adequate space and structural support in the ceiling for the showerhead and proper plumbing for the thermostatic valve.
1. Prepare the Installation Area
- Turn off the main water supply and electrical power to the bathroom.
- Mark the desired location for the recessed showerhead on the ceiling and the thermostatic valve on the wall.
- Create necessary openings in the ceiling and wall for the showerhead housing and valve rough-in kit.

Image: Exploded view showing the internal structure and components of the recessed ceiling-mounted shower head, including the 304 stainless steel mirror surface.
2. Install the Thermostatic Valve
- Mount the rough-in kit for the 5-knob thermostatic valve securely within the wall opening.
- Connect the hot and cold water supply lines to the designated inlets on the valve.
- Connect the outlet lines from the valve to the showerhead, handheld shower, and bathtub spout. Ensure correct labeling for each function.

Image: Close-up of the 5-knob thermostatic shower valve, showing its control interface.

Image: Diagram illustrating the plumbing connections for the shower system, including the shower head, handheld, and body jets (if applicable).
3. Install the Recessed Shower Head
- Secure the showerhead housing within the ceiling opening.
- Connect the water supply lines from the thermostatic valve to the corresponding inlets on the showerhead (Rainfall, Waterfall, Rain Curtain).
- Connect the LED power cable from the showerhead to the provided power adapter, then plug into a suitable electrical outlet.
- Ensure all connections are watertight and secure.
4. Install Handheld Shower and Spout
- Mount the shower holder for the handheld shower at a convenient height on the wall.
- Connect the handheld shower hose to the valve outlet and the handheld shower head.
- Install the waterfall bathtub spout according to manufacturer instructions, connecting it to its dedicated valve outlet.

Image: Close-up of the handheld shower head.

Image: Close-up of the waterfall bathtub spout.
5. Final Checks
- Once all components are installed, slowly turn on the main water supply and check for leaks.
- Restore electrical power and test the LED lights and all shower functions.
Operating Instructions
Thermostatic Valve Operation
The 5-knob thermostatic valve allows independent control of water temperature and each shower function.
- Temperature Control: The leftmost knob controls the water temperature. Rotate to adjust to your desired warmth.
- Function Selection: The remaining four knobs independently control the Rainfall, Waterfall, Rain Curtain, and Handheld Shower functions. Turn a knob to activate or deactivate a specific function.
- Water Pressure: Note that running multiple functions simultaneously may reduce water pressure depending on your home's water supply.
LED Light Operation
The showerhead features integrated LED lights controlled by a remote controller.

Image: The shower system in operation, showing the LED lights and the remote control used to change their color.
- Use the provided remote controller to turn the LED lights on/off and change colors.
- Refer to the remote controller's specific instructions for advanced light settings (e.g., brightness, modes).
Video: This video demonstrates the installation process and various functions of the Cascada Classic recessed shower system, including LED light color changes and different water modes like mist, rainfall, and waterfall.
Shower Modes
- Rainfall Mode: Provides a gentle, wide coverage shower experience.
- Waterfall Mode: Delivers a concentrated stream of water, ideal for rinsing.
- Rain Curtain Mode: Creates a dense curtain of water for a unique sensation.
- Handheld Shower: Offers flexibility for targeted rinsing or cleaning.
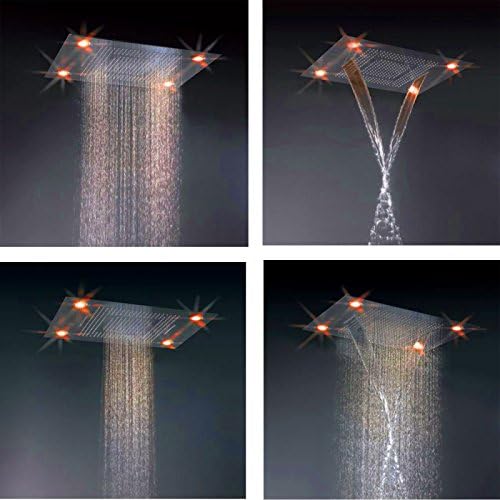
Image: Visual representation of the four distinct shower modes: rainfall, waterfall, rain curtain, and a combination of modes.
Maintenance
Cleaning the Finish
- Clean the polished chrome surfaces regularly with a soft cloth and mild soap or a non-abrasive cleaner specifically designed for chrome finishes.
- Rinse thoroughly with water and dry with a soft cloth to prevent water spots.
- Avoid using abrasive pads, harsh chemicals, or cleaners containing ammonia, bleach, or alcohol, as these can damage the finish.
Cleaning Shower Nozzles
- Over time, mineral deposits may accumulate in the showerhead nozzles. Gently rub the rubber nozzles with your finger or a soft brush to dislodge any buildup.
- For stubborn deposits, a solution of white vinegar and water can be used. Soak the showerhead (if removable) or apply the solution to the nozzles, let it sit for a few minutes, then scrub and rinse.
Thermostatic Valve Maintenance
- Periodically check the thermostatic valve for smooth operation. If the temperature control becomes stiff or inaccurate, consult a qualified plumber for inspection and potential cartridge replacement.
Troubleshooting
| Problem | Possible Cause | Solution |
|---|---|---|
| No water flow or low pressure from showerhead. |
|
|
| Water temperature is inconsistent or incorrect. |
|
|
| LED lights not working. |
|
|
| Leaks from connections. |
|
|
Specifications
| Brand: | Cascada Showers |
| Model Number: | HDD901 |
| Color: | Polished Chrome |
| Material: | Stainless Steel (Shower Head), Brass (Handle Material) |
| Finish Type: | Polished Stainless Steel |
| Number of Handles: | 5 |
| Mounting Type: | Ceiling Mount |
| Flow Rate: | 3 GPM |
| Maximum Pressure: | 40 PSI |
| Head Size: | 31 inches (600mm x 800mm) |
| Item Weight: | 64 Pounds |
| Included Components: | Hose, Shower Head, Valve |
| UPC: | 722589186257 |
Warranty and Support
This Cascada Shower System is backed by a 1-year product warranty, which includes coverage for the LED lights. This warranty ensures long-lasting performance and support for your product.
For technical assistance, troubleshooting, or warranty claims, please contact Cascada Showers customer support. Keep your purchase receipt as proof of purchase for warranty validation.
Additionally, the product is eligible for a 30-day easy return policy from the seller, Horizon Direct Depot.